


If you've recorded voice memos on your iPhone, downloaded tracks from Apple Music, or captured audio in M4A format, you may need to learn how to convert M4A to WAV for podcast editing, hardware compatibility, or professional audio workflows. The conversion process varies depending on your platform and the codec in your M4A file. This guide walks you through every method — from native Mac tools to Windows software to browser-based converters — and explains the quality implications you need to understand before converting.
Does converting M4A to WAV improve sound quality?
The answer depends entirely on which codec your M4A file contains. M4A is a container format that can hold either AAC (lossy compression) or ALAC (Apple Lossless) audio streams. Understanding this distinction is critical before you convert M4A to WAV, because the two scenarios produce very different results.
AAC-encoded M4A files: no quality improvement
Most M4A files you encounter use AAC compression. iPhone voice memos, downloaded podcasts, iTunes Match files, and Apple Music streaming downloads (on the standard tier) all deliver AAC-encoded M4A files. AAC is a lossy codec that discards audio data during compression to reduce file size, typically to 128 or 256 kilobits per second.
When you convert an AAC-encoded M4A to WAV, the conversion does not improve audio quality. The AAC encoder has already removed portions of the sound spectrum assumed to be masked by other frequencies or inaudible to most listeners. Copying that compressed audio to an uncompressed WAV container cannot restore the missing data. You keep exactly the same audio quality and simply make the file roughly five to six times larger.
A 20 MB voice memo becomes approximately 110 MB as WAV, with no perceptible improvement in clarity or fidelity. Multiple Apple Community discussions confirm this reality, and audio engineers widely agree: converting from lossy to lossless does not recover lost information.
ALAC-encoded M4A files: lossless conversion
Apple Lossless Audio Codec (ALAC) is a different story. ALAC-encoded M4A files come from Apple Music Lossless subscriptions or CD rips created with the Apple Lossless Encoder in the Apple Music app. ALAC uses mathematically lossless compression, meaning the underlying PCM data remains bit-for-bit identical to the original uncompressed audio.
When you convert ALAC to WAV, the conversion is completely lossless. The WAV file decompresses the ALAC stream without any change in quality; it simply makes the file two to three times larger. If you're working with high-quality music production sources or archival audio, converting ALAC M4A to WAV preserves every nuance of the original recording.
How to identify which codec your M4A uses
On Mac, select the M4A file in Finder and press Command+I. Expand the More Info section and look at the Codecs line, which displays either "AAC" or "Apple Lossless."
In the Apple Music app, right-click the track, select Get Info, and navigate to the File tab. The Kind field shows "Apple Music AAC audio file" or "Apple Lossless audio file."
On Windows or any platform, open the file in VLC Media Player, then go to Tools> Codec Information. The Codec Details tab displays "mpeg4aac" for AAC or "alac" for ALAC.
A quick size hint: ALAC files are roughly four to five times larger than AAC files of the same length and source. If your M4A is unusually large, it's likely ALAC.
When you actually need to convert M4A to WAV
Understanding when you genuinely need WAV format helps you avoid unnecessary conversions and file bloat. Several professional and technical workflows require WAV, and knowing how to convert M4A to WAV becomes essential in these scenarios.
Podcast editing is one of the most common use cases. If you record podcast interviews or solo episodes using iPhone Voice Memos or other Apple audio apps, you end up with M4A files. Digital audio workstations like Pro Tools, Logic Pro, Ableton Live, Reaper, and Audacity all support M4A, but many podcasters prefer WAV for editing because it eliminates potential codec compatibility issues and ensures that every plugin and effect processes the audio identically across sessions.
Voice memo workflows often require WAV output. Transcription services, voice analysis software, broadcast submission systems, and forensic audio tools frequently accept only uncompressed formats. Court reporters using Stenograph CAT systems need WAV files in specific sample-rate configurations that M4A cannot deliver directly.
Music production from Apple Lossless sources benefits from WAV conversion when you want to edit tracks downloaded from Apple Music Lossless. Because ALAC M4A converts losslessly to WAV, producers can import Apple Music Lossless downloads into their DAW projects without quality degradation.
Hardware compatibility forces many users to convert. TASCAM media players, older broadcast equipment, certain karaoke machines, and legacy audio players only recognize WAV files. One Audacity Forum user described needing to convert M4A music files to WAV specifically for playback on an SD-card TASCAM device, a scenario that applies across dozens of professional and consumer hardware platforms.
CD burning requires uncompressed PCM audio. Red Book audio CD specifications mandate WAV or AIFF, so if you want to create physical CDs from M4A files, conversion is mandatory.
DAW session compatibility sometimes demands WAV even when the software technically supports M4A. Collaborative music projects, session archiving, and multi-platform workflows run more smoothly when everyone uses the same uncompressed format.
How to convert M4A to WAV using PDF Guru
For quick, browser-based conversion on any device, PDF Guru's M4A to WAV converter offers a simple solution. The converter runs entirely in your browser and works on Mac, Windows, Linux, iPhone, and Android.
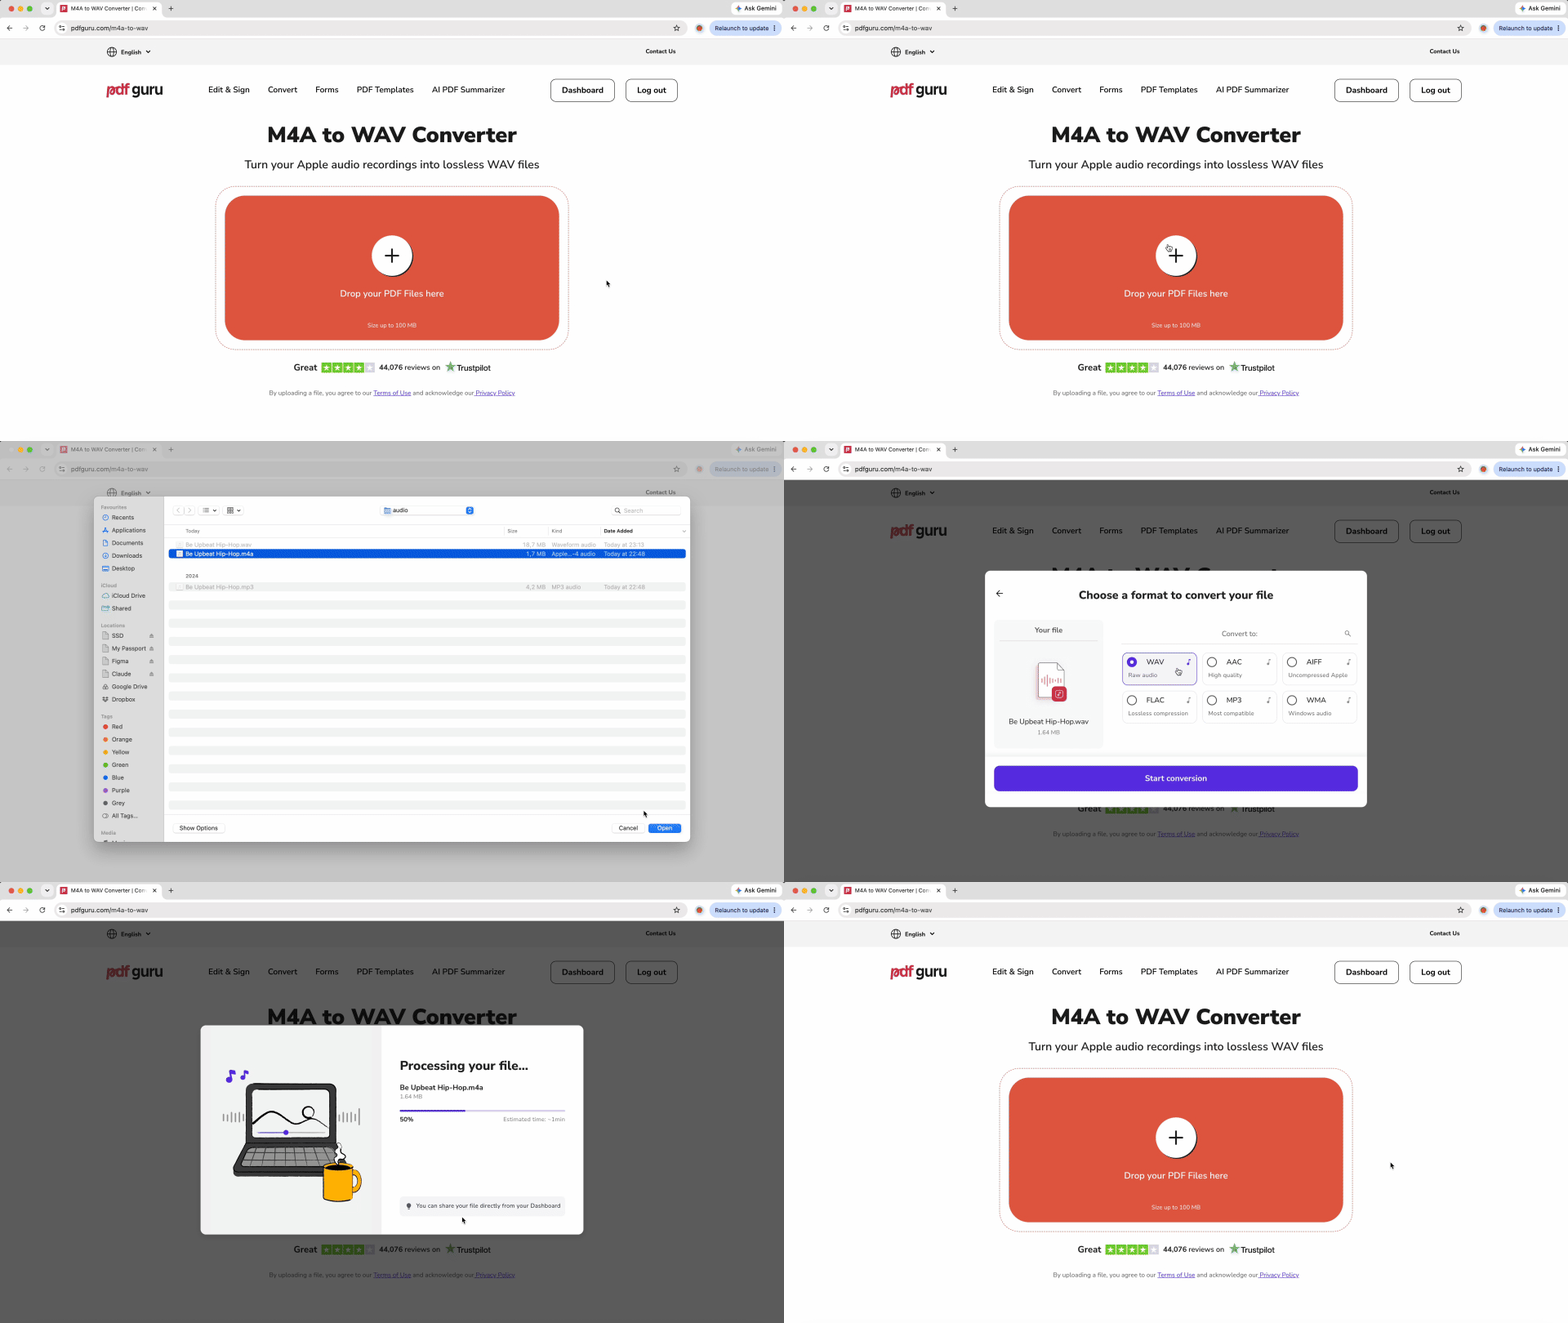
- 1Open the converter page.
- 2Upload your M4A file by dragging and dropping it into the upload zone or clicking to select it from your device.
- 3The tool automatically decodes the AAC or ALAC audio stream inside the M4A container and writes the audio as uncompressed PCM data inside a WAV container.
- 4Once processing completes, download the WAV file to your device.
The converter handles both AAC and ALAC sources. For AAC-encoded M4A files, it decompresses the audio to WAV format while preserving the existing quality level. For ALAC-encoded files, the conversion is lossless and mathematically identical to the original recording.
One critical consideration: WAV output is roughly five to six times larger than the source AAC M4A file. A 20 MB voice memo becomes approximately 110 MB in WAV format. If your source file approaches the platform's file size limit (typically 100 MB for most online converters), the resulting WAV may exceed the upload capacity. Long voice memos, full albums, or ALAC archives often produce WAV files too large for browser-based tools. In those cases, the desktop methods described below handle large conversions more efficiently.
The browser-based approach works well for single files, quick conversions, and situations where you need to convert M4A to WAV on a device without installed audio software.
How to convert M4A to WAV on Mac
Mac users have multiple built-in tools for converting M4A to WAV, with the Apple Music app offering the simplest path.
Using Apple Music app
The Apple Music app on macOS Catalina and later includes a WAV encoder that converts M4A files in a few clicks.
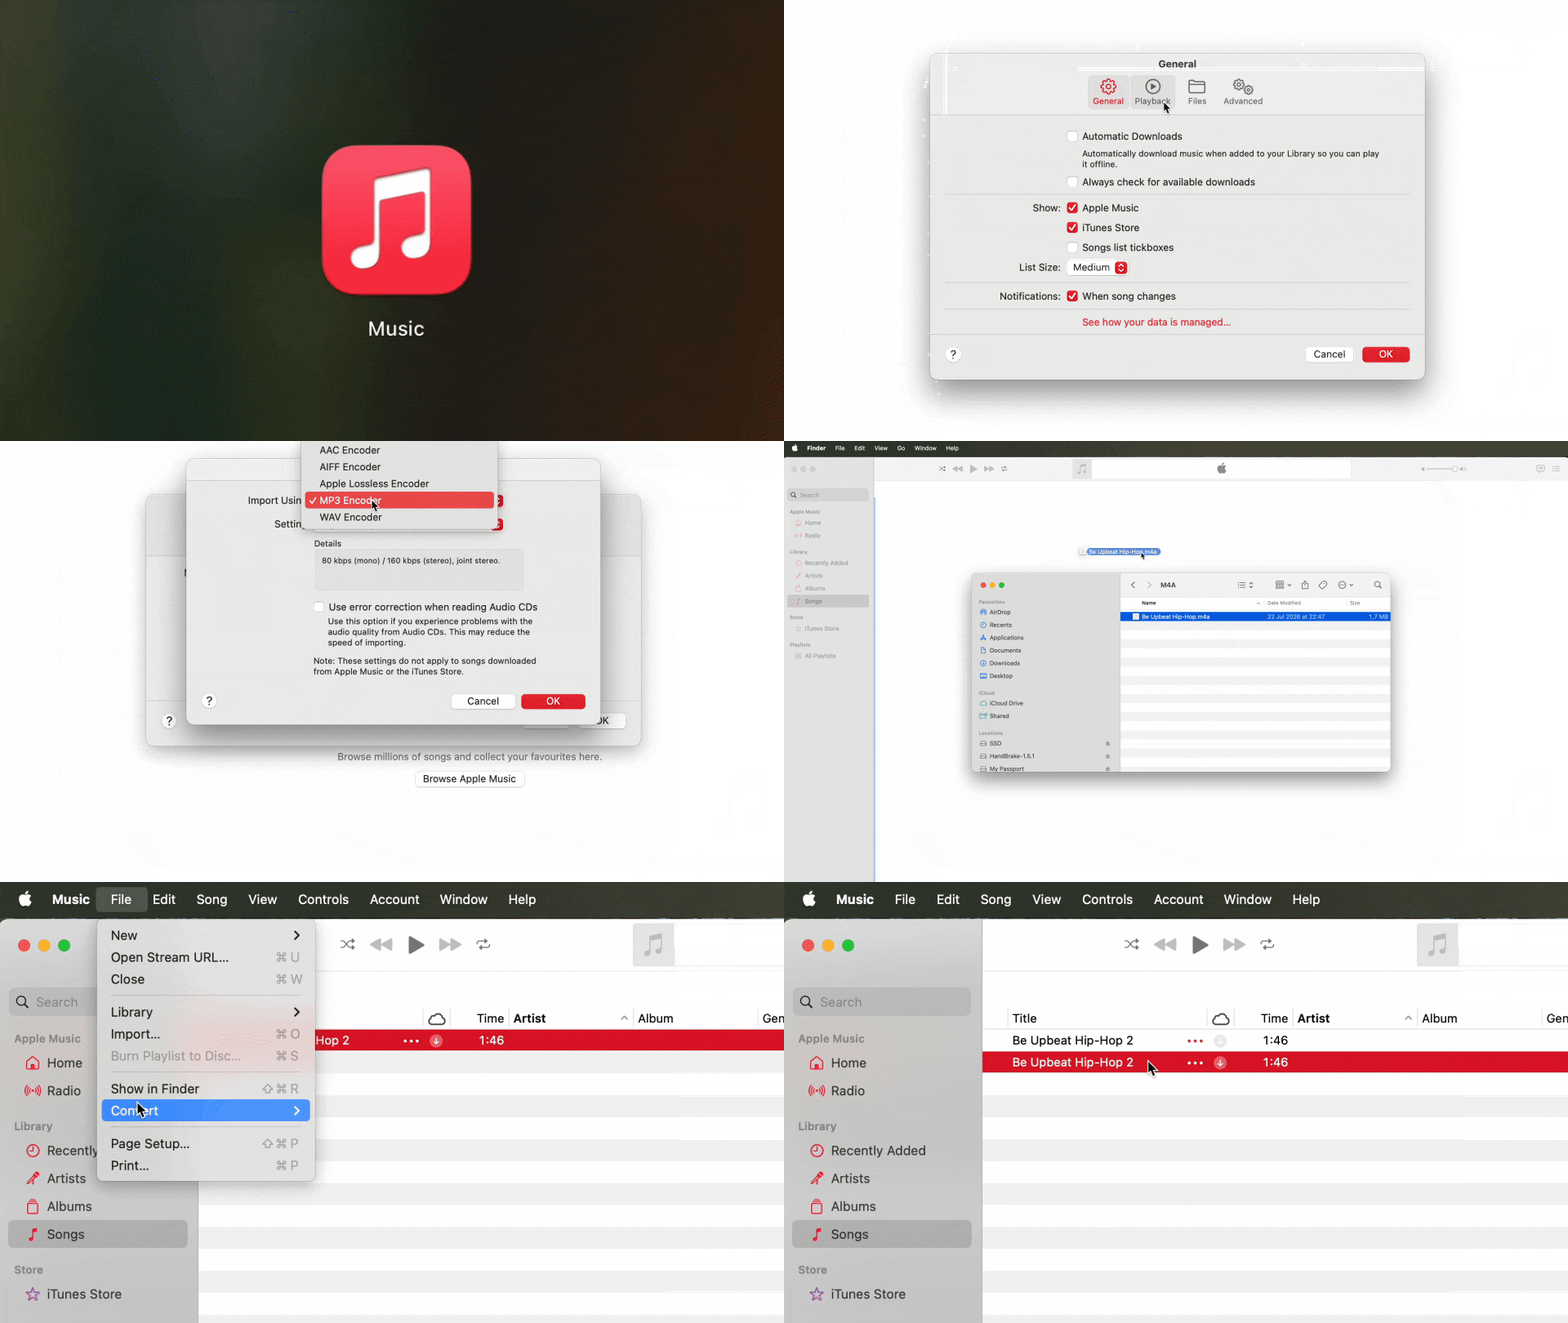
- 1Open the Music app, go to Music in the menu bar, then select Settings (or Preferences on older macOS versions).
- 2
- 3In the Import Using dropdown, select WAV Encoder, then click OK.
- 4Drag your M4A file from Finder directly into the Apple Music library window.
- 5Once the file appears in your library, select it, then go to File in the menu bar, choose Convert, and select Create WAV Version.
- 6The app processes the conversion and places the WAV file in your music library alongside the original M4A.
- 7To access the converted file, right-click the new WAV entry in the library and select Show in Finder.
One common troubleshooting issue: if File > Convert appears grayed out and unavailable, the track is stored in iCloud rather than downloaded locally. Right-click the track and select Make Available Offline, wait for the download indicator to complete, then try the Convert option again. This issue frequently appears in Apple Community discussions and typically resolves immediately once the file downloads.
Using iTunes (older macOS Mojave and earlier)
If you're running macOS Mojave or earlier, iTunes handles the conversion with the same workflow.
- 1Go to iTunes > Preferences > General > Import Settings.
- 2Set Import Using to WAV Encoder and click OK.
- 3Drag the M4A into the library.
- 4Select it, then go to File > Convert > Create WAV Version.
Using GarageBand
GarageBand offers an alternative conversion path that works for single files.
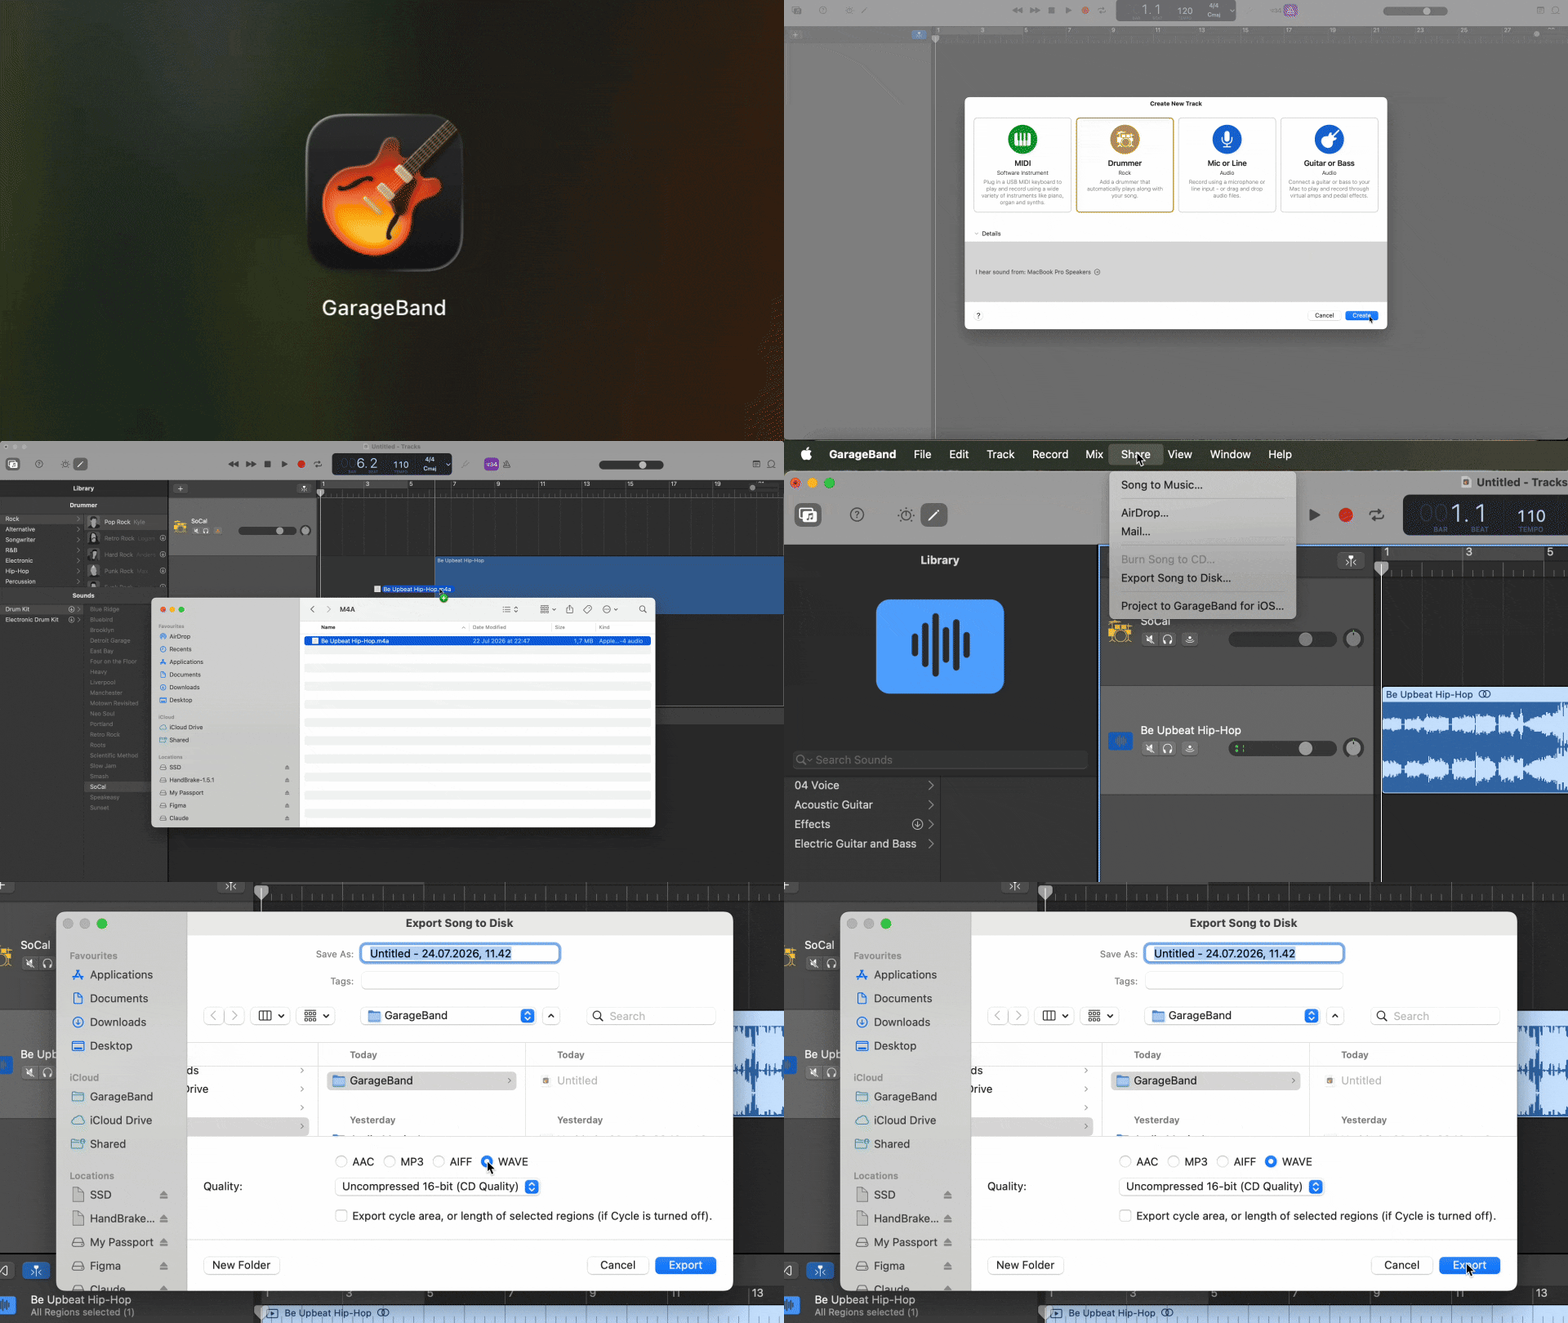
- 1Open GarageBand and create a new empty project (File > New > Empty Project).
- 2Drag your M4A file from Finder into the GarageBand timeline.
- 3Once the audio appears on a track, go to Share > Export Song to Disk.
- 4Select WAV from the format options and click Export.
- 5Choose your destination folder and save.
Using FFmpeg via Homebrew (advanced/batch)
For users comfortable with the command line or those needing to convert M4A to WAV in batch, FFmpeg offers the fastest solution.
- 1Install Homebrew if you haven't already.
- 2Open Terminal and run
brew install ffmpeg. - 3Convert a single file with the command:
ffmpeg -i input.m4a output.wav. - 4For batch conversion of an entire folder of voice memos or music files, navigate to the folder in Terminal and run:
for f in *.m4a; do ffmpeg -i "$f" "${f%.m4a}.wav"; done.
This loop processes every M4A file in the folder and outputs a corresponding WAV file with the same base filename.
How to convert M4A to WAV on Windows
Windows users have several options, with VLC Media Player and iTunes for Windows providing the most accessible paths.
Using VLC Media Player
VLC is a open-source media player that includes powerful conversion capabilities.
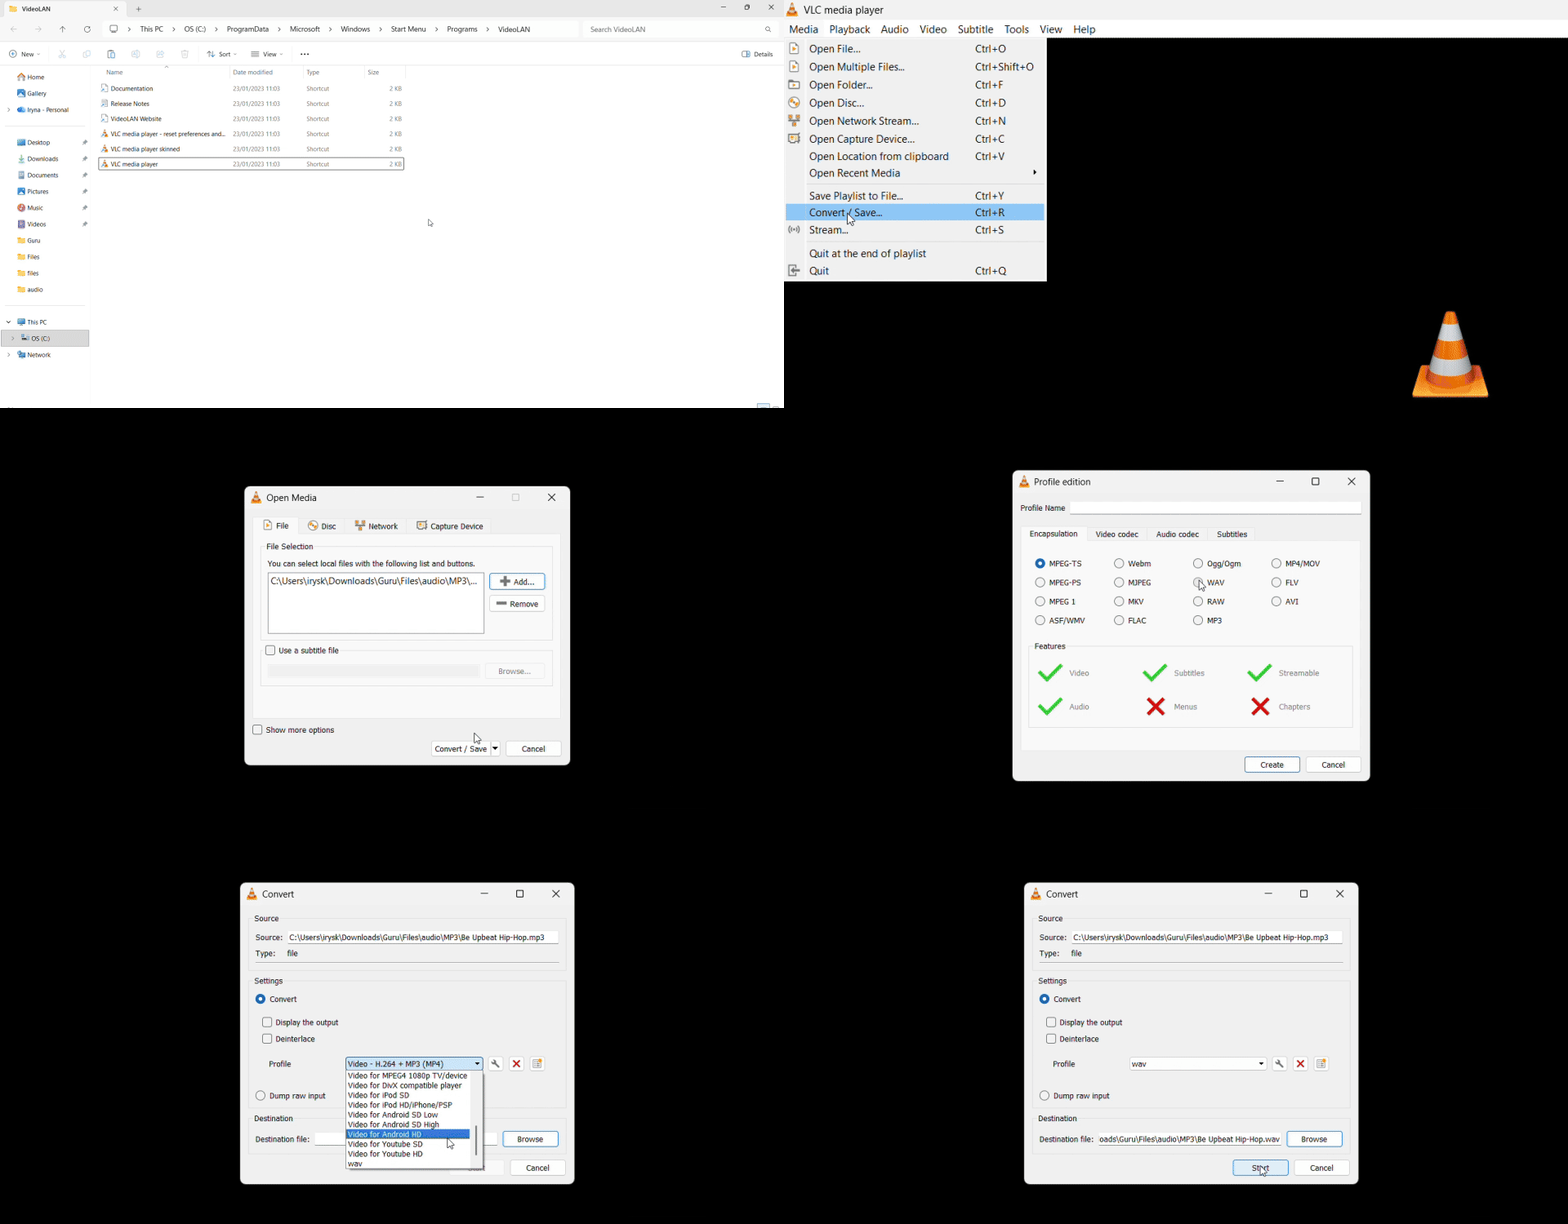
- 1Download and install VLC if you don't already have it, then open the application.
- 2Go to Media in the menu bar and select Convert/Save (or press Ctrl+R).
- 3In the Open Media window, click the Add button and browse to your M4A file.
- 4Once added, click Convert/Save at the bottom.
- 5In the Convert window, click the small wrench icon next to the Profile dropdown to create a new profile.
- 6Click the "Create a new profile" button (a page-with-plus icon), name your profile "WAV," and navigate to the Encapsulation tab.
- 7Select WAV from the list, then click Create.
- 8Back in the Convert window, select your new WAV profile from the Profile dropdown.
- 9Click Browse next to the Destination file field, choose where to save the converted file, and give it a .wav extension.
- 10Click Start to begin conversion.
VLC processes the file and saves the WAV to your chosen location. This method works reliably for both AAC and ALAC M4A sources.
Using iTunes or Apple Music for Windows
Apple offers iTunes for Windows and the newer Apple Music app for Windows (available through the Microsoft Store). Both applications use the same WAV encoder as the Mac version.
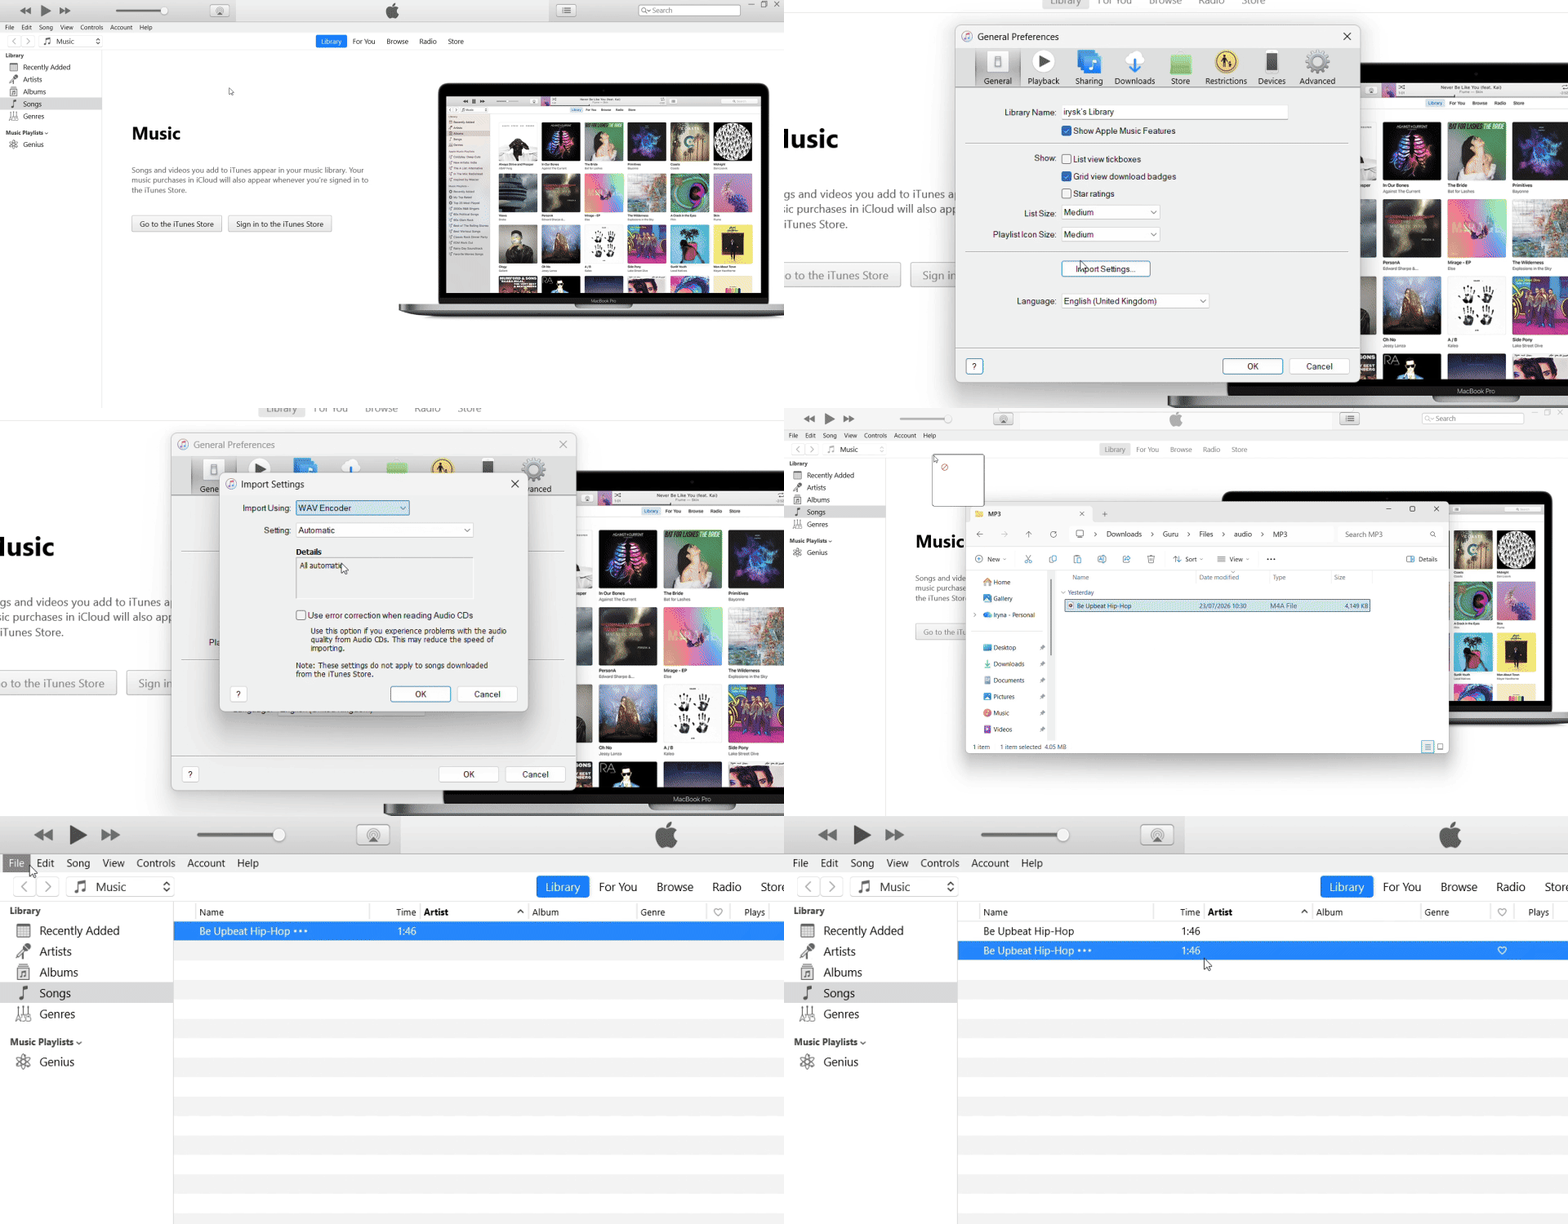
- 1Open iTunes or Apple Music for Windows.
- 2Go to Edit > Preferences > General > Import Settings.
- 3Set Import Using to WAV Encoder and click OK.
- 4Drag your M4A file into the library.
- 5Select the file, then go to File > Convert > Create WAV Version.
- 6The application processes the conversion and places the WAV in your Music library folder.
Using Audacity
Audacity is a open-source audio editor available for Windows. However, Audacity requires the FFmpeg library to import M4A files; see the dedicated section below for installation instructions.
Using FFmpeg (command-line)
For Windows users comfortable with command-line tools, FFmpeg offers fast conversion.
- 1Download FFmpeg for Windows, extract the archive, and add the bin folder to your system PATH.
- 2Open Command Prompt or PowerShell.
- 3
- 4Run:
ffmpeg -i input.m4a output.wav.
FFmpeg processes the conversion quickly and works identically to the Mac version for batch operations.
Windows Media Player (nuanced clarification)
Windows Media Player does not have a dedicated audio file conversion function. Some users report success with an unofficial workaround on Legacy Windows Media Player (still available in Windows 10 and 11), which repurposes the CD rip feature for library files.
The workaround: Add your M4A file to the Windows Media Player library. Go to Organize > Options > Rip Music tab, and set Format to WAV. Right-click the M4A file in the library and select Rip Music. This triggers the rip encoder to process the library file and output a WAV file.
Multiple Microsoft Tech Community users confirm this method works on some systems, but others report the Rip Music option does not appear or the necessary menu paths are missing. The method is version-dependent and undocumented. The new Windows Media Player available through the Microsoft Store on Windows 11 does not include these options at all.
For predictable, reliable results when you need to convert M4A to WAV on Windows, use VLC, Audacity with FFmpeg, or iTunes for Windows instead of relying on Windows Media Player.
Solving the Audacity import error for M4A files
Audacity is one of the most popular audio editors, but many users encounter a frustrating "Import Error" when they try to drag an M4A file into the application. Audacity does not natively support M4A files, which causes the import failure. The solution takes two minutes: install the FFmpeg library for Audacity.
FFmpeg is a open-source multimedia framework that decodes dozens of audio and video formats. Audacity uses FFmpeg to handle formats it doesn't support natively, including M4A.
- 1Download the FFmpeg installer from the official Audacity support page. For most computers, choose the 64-bit version.
- 2Download the FFmpeg library specific to your operating system and Audacity version (an .exe installer on Windows or a .dmg package on Mac).
- 3Run the installer. The FFmpeg installer typically auto-detects your Audacity installation and places the library files in the correct location.
- 4In modern Audacity 3.2 and later, the FFmpeg library is detected automatically upon installation. Simply restart Audacity after installation.
- 5For older Audacity 2.x versions, you may need to manually link the library. Open Audacity and go to Edit > Preferences (Windows) or Audacity > Preferences (Mac). Navigate to the Libraries section. Under "FFmpeg library," click the Locate button. Browse to the FFmpeg installation directory and select the avformat-.dll file (Windows) or avformat-.dylib file (Mac). Click OK and restart Audacity.
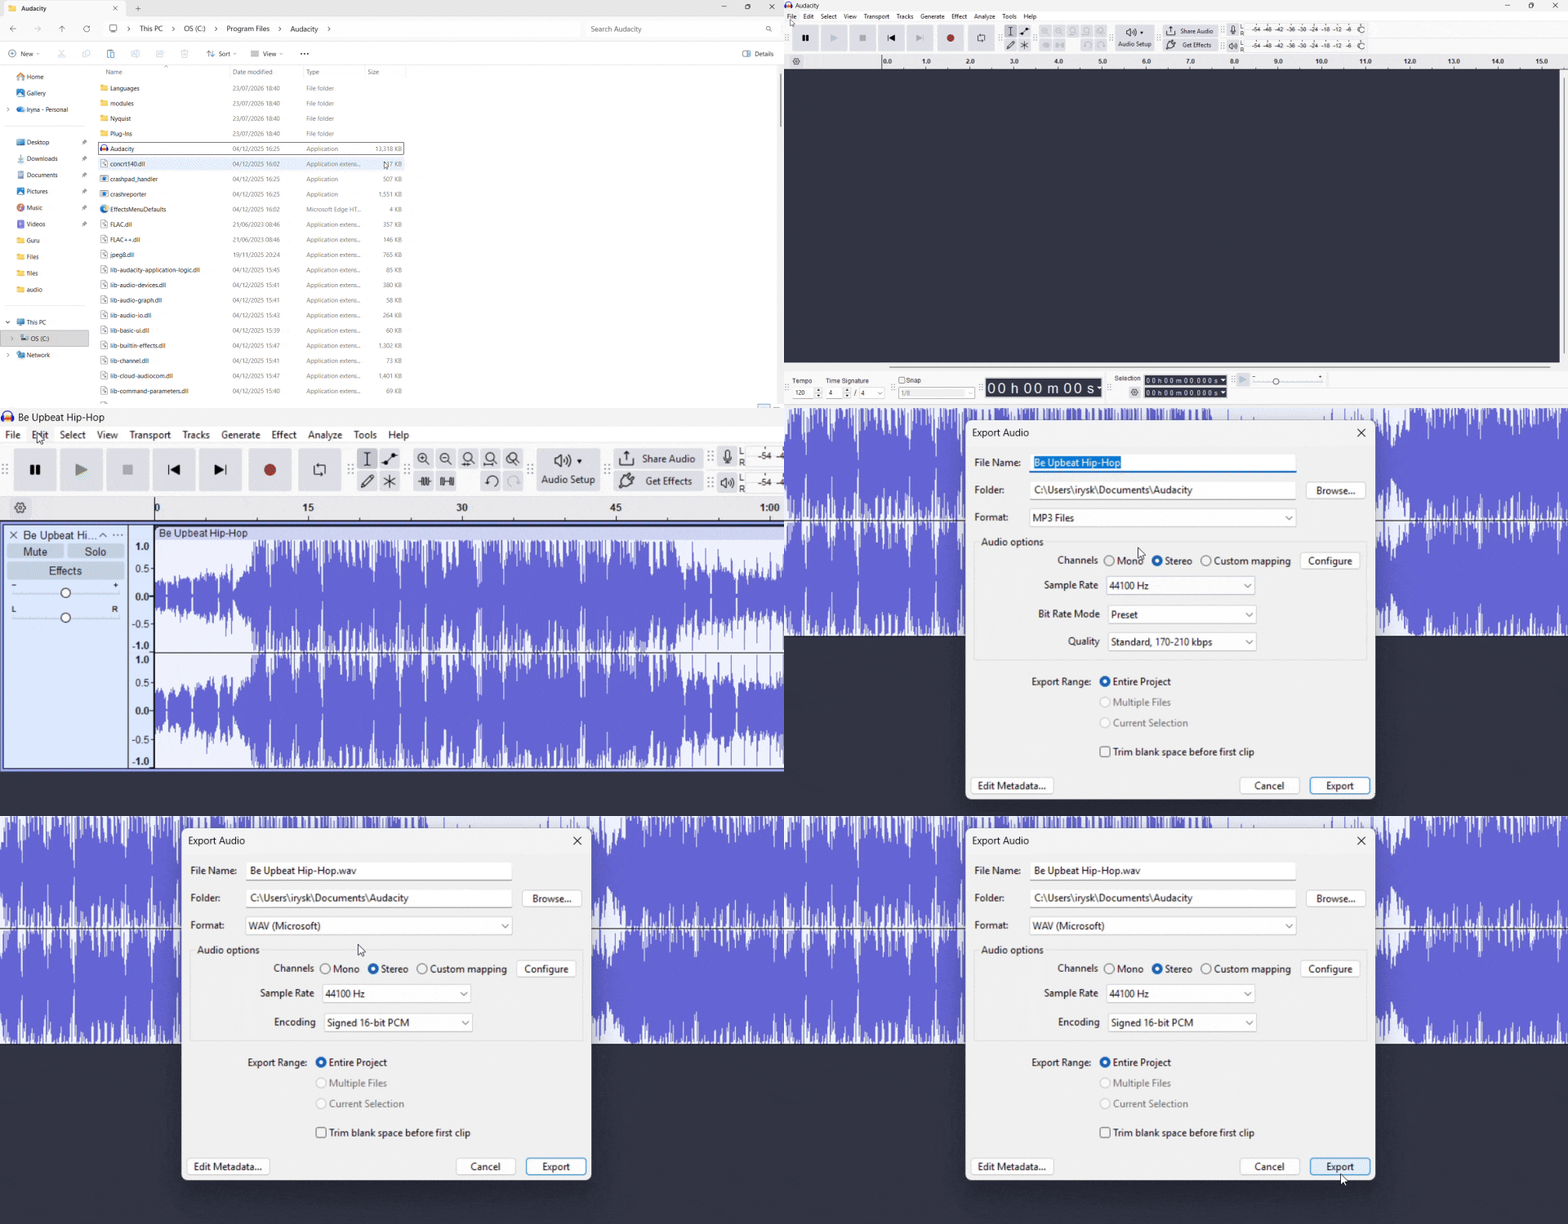
- 6Once FFmpeg is installed and Audacity has restarted, go to File > Import > Audio and select your M4A file. It should now load without error, displaying the waveform in the Audacity timeline.
- 7To export the converted audio as WAV, go to File > Export Audio.
- 8In the format dropdown, select "WAV (Microsoft) signed 16-bit PCM."
- 9Set the sample rate to match your source (typically 44.1 kHz for music and voice memos, or 48 kHz for video audio). Avoid upsampling, which increases file size without adding usable audio detail.
- 10Click Export to save the WAV file.
Alternative workaround if FFmpeg installation fails
If you encounter issues installing FFmpeg or linking it to Audacity, a simple alternative bypasses the M4A limitation entirely. First, convert your M4A to WAV using the Apple Music app on Mac (or iTunes for Windows) as described in earlier sections. Once you have the WAV file, drag it directly into Audacity.
This two-step approach — external conversion followed by WAV import — often proves faster for casual users who only need to edit one or two files and want to avoid troubleshooting FFmpeg configuration.
How to convert M4A to WAV online
Online converters offer cross-device compatibility and require no software installation, making them popular for users on Chromebooks, mobile devices, or shared computers. Understanding how to convert M4A to WAV online requires evaluating several factors before uploading your files.
File size limits matter significantly for M4A to WAV conversion. Because WAV output is five to six times larger than AAC-encoded M4A input (and two to three times larger than ALAC input), a seemingly small M4A file can produce a WAV that exceeds typical 100 MB upload limits. A 20 MB voice memo becomes roughly 110 MB in WAV format, already over the threshold. Check the converter's file size cap before uploading to avoid wasted time.
Privacy policies and file deletion timelines vary widely across online tools. For sensitive audio — private voice memos, confidential interview recordings, unreleased music masters, legal evidence, or any recording you wouldn't share publicly — do not upload to any online tool regardless of stated privacy promises. The risk of unauthorized access or data retention outweighs the convenience.
Look for HTTPS encryption during upload. The padlock icon in your browser's address bar confirms the connection is encrypted. Avoid any converter served over plain HTTP.
PDF Guru offers an audio files converter that handles M4A to WAV conversion in the browser. The tool works across Mac, Windows, Linux, and mobile platforms.
For users who need to convert M4A to WAV frequently or work with large files, desktop methods using the Apple Music app, VLC, or FFmpeg handle unlimited file sizes and keep your audio entirely on your local machine.
Tips for better M4A to WAV conversion
Five practical strategies improve conversion results and help you avoid common pitfalls.
Check the codec first before converting. Identify whether your M4A contains AAC or ALAC using the methods described earlier: Finder's Get Info on Mac, VLC's Codec Information on any platform, or the Apple Music app's File tab. Knowing the source codec sets realistic expectations — AAC files will not gain quality when converted, while ALAC files convert losslessly. This thirty-second check prevents disappointment and helps you decide whether conversion is necessary.
Match the source sample rate during conversion. Most voice memos and music files use 44.1 kHz, while video audio typically uses 48 kHz. When your converter offers sample rate options, select "As Source," "Automatic," or manually set it to match the original. Do not upsample a 44.1 kHz file to 48 kHz or 96 kHz — upsampling inflates file size without adding usable audio detail because the additional samples are interpolated, not original data.
Preserve the original channel count. iPhone voice memos and many podcasts are mono (single-channel) audio. If your source is mono, keep the output mono. Converting mono to stereo duplicates the same signal into two channels, doubling the file size for zero benefit. Check your converter's channel options and select "Preserve" or "As Source" when available.
Keep the original M4A file after conversion. WAV files occupy five to six times as much storage space as AAC M4A files, and conversion is irreversible; you cannot recover the smaller M4A from the WAV later. If you only need WAV for a specific editing session, project export, or hardware playback, archive the original M4A. You can convert again later if needed, avoiding permanent storage bloat.
Use batch tools for multiple files. If you need to convert dozens of voice memos or an entire music library, single-file tools become tedious. On Mac, the Apple Music app processes multiple files in sequence: select all the M4A files in your library, then go to File > Convert > Create WAV Version to convert them all at once. On Windows or Mac, FFmpeg folder loops (described in earlier sections) process entire directories with a single command. Even with FFmpeg installed, Audacity processes one file at a time and requires manual export for each, making it inefficient for batch work.
For users exploring alternative formats, PDF Guru also offers an M4A to MP3 converter if you need a more storage-efficient lossy format instead of uncompressed WAV.