
Whether you've just discovered that your iPhone videos won't upload to Instagram, or you're trying to share a Mac-recorded clip with Windows users, you've hit a common compatibility wall. MOV files play beautifully on Apple devices but stumble on nearly everything else. Converting to MP4 opens your video to every device, platform, and sharing service you'll encounter.
Why convert MOV to MP4?
Four practical reasons drive most conversions:
Universal device compatibility. MOV is Apple-centric — it plays natively on macOS and iOS but offers limited support on Windows, Android, smart TVs, and game consoles. MP4 is the web's universal standard, playing seamlessly across every operating system and device you'll encounter.
Smaller file size. MP4 compression is more efficient than MOV for equivalent quality, which often results in smaller files. When you need to email a video, upload to cloud storage, or stay under a platform's file size limit, MP4 is the better choice.
Required by upload platforms. YouTube, Vimeo, Instagram, TikTok, and most social media services favor MP4. Many reject MOV files outright or transcode them server-side with quality loss. Learning how to convert MOV file to MP4 before uploading solves platform requirements and preserves quality.
Better cross-platform editability. Non-Apple video editors handle MP4 more reliably than MOV, removing codec headaches and ensuring smoother editing workflows on any software.
How to convert MOV to MP4 using PDF Guru
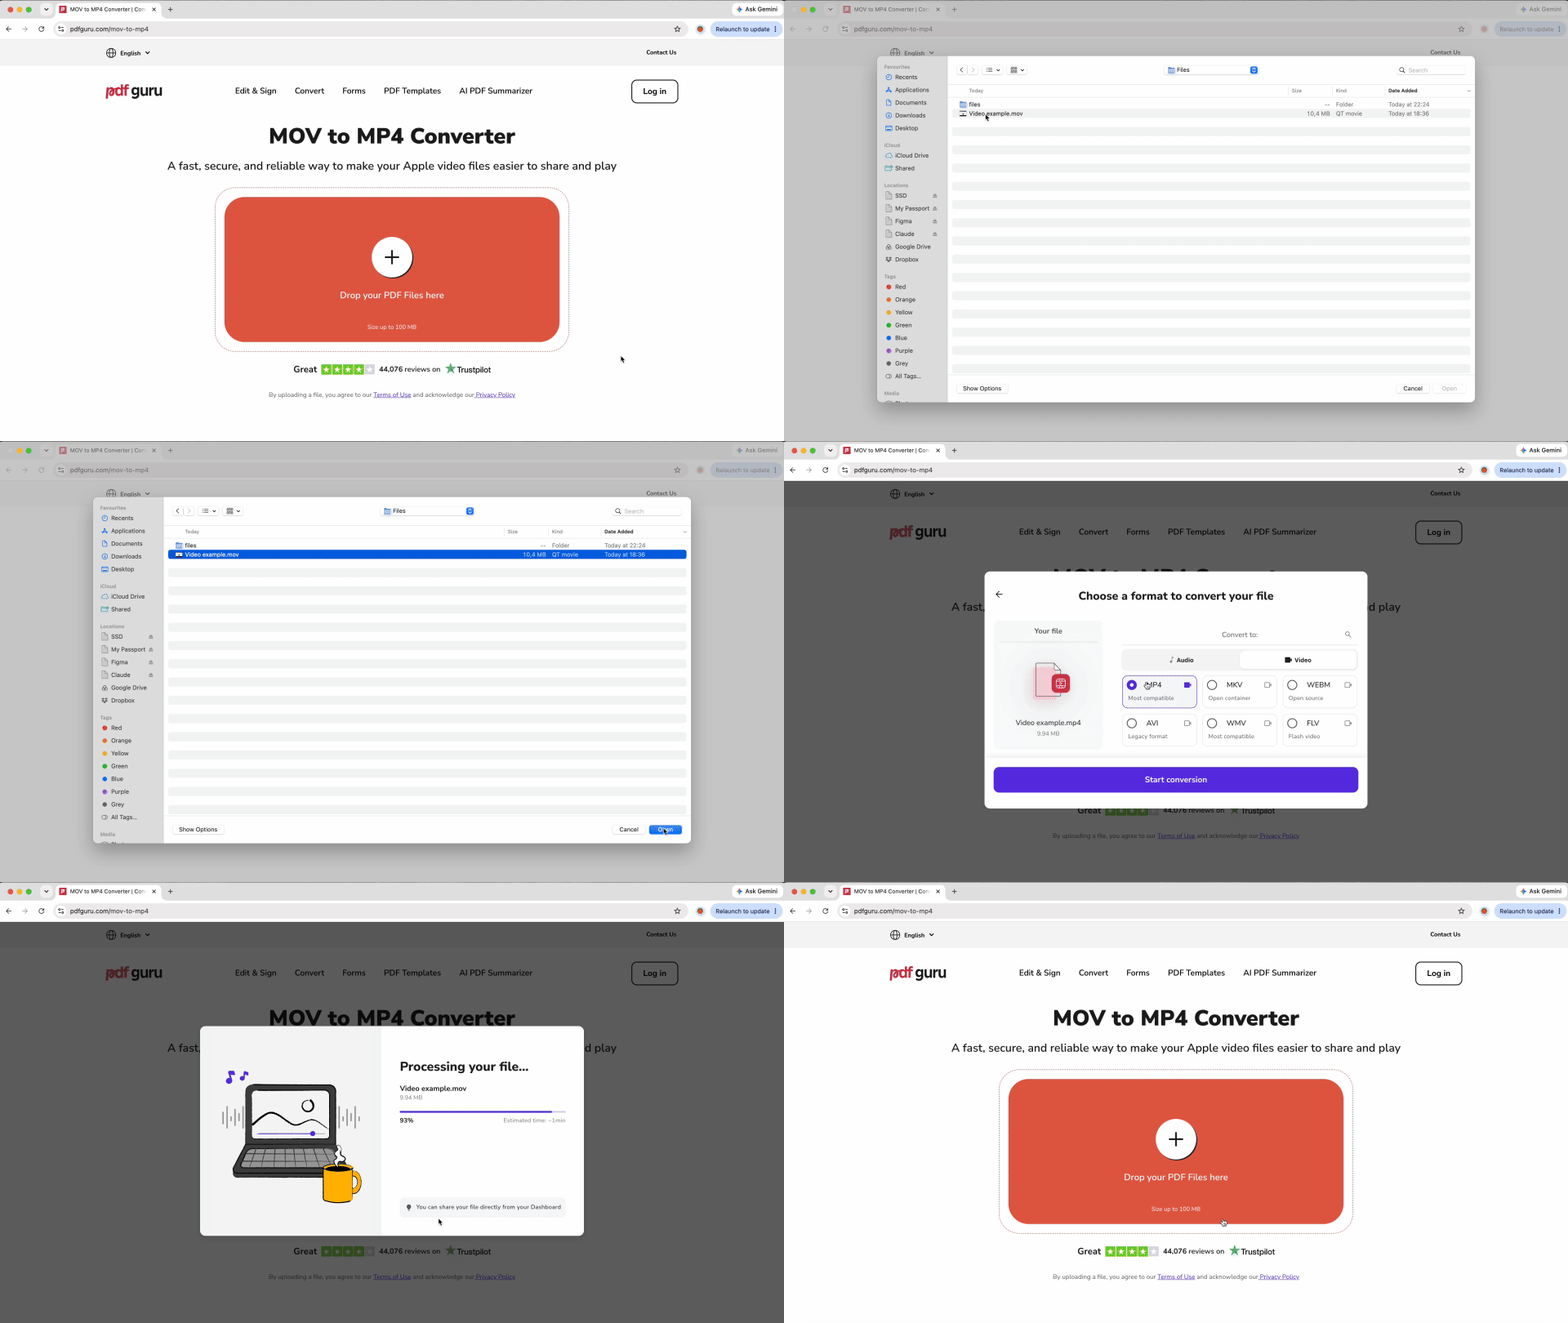
For quick conversions under 100 MB, convert MOV to MP4 with PDF Guru — it handles the job automatically in any browser.
- 1Open the converter page in your browser.
- 2Upload your MOV file by dragging it into the upload area or clicking the upload button to select from your device.
- 3The tool reads your video and audio streams and repackages them into an MP4 container automatically — no settings to configure, no codec decisions to make.
- 4Download the converted MP4 file once processing completes.
The converter runs on Mac, Windows, iPhone, Android, Linux, and Chromebooks without installing software. Because the tool repackages the container rather than fully re-encoding your video, quality stays close to the original. The conversion is fully automatic with no manual controls for resolution, bitrate, or codec selection.
File size limit: The tool accepts files up to 100 MB. Many 4K iPhone clips and longer recordings exceed this limit and require desktop software or trimming before upload.

How to convert MOV to MP4 on Mac
Mac users have three native options, from instant renaming to full re-export.
Rename the file extension
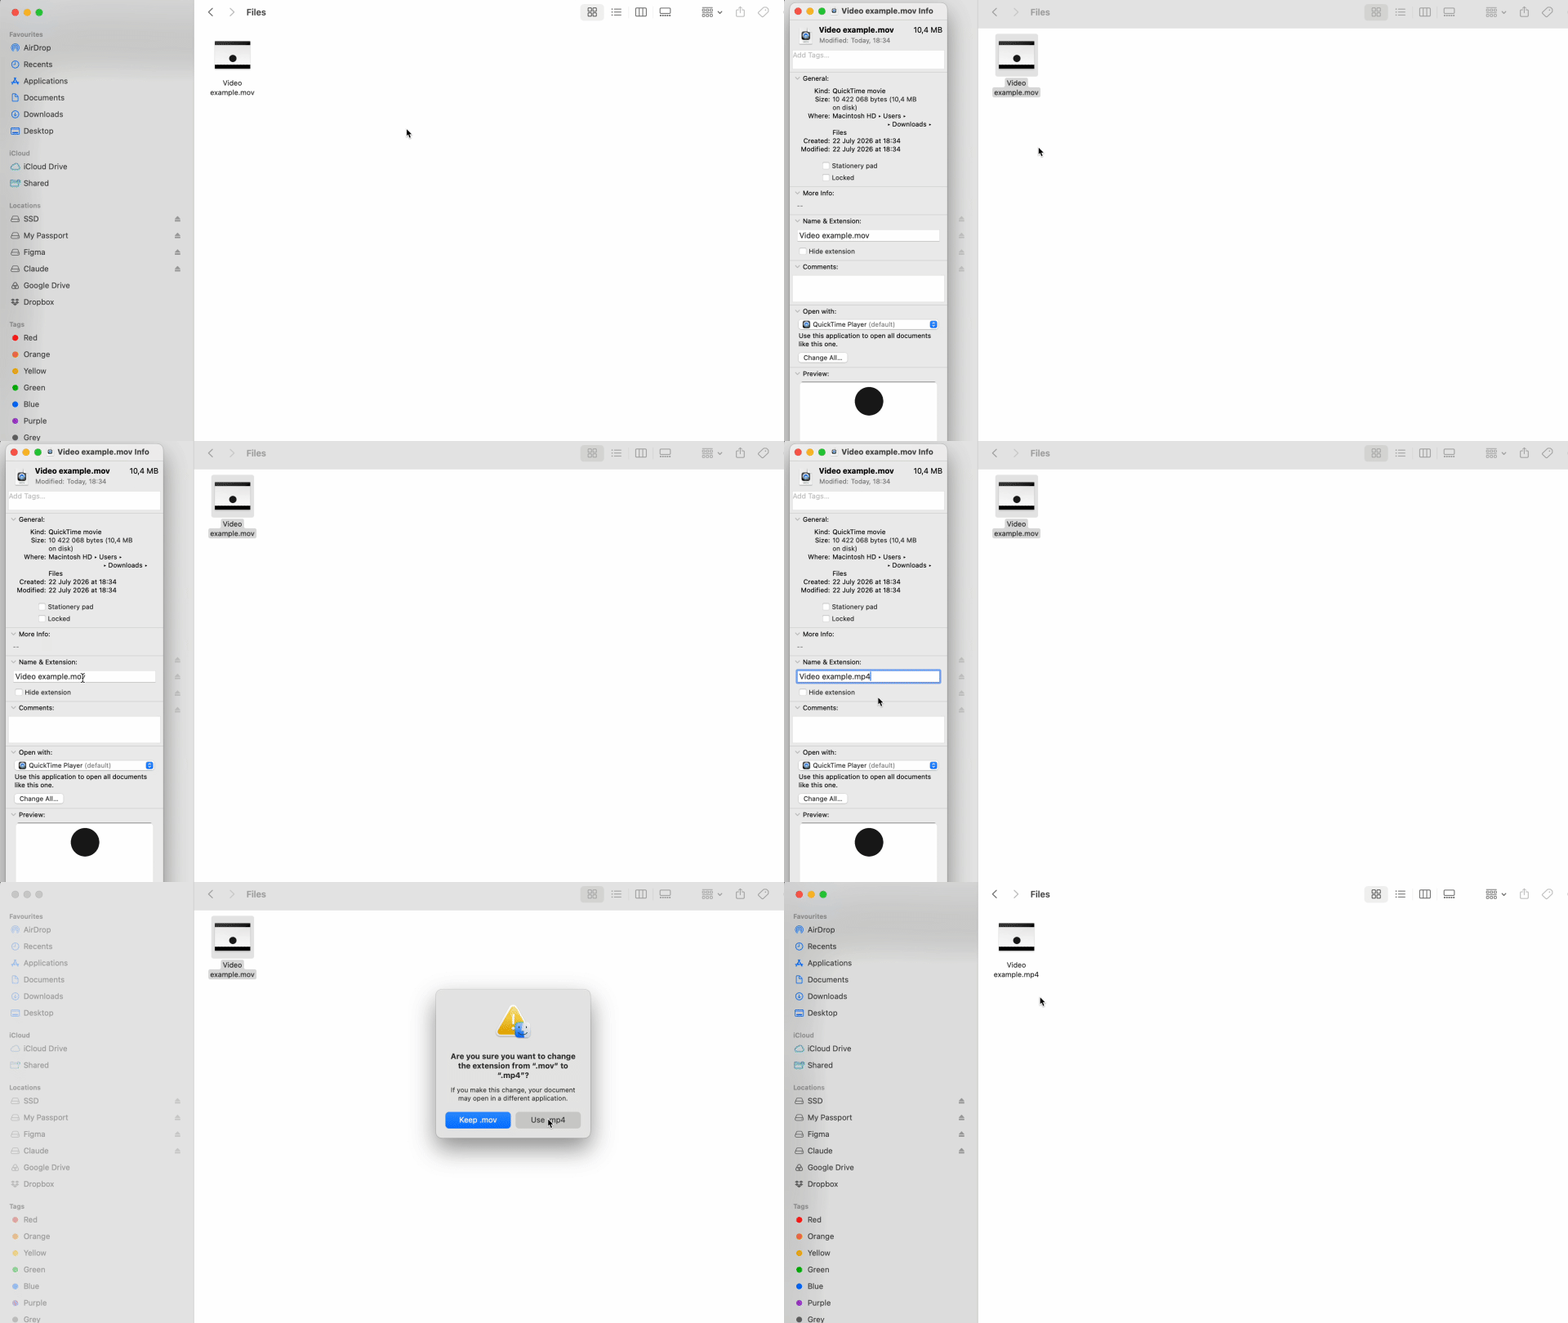
The fastest lossless method if your MOV uses the H.264 codec:
- 1Open Finder and select your MOV file.
- 2Right-click and choose Get Info.
- 3Look under More Info for the Codec field — if it shows H.264, you can proceed.
- 4Control-click the file and select Rename.
- 5Change the extension from .mov to .mp4.
- 6Confirm "Use .mp4" when prompted.
This method works because H.264 video with AAC audio is identical in both containers — you're simply relabeling the wrapper. The process takes seconds and preserves perfect quality because no re-encoding occurs. If your codec shows HEVC, ProRes, or anything other than H.264, you'll need one of the methods below.
iMovie

Apple's video editor exports MP4 by default:
- 1Open iMovie and create a new Movie project.
- 2Click Import and select your MOV file.
- 3Drag the clip to the timeline.
- 4
- 5Set your preferred resolution and quality.\ Note: do not choose ProRes as the quality setting — this forces a .mov output. Any other quality option exports as MP4.
- 6Click Save and choose a destination.
QuickTime Player
Built into macOS, QuickTime Player can open and play MOV files, but it exports as .mov only — not MP4. If you need an MP4, use iMovie or the extension rename method (H.264 codec only). For advanced control over codecs and bitrates, consider Final Cut Pro or Compressor.
How to convert MOV to MP4 on Windows
Windows lacks native MOV support in many default apps, so third-party tools fill the gap.
VLC Media Player
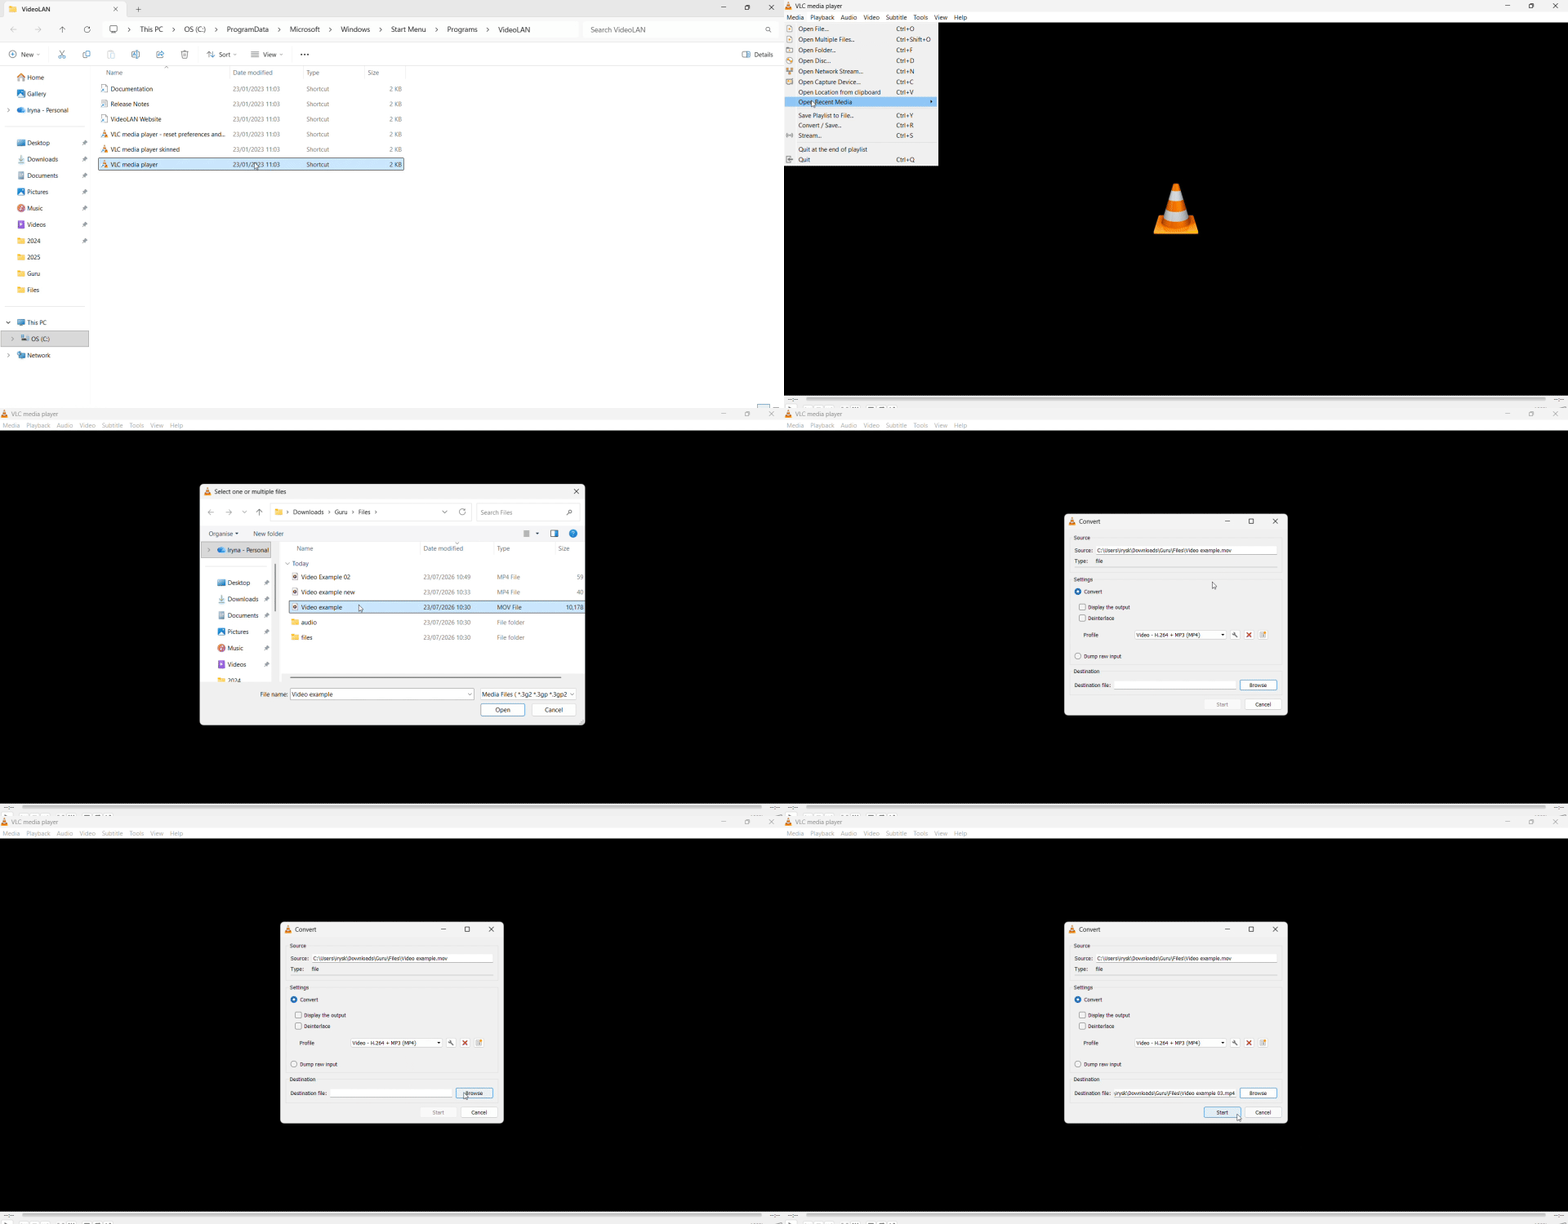
Open-source and trusted by millions:
- 1Open VLC and go to Media > Convert/Save.
- 2Click Add and select your MOV file.
- 3Click Convert/Save at the bottom.
- 4Under Profile, choose "Video - H.264 + MP3 (MP4)".
- 5Set your destination file path.
- 6Click Start.
VLC does not automatically change the file extension. After conversion completes, manually rename the output file to end in .mp4 if VLC saved it with a different extension.
Microsoft Clipchamp
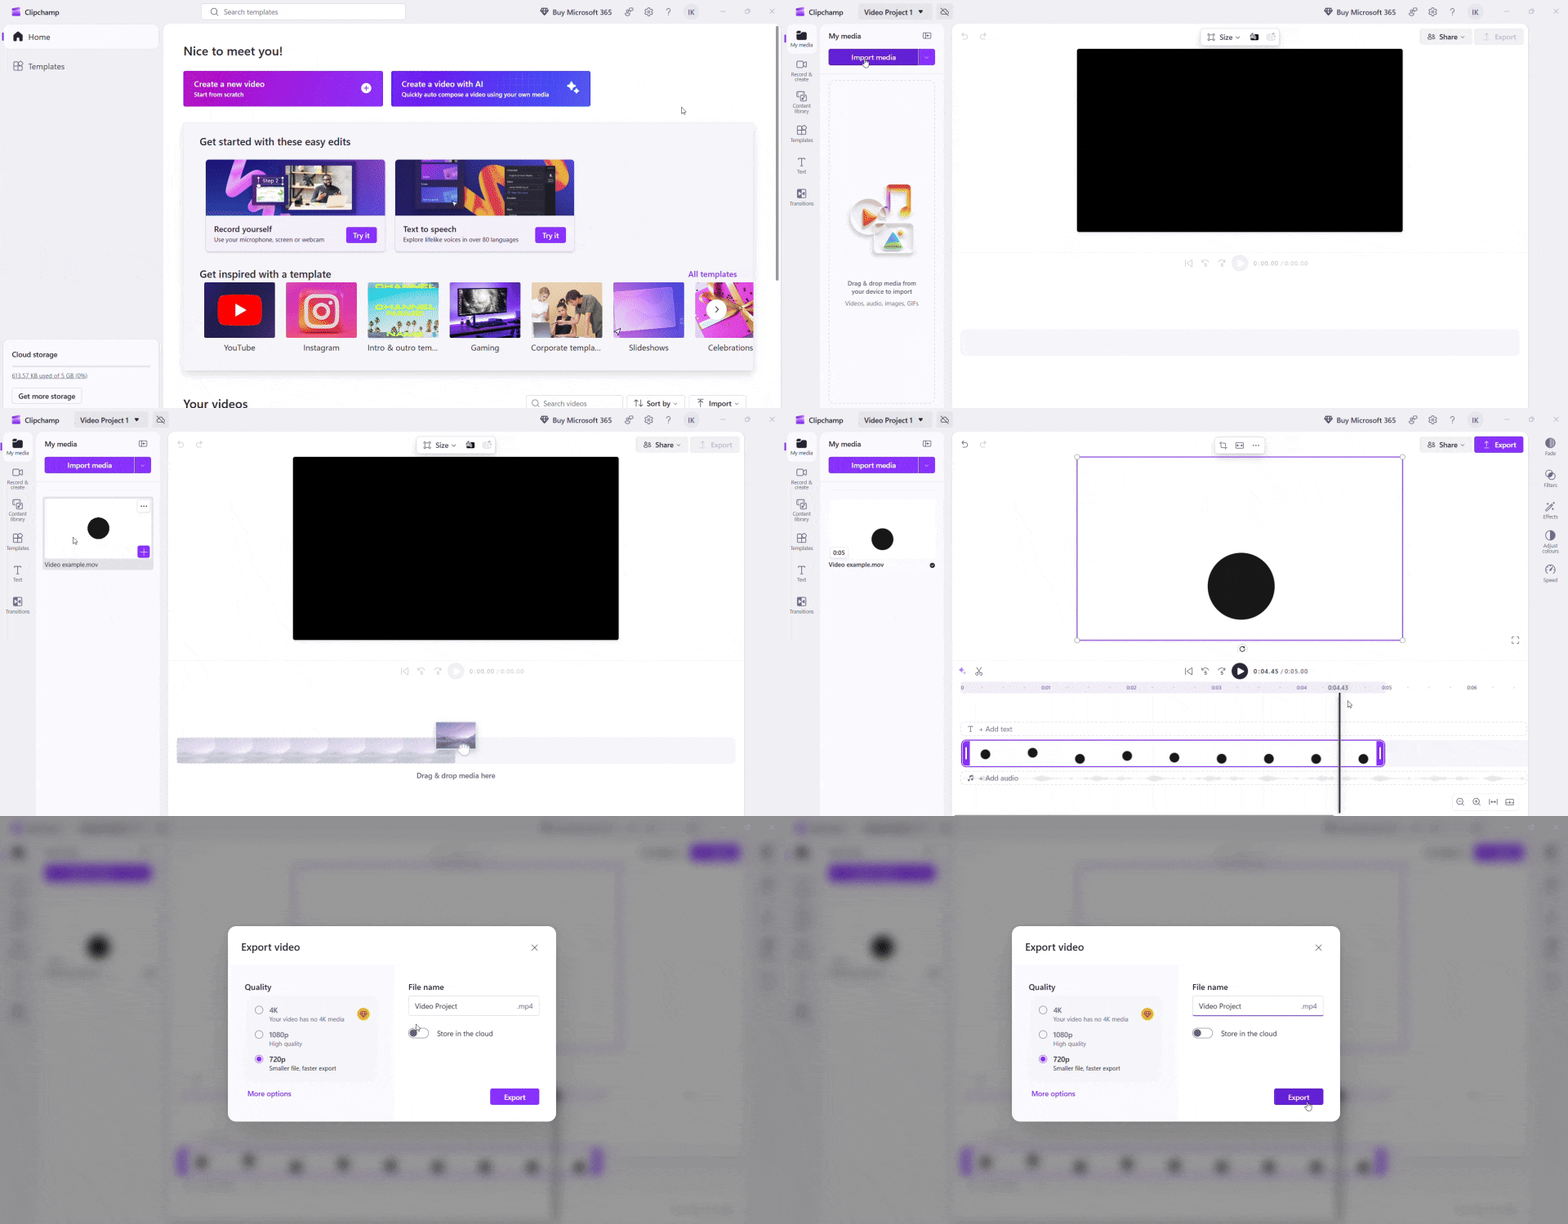
Pre-installed on Windows 11 and exports MP4 by default:
- 1Open Clipchamp and create a new video project.
- 2Import your MOV file.
- 3Drag the clip to the timeline.
- 4Click Export and choose your preferred resolution.
All Clipchamp exports use MP4 format automatically, so no profile selection is needed. The tool is beginner-friendly and integrates with OneDrive for cloud storage.
HandBrake
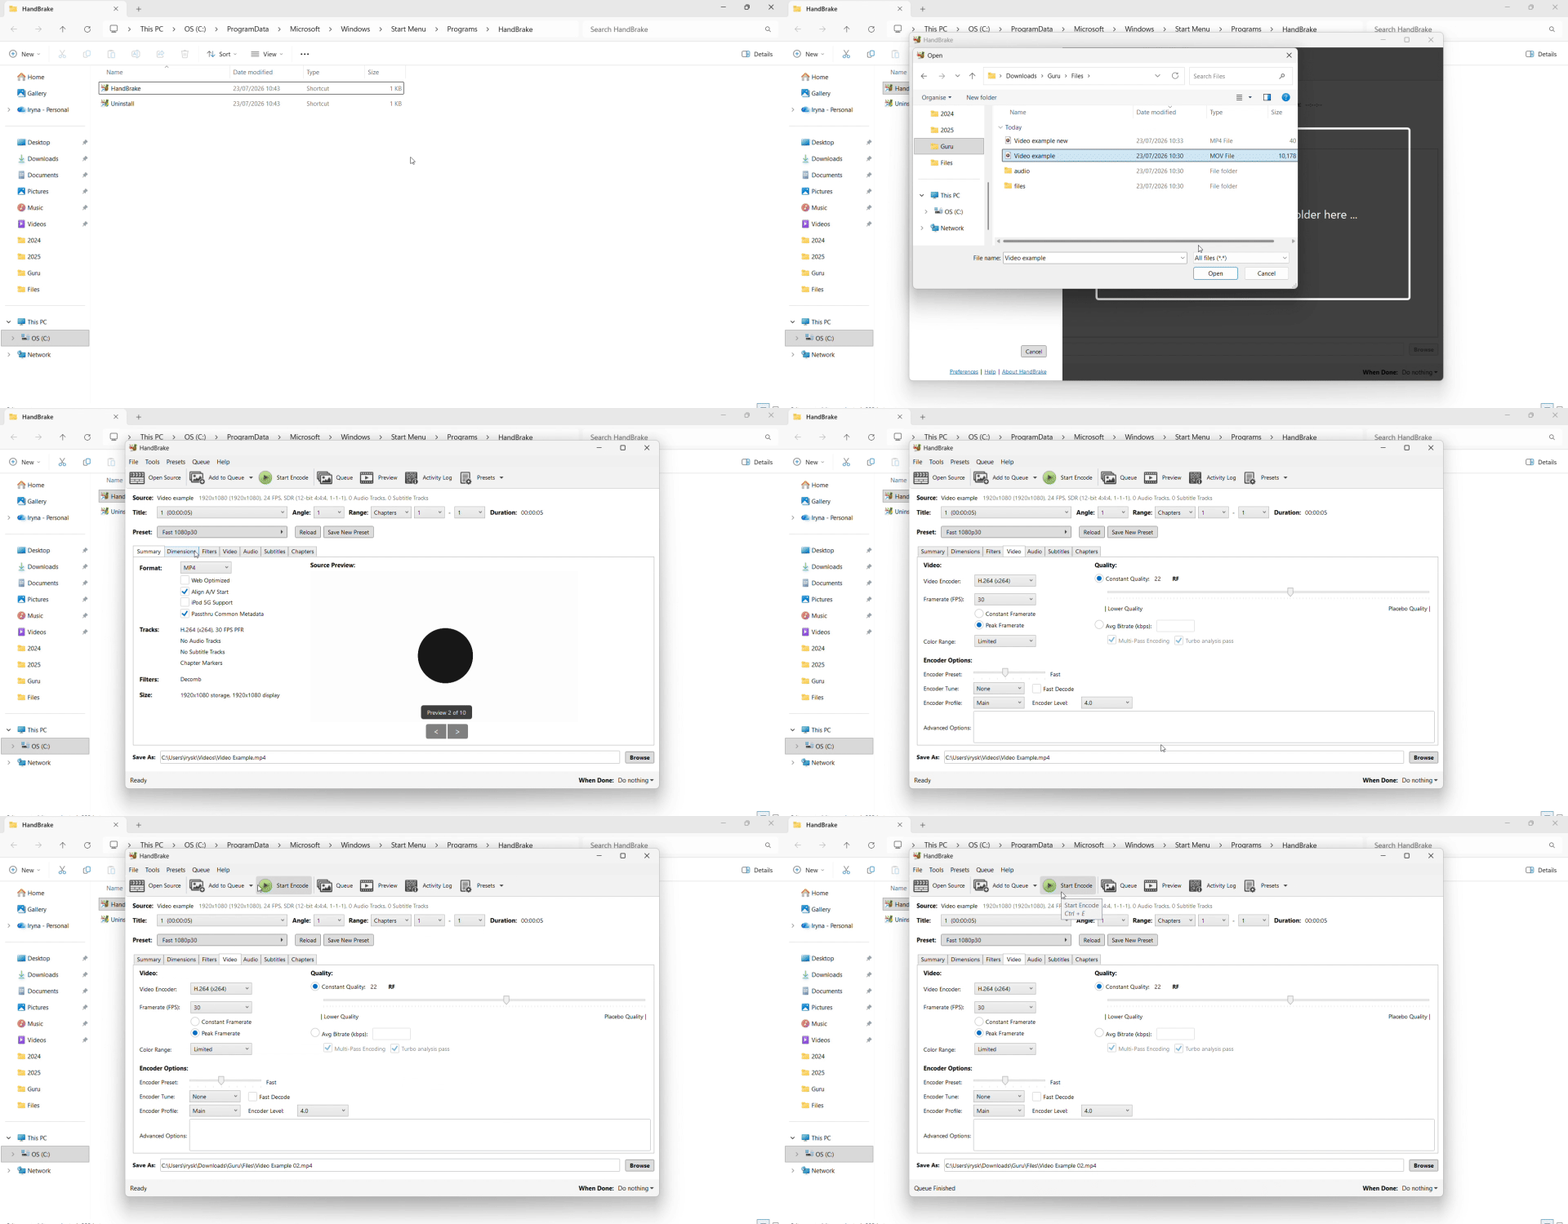
Open-source and built for batch conversions:
- 1Click Open Source and select your MOV file, or drag it into HandBrake's main window.
- 2Select the Fast 1080p30 preset (or choose another resolution).
- 3Ensure the Format dropdown shows MP4.
- 4Set your destination file path by clicking Browse next to the Save field.
- 5Click Start Encoding.
HandBrake excels at batch workflows — you can queue dozens of MOV files and convert them overnight with consistent quality settings.
How to convert MOV to MP4 on iPhone
iPhones record video in MOV by default, which blocks uploads to many non-Apple platforms. Three methods solve the problem directly on your device.
Online converter via Safari

Works for smaller clips:
- 1
- 2
- 3Wait for the conversion to complete.
- 4Download the MP4 file to your device.
The 100 MB file size limit common to most online tools is a significant constraint for iPhone users. A single minute of 4K video at 60fps can exceed 400 MB. If your clip is too large, trim it in the Photos app first or use one of the methods below.
iMovie for iOS
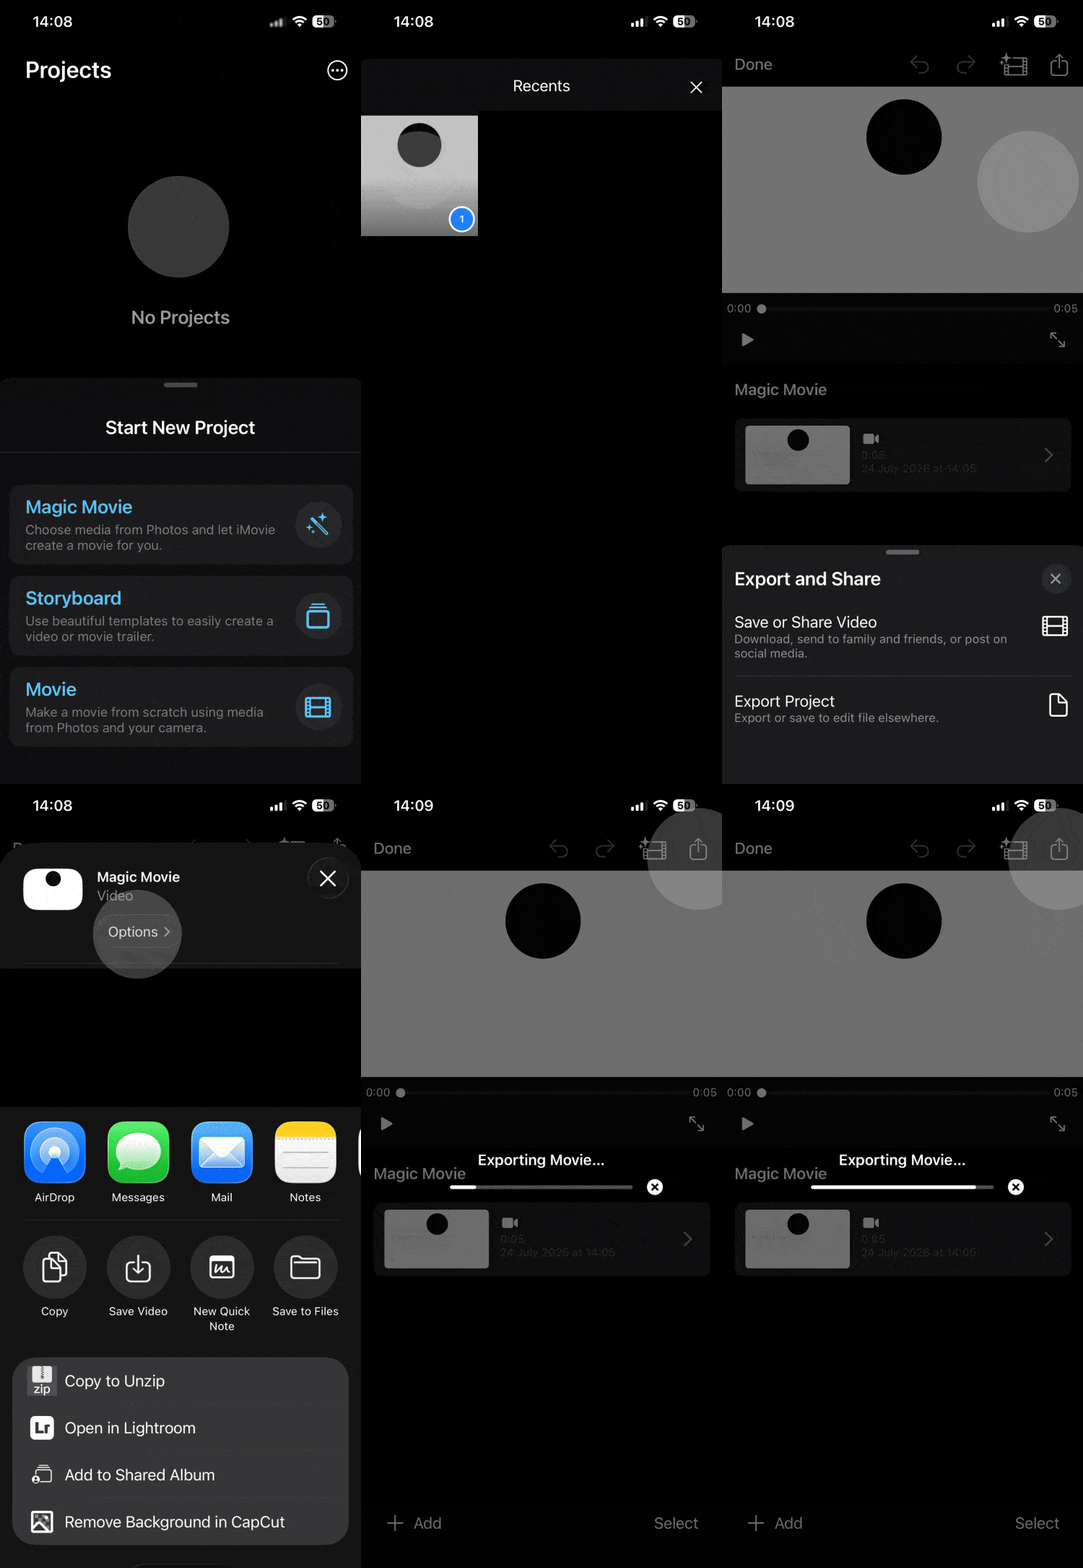
Apple's mobile editor exports in MP4-compatible format:
- 1Open iMovie and create a new project.
- 2Add your MOV clip to the timeline.
- 3
- 4Tap Save Video.
The file saves to your Photos library in MP4 format and uploads directly to YouTube, Instagram, and other platforms.
Third-party iOS apps
Several App Store apps handle local conversion for larger files without upload limits. Search for "video converter" and check reviews for reliability and privacy practices.
How to convert MOV file to MP4 online
Online converters appeal to users working on Chromebooks, locked-down work computers, or mobile devices where installing software isn't possible. They work across every device with a modern browser.
Before uploading, verify four key details:
- 1Privacy policy and file retention — check whether the service retains files for an unspecified period. Avoid uploading sensitive or personal footage to any online tool you don't trust.
- 2File size limit — most online converters cap uploads at 100–500 MB. A 4K video from your iPhone can easily exceed this.
- 3Watermark policy — some converters add visible branding to output files. Read terms before converting.
- 4HTTPS encryption — verify the site uses encrypted connections to protect your upload.
PDF Guru offers encrypted uploads, automatic processing with no watermarks, and a straightforward upload-convert-download flow. The tool works on any device with a browser, making it ideal for quick conversions when you're away from your primary computer. For files larger than 100 MB or when you need manual control over codecs and bitrates, desktop software like VLC or HandBrake provides more flexibility. PDF Guru also offers a broader video converter suite for other format needs.
Tips for better MOV to MP4 conversion
Five practices ensure smooth conversions and maximum compatibility:
- 1Ensure your output uses H.264 video and AAC audio codecs. This combination is universally supported across devices, browsers, and upload platforms. Most converters default to H.264 + AAC, but verify settings in tools like VLC and HandBrake.
- 2Keep the original MOV file until you've verified the MP4 plays correctly on your target device. Test playback on the platform where you'll use the file — upload a sample to YouTube or Instagram, play it on the TV or game console, or send it to a Windows colleague. Only delete the source once you've confirmed the conversion succeeded.
- 3For files larger than 100 MB, use desktop software or trim the video first. HandBrake and VLC have no file size limits. If you prefer online tools, edit your clip in the Photos app (iPhone) or a video editor (Mac/Windows) to reduce length or resolution before uploading.
- 4On Mac, verify your MOV codec via Get Info before choosing a conversion method. If the codec shows H.264, renaming the extension is the fastest, lossless option. If it shows HEVC or ProRes, use iMovie or another tool that re-encodes properly.
- 5Test playback on the target platform before batch-converting many files. Convert one sample first, upload it to YouTube or your social media platform, and verify quality and compatibility. Once confirmed, batch-process the rest with confidence. This saves hours of re-work if settings need adjustment.
If you ever need the reverse process, the MP4 to MOV converter at PDF Guru handles conversions back to Apple's format for editing in Final Cut Pro or compatibility with legacy QuickTime workflows.