
If you're trying to figure out how to convert MP3 to WAV, you're tackling one of the most common audio format conversions. It's also one of the most misunderstood. Many people believe that converting an MP3 file to WAV will improve sound quality. The truth is more nuanced, and understanding it helps you make better decisions about when and why to convert.
This guide walks through every method — from browser-based tools that work on any device to native Mac and Windows applications — and explains the real reasons you might need WAV files in the first place.
Does converting MP3 to WAV improve sound quality?
No. Converting MP3 to WAV does not improve sound quality.
The MP3 file has already lost audio data during its original compression. MP3 is a lossy codec that typically discards 80 to 90 percent of the source's PCM data to achieve smaller file sizes. Those discarded frequencies and audio details are gone permanently. When you convert that MP3 to WAV, you create an uncompressed file containing exactly the same already-degraded audio. The file gets about ten times larger, but nothing is recovered.
Think of it like resizing a low-resolution JPEG to a larger TIFF image. The new image takes up more storage space, but it doesn't reveal pixels that were never captured. The detail simply isn't there to restore.
This misconception is widespread. The top Microsoft Tech Community thread on this topic is titled "How to convert MP3 to WAV in Windows for better quality," which reinforces the myth. If your actual goal is better sound quality, the only path is to find the original lossless source — a FLAC or ALAC file, or the original CD ripped in lossless mode — and start from there.
Understanding this upfront is crucial because it changes what you should expect from the conversion. The WAV file won't sound better through your headphones. But as the next section explains, there are many legitimate technical reasons you might still need to convert MP3 to WAV.
When you actually need to convert MP3 to WAV
Even though converting doesn't improve quality, there are several valid situations where WAV format is genuinely required.
Audio editing in workstations. Professional and prosumer DAWs like Pro Tools, Logic Pro, Ableton Live, Reaper, Audacity, and GarageBand all work better with uncompressed audio. If you edit an MP3 file directly and save your changes, the software re-encodes the audio back to MP3, causing additional quality loss with each save. This is called generation loss. Working from a WAV copy avoids these generation losses because WAV is uncompressed — you're editing the raw PCM data.
Burning audio CDs. The Red Book audio CD standard requires uncompressed PCM audio in WAV or AIFF format. Some CD burning software converts MP3 to WAV automatically during the burn process, but doing it explicitly first gives you more control over sample rate settings and lets you verify the files before committing them to disc.
Voiceover, podcast, and music production deliverables. Many recording studios and broadcast systems require WAV files for mixing, mastering, and submission. If you're delivering audio for professional production, the WAV format ensures compatibility with studio equipment and workflows.
Hardware compatibility. Some older karaoke machines, embedded broadcast equipment, public-address systems, and transcription playback hardware only support WAV. These devices can't decode MP3, so if you need to convert MP3 to WAV, it's because the hardware requires uncompressed PCM.
Specialized software. Court reporting CAT systems such as Stenograph Case CATalyst, speech-analysis tools, and scientific audio measurement software typically require WAV input at specific sample rates. If your workflow involves any of these tools, WAV is non-negotiable.
Long-form audio editing that requires non-destructive cuts. When you're slicing and rearranging clips in an editor, WAV's lack of compression means no quality degradation between operations. For podcasts, audiobooks, or interviews where you're making many edits, starting from WAV eliminates the cumulative quality loss you'd get from repeatedly re-encoding MP3.
How to convert MP3 to WAV using PDF Guru
The MP3 to WAV converter from PDF Guru runs entirely in your browser, making it the simplest option if you need to convert MP3 to WAV on any device without installing software.
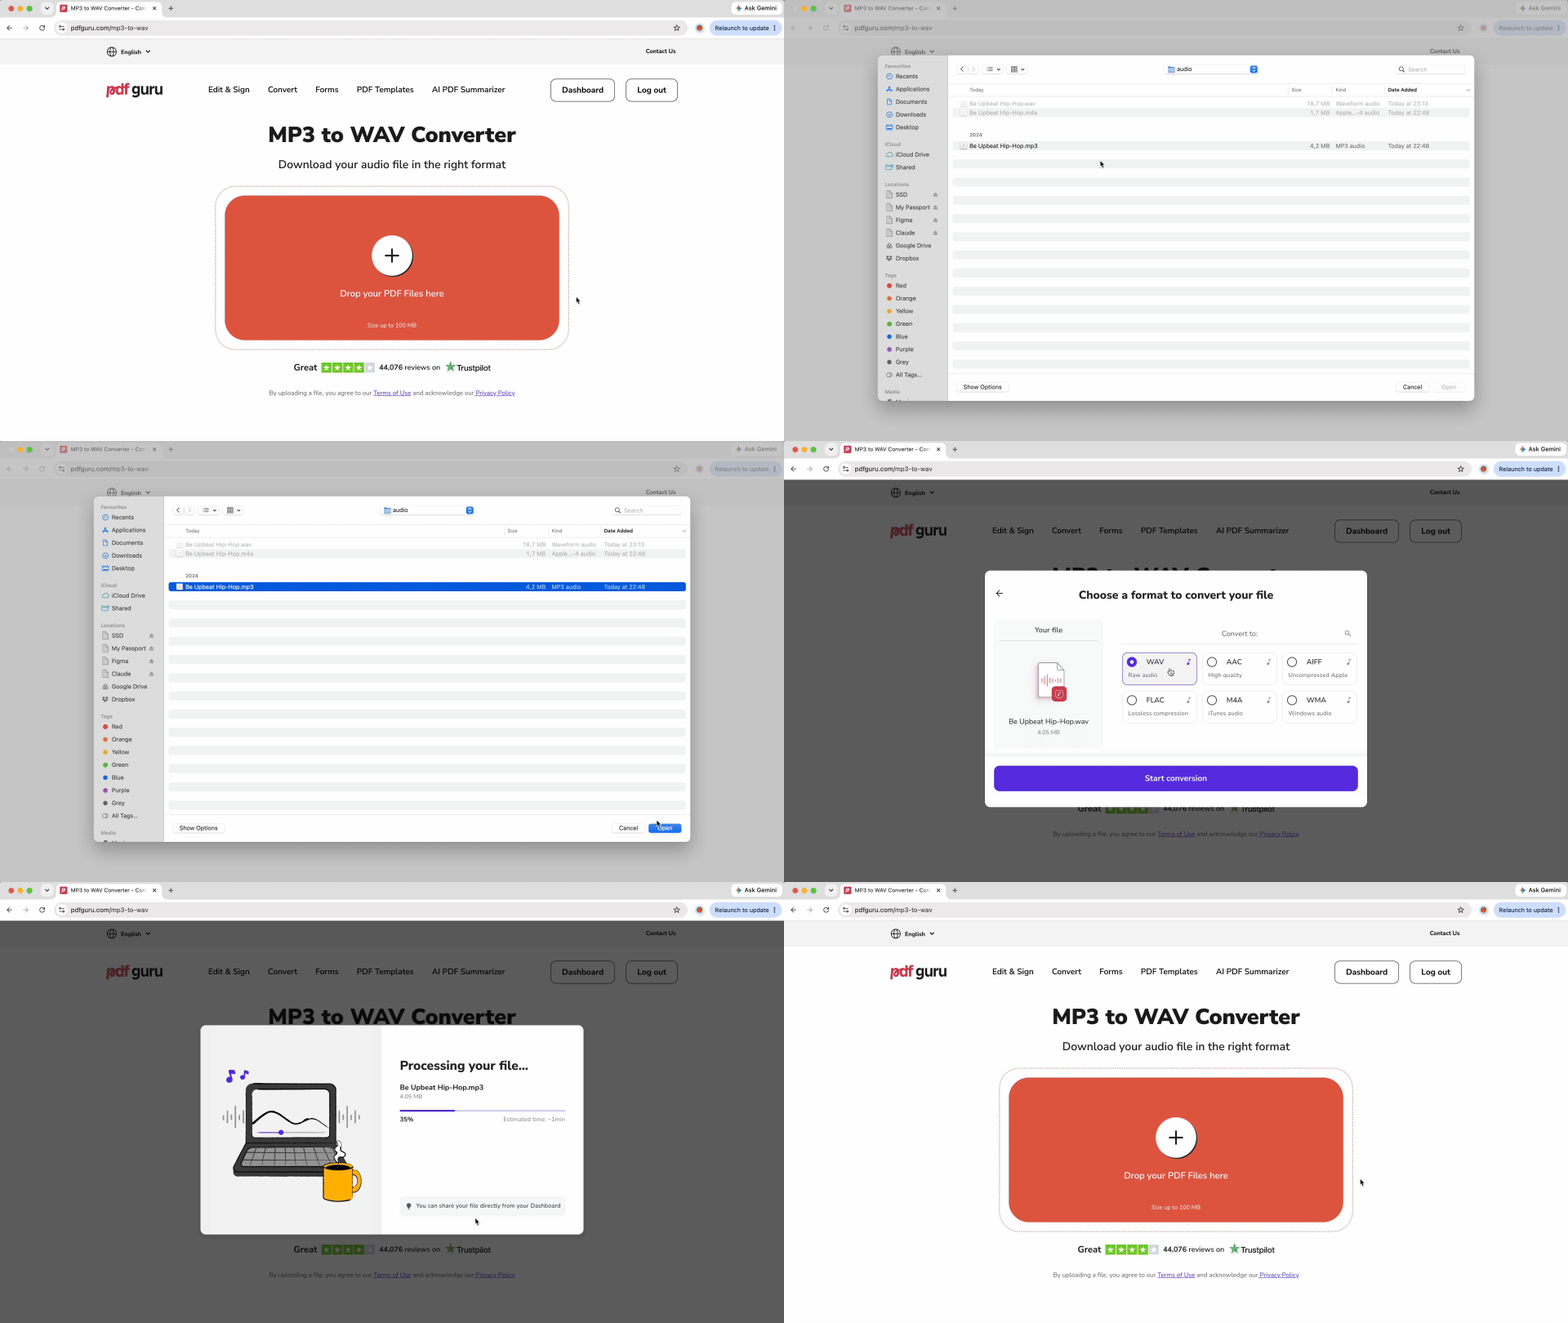
- 1Open the converter page in any modern browser.
- 2Upload your MP3 file by dragging it into the upload area or clicking to select it from your device.
- 3The tool decompresses the audio automatically and writes it as uncompressed PCM inside a WAV container.
- 4Download the WAV file once processing completes.
The converter works on Mac, Windows, Linux, iPhone, and Android — anywhere you have a modern web browser. This makes it ideal for one-off conversions when you're on a Chromebook, iPad, or any system where you can't install desktop software.
One important consideration: WAV files are roughly ten times larger than the source MP3. A 30 MB MP3 album becomes a 300 MB WAV. The file size limit applies to the output size, not just the upload. If you're working with longer recordings or full albums, you may need to use the desktop methods described below instead.
How to convert MP3 to WAV on Mac
Mac users have several built-in and free options.
Using Apple Music app
This is the recommended method for modern macOS (Catalina and later). The Music app includes a built-in WAV encoder.
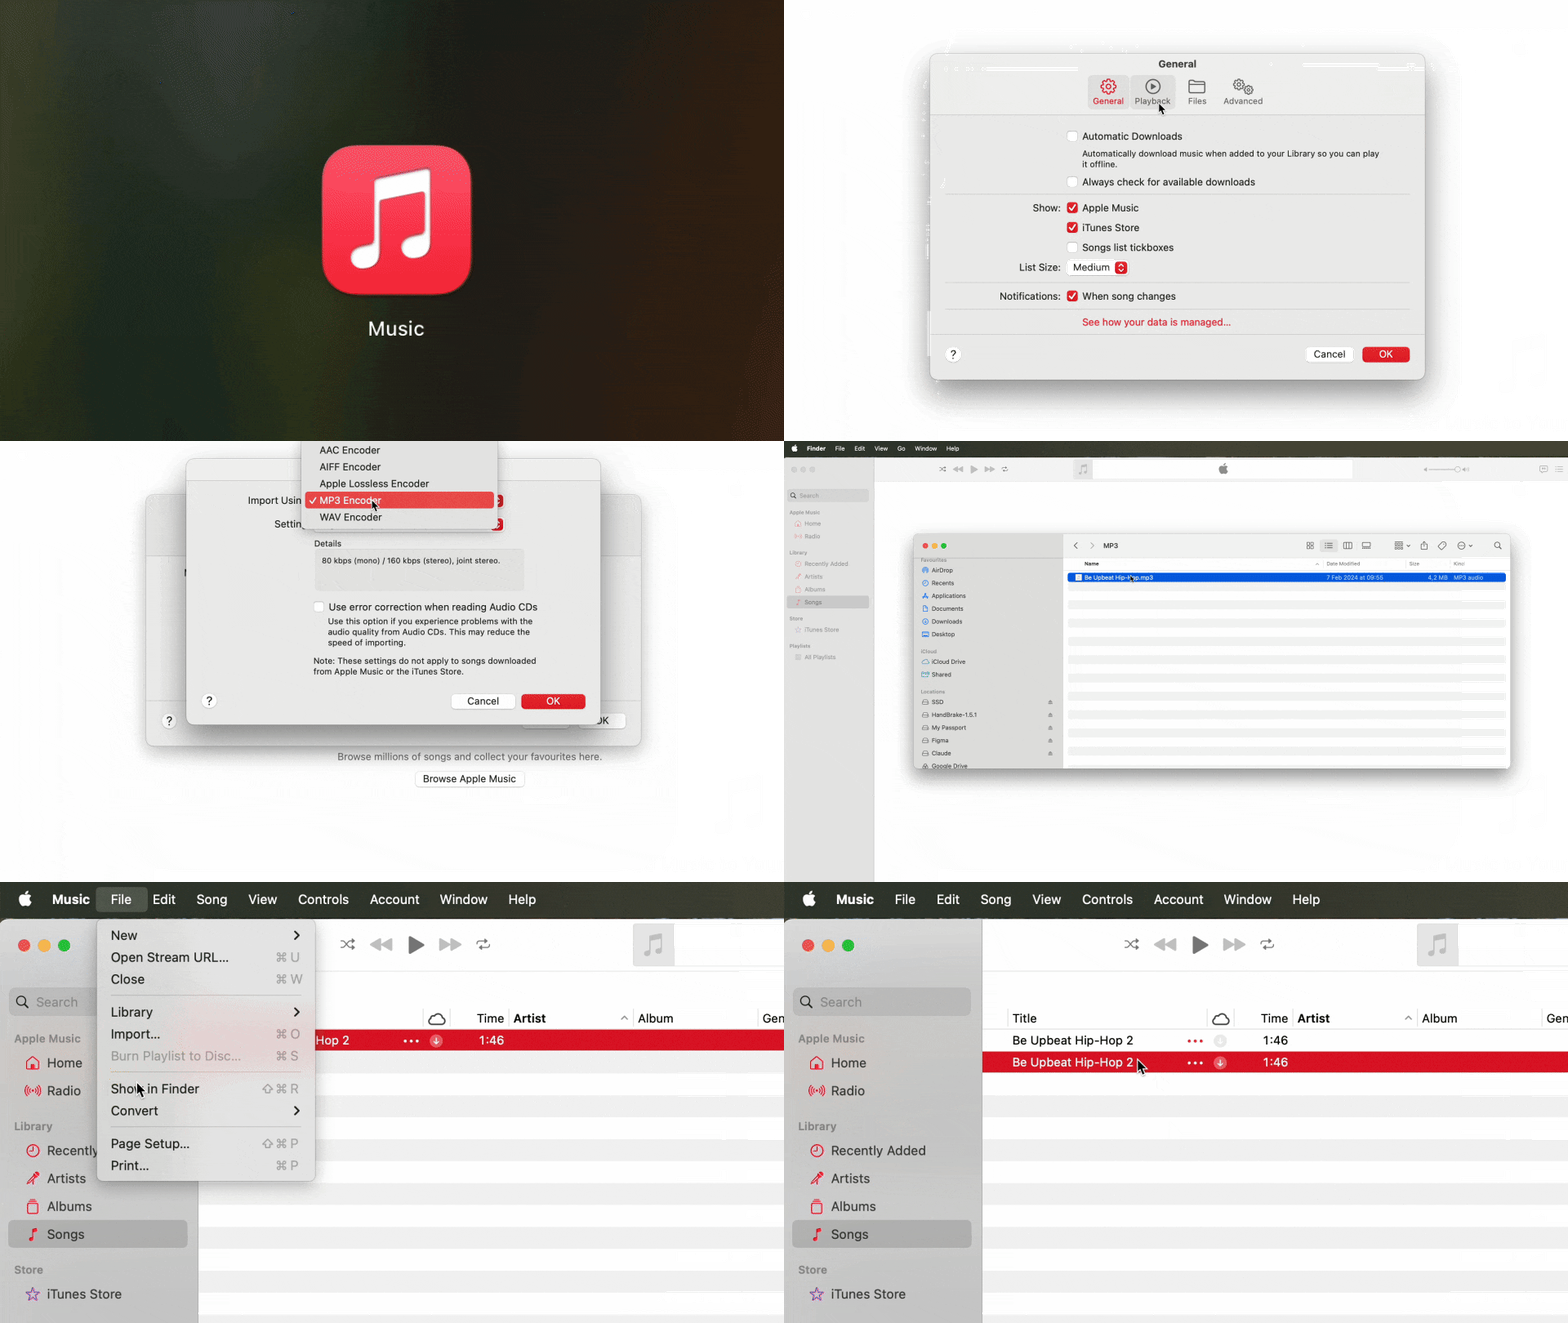
- 1Open the Music app.
- 2Go to Music > Settings.
- 3Click the Files tab.
- 4Click Import Settings.
- 5Set Import Using to WAV Encoder.
- 6Click OK to save.
- 7Drag the MP3 file from Finder into the Music library.
- 8Select the file in the library.
- 9Go to File > Convert > Create WAV Version.
- 10The WAV file appears next to the original in the library.
- 11Right-click the WAV file and select Show in Finder to access it.
If the File > Convert option is grayed out, the file is stored only in iCloud. Right-click the file and select Make Available Offline first, then try the conversion again.
Using iTunes
For older macOS versions (Mojave and earlier), the process is nearly identical but uses iTunes instead of the Music app.
- 1Open iTunes.
- 2Go to iTunes > Preferences.
- 3Click the General tab.
- 4Click Import Settings.
- 5Set Import Using to WAV Encoder.
- 6Click OK.
- 7Drag your MP3 into the iTunes library.
- 8Select the file, then go to File > Convert > Create WAV Version.
Using GarageBand
GarageBand provides another straightforward path if you have it installed.
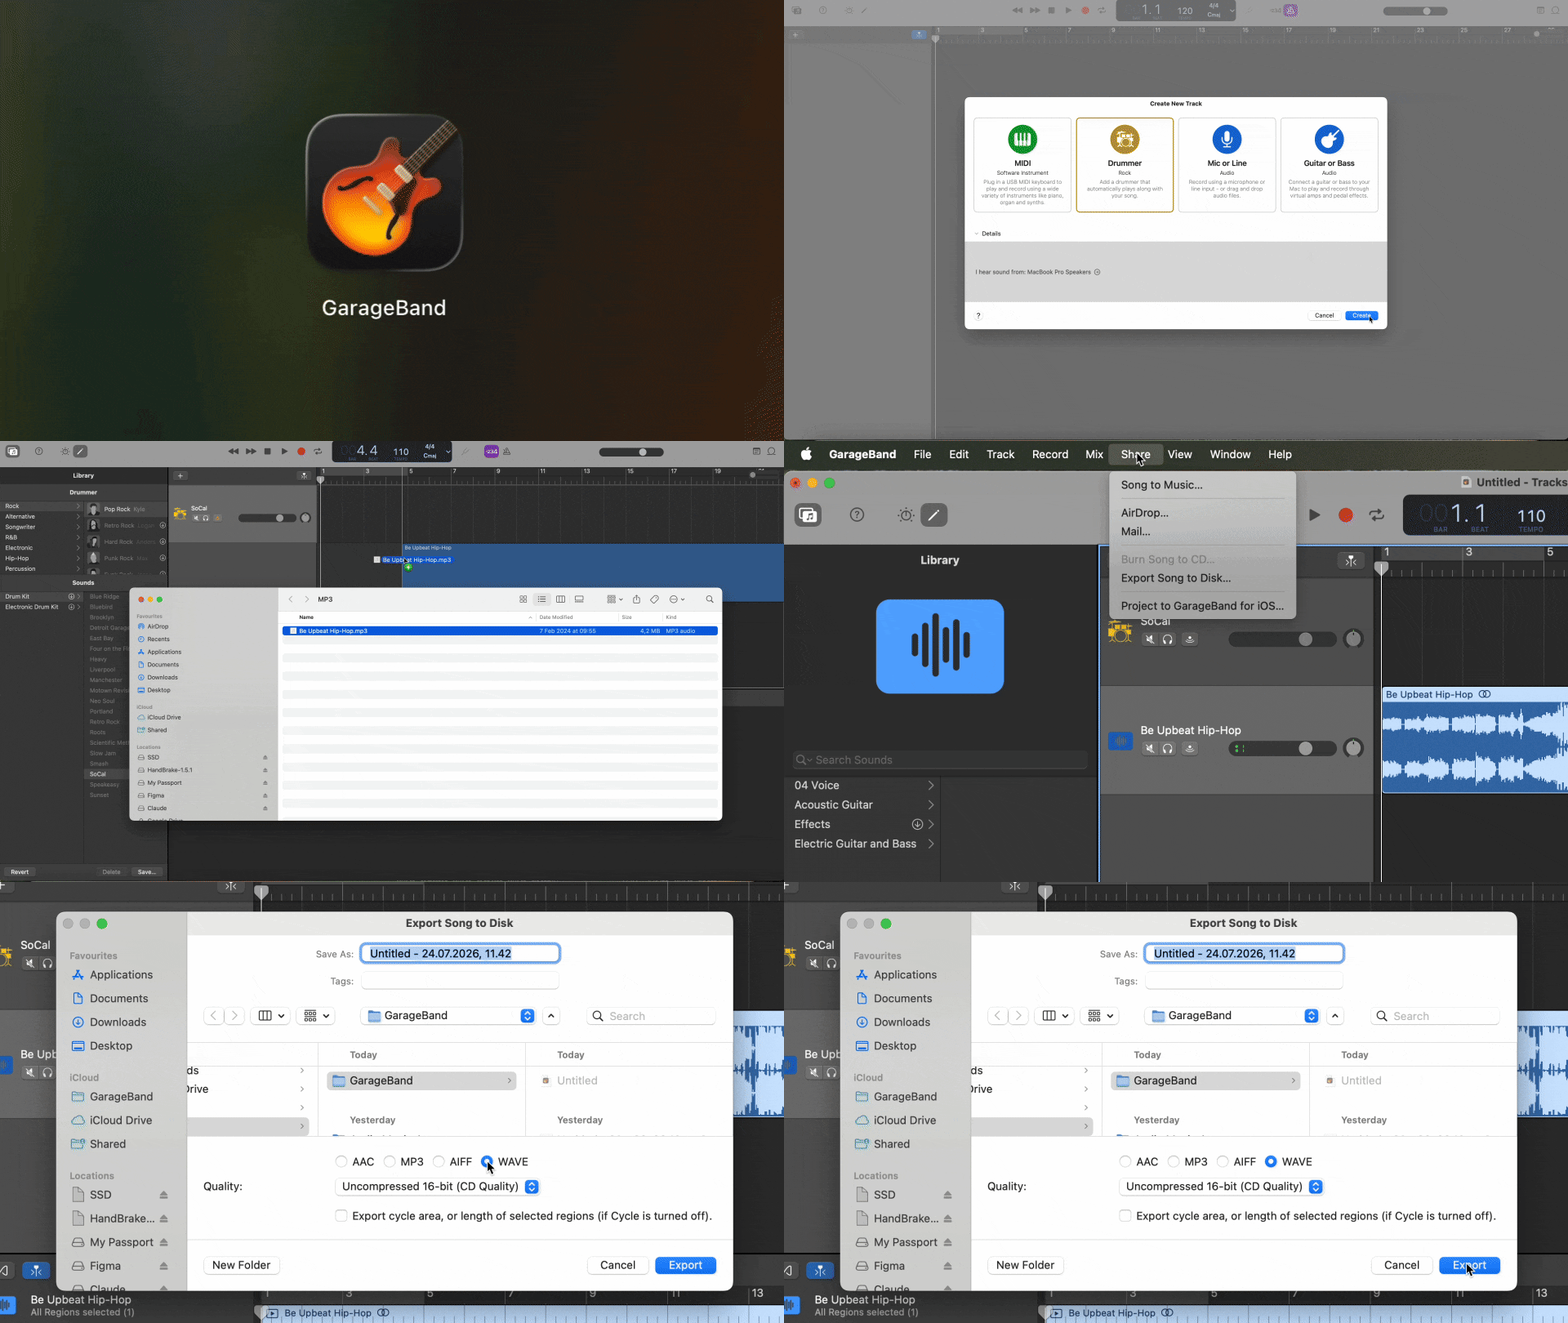
- 1Open GarageBand.
- 2Go to File > New.
- 3Select Empty Project.
- 4Drag the MP3 file into the workspace.
- 5
- 6Set the format to WAV.
- 7Click Export.
Using Audacity
Audacity is free, open-source, and particularly useful if you plan to edit the audio afterward.
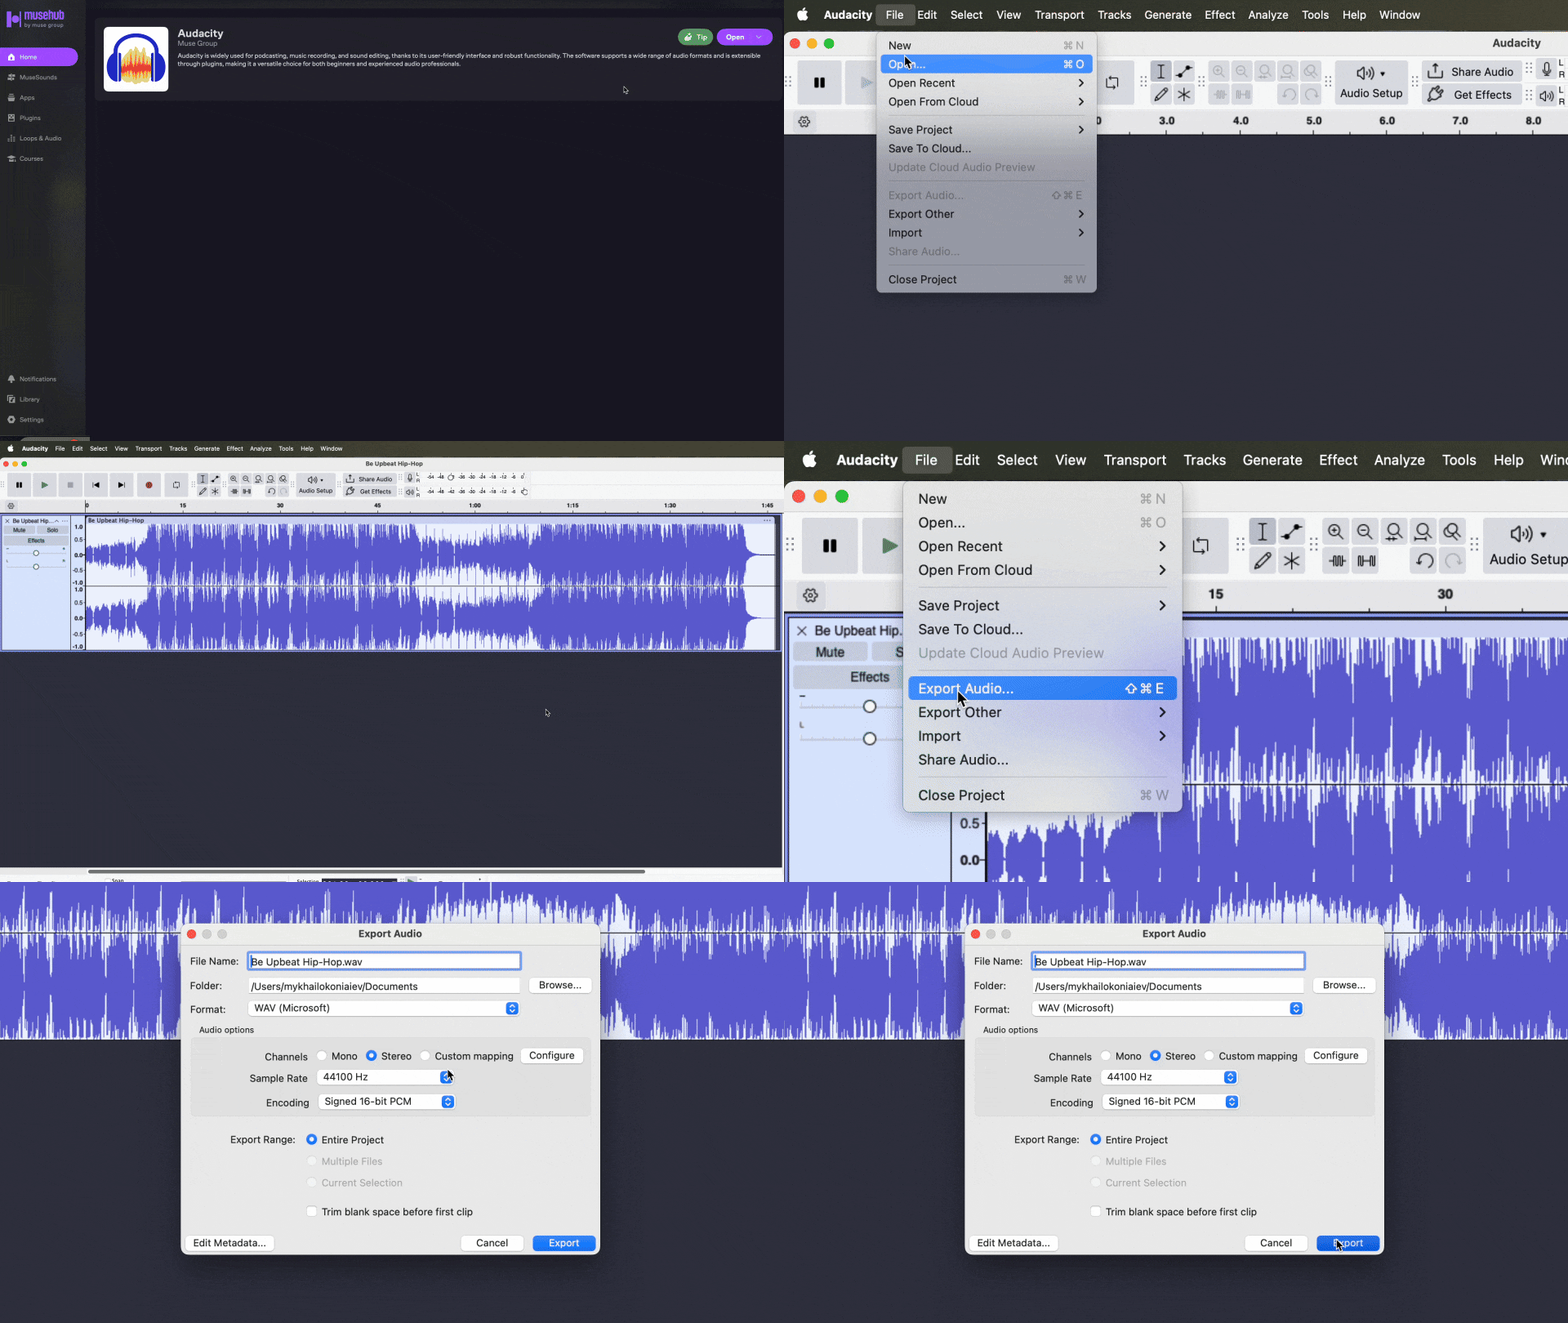
- 1Download and install Audacity.
- 2Go to File > Open.
- 3Select your MP3 file.
- 4Go to File > Export > Export as WAV.
- 5Set your preferred sample rate (typically 44.1 kHz for music).
- 6Click Export.
Using FFmpeg
For advanced users who need to batch-convert many files, FFmpeg is the fastest option.
- 1Install Homebrew if you don't have it:
/bin/bash -c "$(curl -fsSL https://raw.githubusercontent.com/Homebrew/install/HEAD/install.sh)" - 2Install FFmpeg:
brew install ffmpeg - 3Convert a single file:
ffmpeg -i input.mp3 output.wav - 4Convert all MP3 files in a folder:
for f in *.mp3; do ffmpeg -i "$f" "${f%.mp3}.wav"; done
How to convert MP3 to WAV on Windows
Windows users have multiple free options, though the process differs from Mac.
Using VLC Media Player
VLC is free and handles the conversion well once you set up a WAV profile.
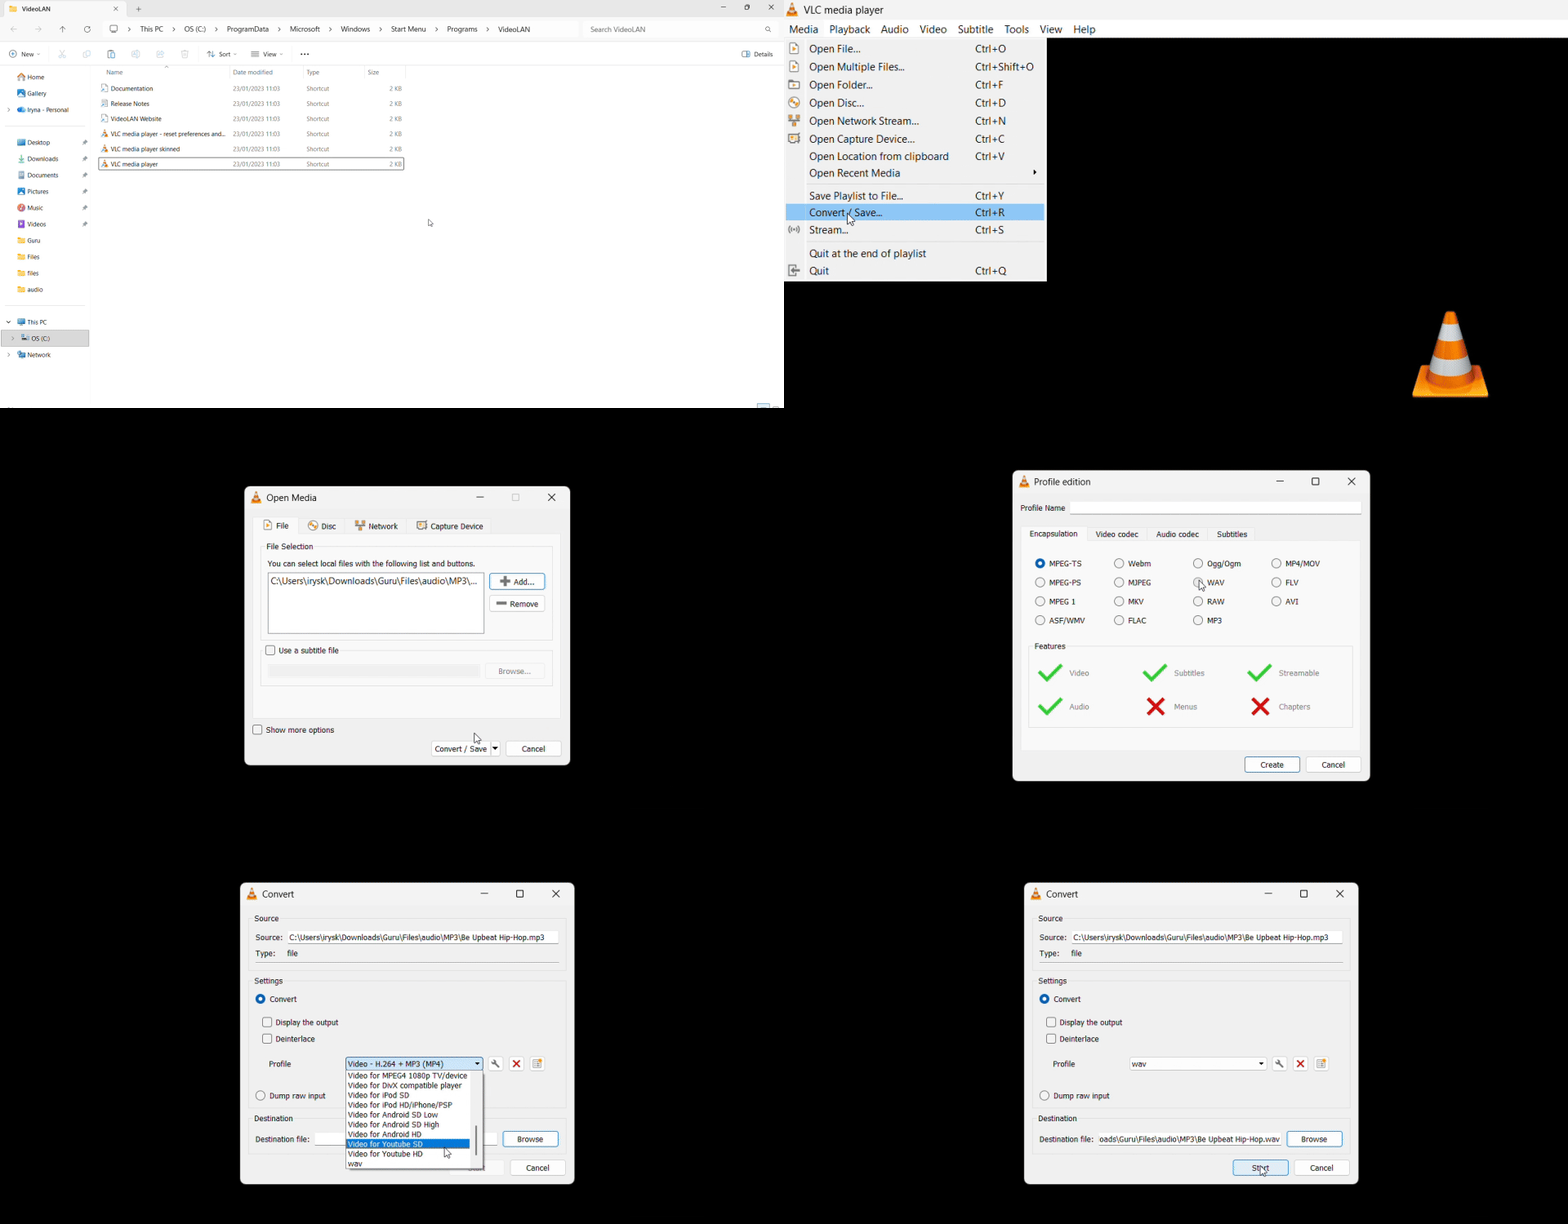
- 1Download and install VLC Media Player.
- 2Open VLC.
- 3Go to Media > Convert/Save (or press Ctrl+R).
- 4Click Add and select your MP3 file.
- 5Click Convert/Save at the bottom.
- 6Under Profile, click the last icon (Create a new profile).
- 7Name it "WAV."
- 8Click the Encapsulation tab and select WAV.
- 9Click the Audio codec tab, check the Audio box, and select WAV from the Codec dropdown.
- 10Click Create.
- 11Back at the Convert window, select your new WAV profile.
- 12Click Browse to choose where to save the output file.
- 13Click Start.
Using Audacity
Audacity works the same on Windows as on Mac and is recommended if you're planning to edit.
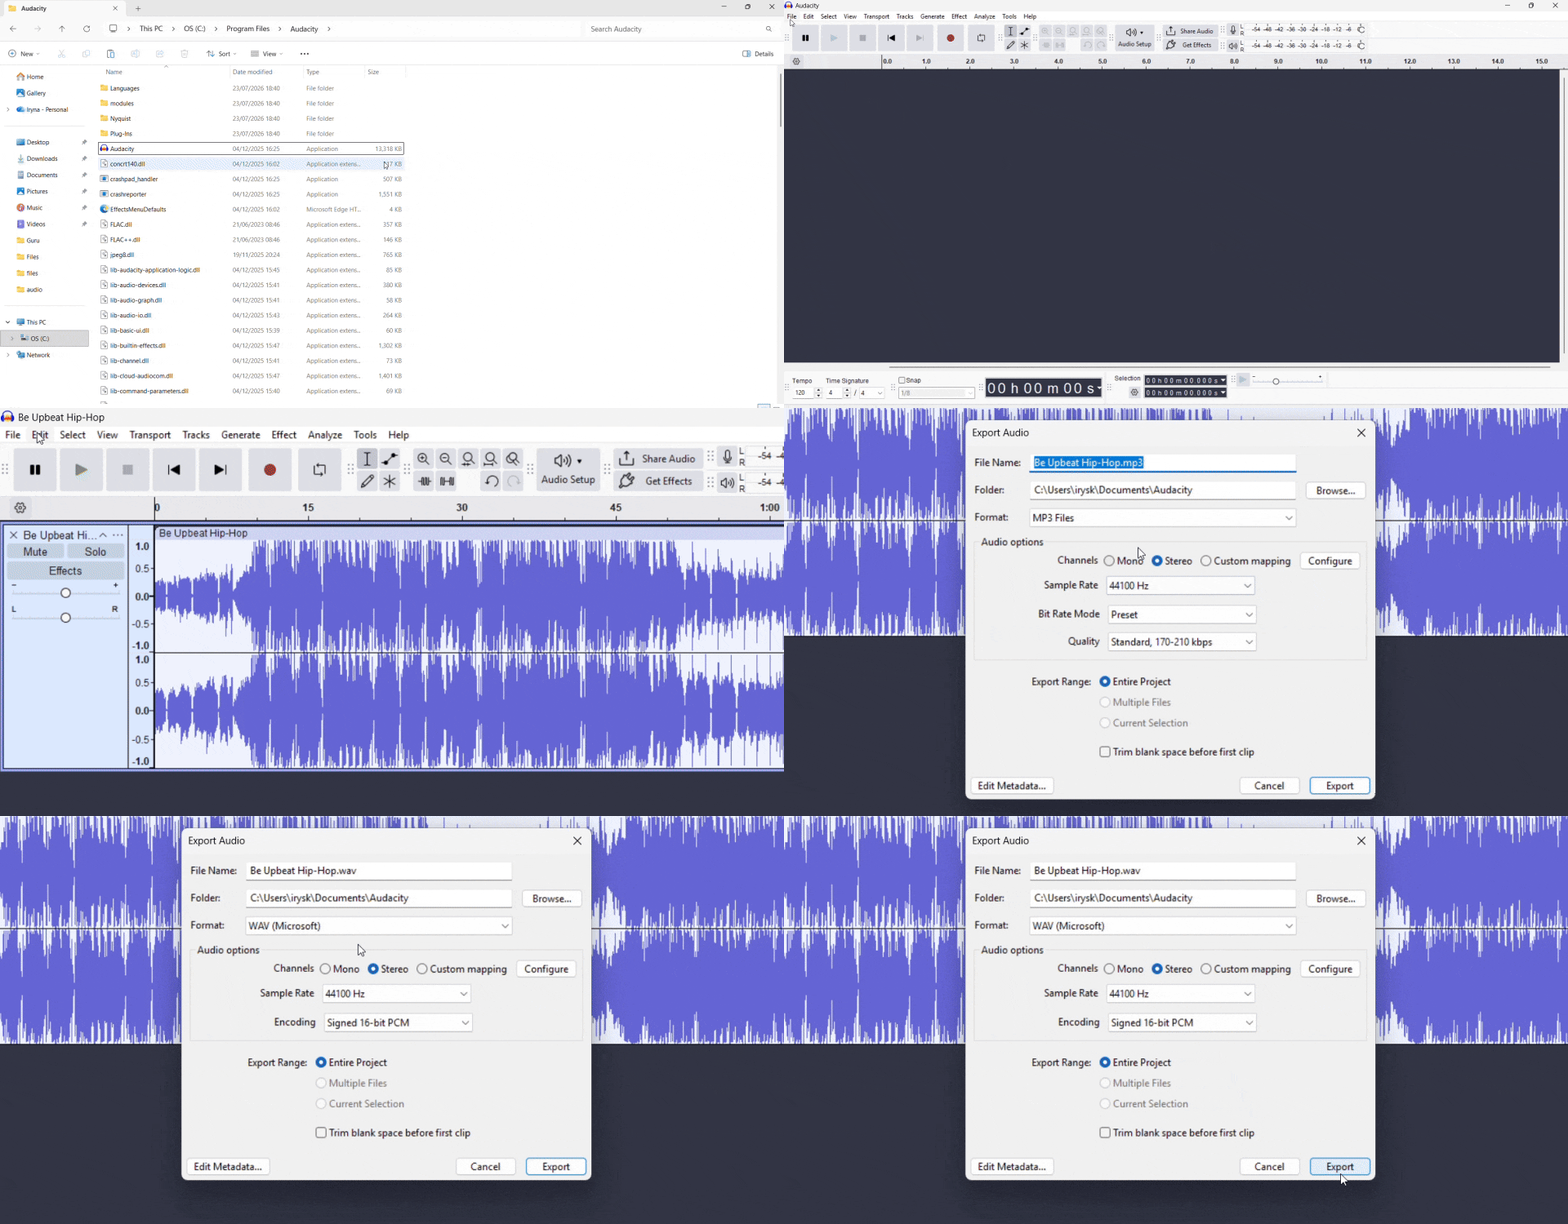
- 1Download and install Audacity.
- 2Go to File > Open.
- 3Select your MP3 file.
- 4Go to File > Export Audio.
- 5Set the format to WAV (Microsoft) signed 16-bit PCM.
- 6Choose your sample rate (typically 44.1 kHz).
- 7Click Export.
Using iTunes or Apple Music for Windows
Apple offers iTunes for Windows and Apple Music for Windows (available from the Microsoft Store). Both can convert MP3 to WAV.
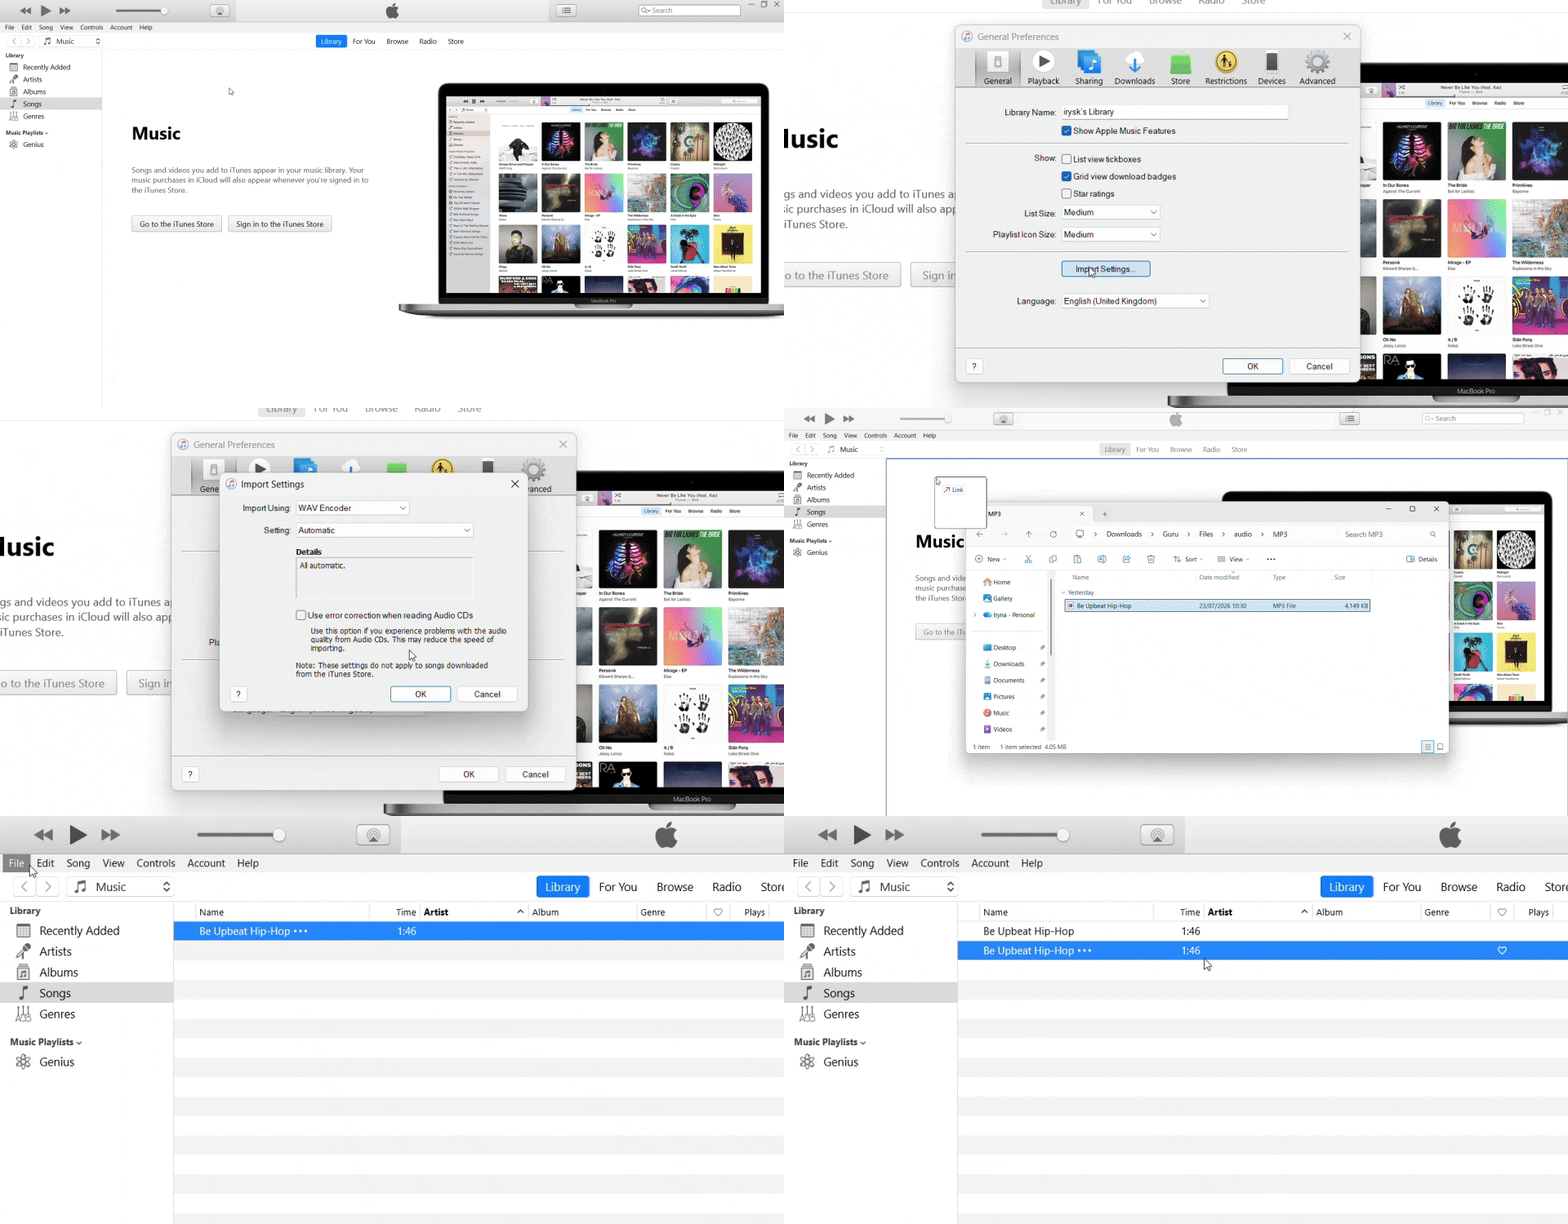
- 1Install iTunes or Apple Music for Windows.
- 2Go to Edit > Preferences.
- 3Click the General tab.
- 4Click Import Settings.
- 5Set Import Using to WAV Encoder.
- 6Click OK.
- 7Drag your MP3 into the library.
- 8Select the file.
- 9Go to File > Convert > Create WAV Version.
Using FFmpeg
FFmpeg works on Windows just as it does on Mac, providing the fastest method for batch conversion.
- 1Download and install FFmpeg for Windows.
- 2Open Command Prompt.
- 3
- 4Run:
ffmpeg -i input.mp3 output.wav
Windows Media Player clarification
Windows Media Player cannot directly convert MP3 files to WAV. Despite some online articles claiming you can use File > Save As to change formats, this option does not include format conversion for audio files.
The Microsoft Tech Community thread on this topic describes a workaround that involves burning the MP3s to an audio CD, then re-ripping them as WAV. This requires a CD burner and blank discs, and is impractical for most users. For modern Windows 11 or Windows 10 systems, install one of the tools described above instead.
How to convert MP3 to WAV online
Browser-based converters offer cross-device convenience without requiring installation. They're ideal for one-off conversions on a Chromebook, iPad, or any system where you don't have admin rights to install software.
Before uploading to any online tool, check these four factors:
File size limit. This matters especially when you convert MP3 to WAV because the output is about ten times larger than the input. A tool might accept a 20 MB MP3 upload but reject the 200 MB WAV output. Verify the limit accommodates the expanded file.
Privacy policy and file deletion timing. Understand how long files remain on the service's servers. Some platforms store uploads indefinitely; others delete within hours.
Watermark or signup requirements. Some converters add watermarks to output files or place features behind account walls. Know what you're agreeing to before uploading.
HTTPS encryption during upload. The connection should be encrypted. Check for the padlock icon in your browser's address bar.
Do not upload private voice memos, confidential meeting recordings, or sensitive audio to any online converter. If the content is personal or proprietary, use a desktop tool instead.
PDF Guru offers an audio converter that handles MP3 to WAV along with other format conversions. As a browser-based option, it works on any device with a modern web browser.
Tips for better MP3 to WAV conversion
Set realistic expectations. The conversion will not make your MP3 sound better. If your true goal is higher audio quality, find a FLAC, ALAC, or original CD source and start from there. Converting MP3 to WAV only changes the container format, not the underlying audio fidelity.
Match the source sample rate. Most MP3 music is encoded at 44.1 kHz. Do not upsample to 48 kHz or 96 kHz during conversion — it bloats the file size without adding usable audio detail. The output quality is limited by what was in the MP3 to begin with. Keep the sample rate at 44.1 kHz unless your target software or hardware specifically requires a different rate.
Use batch conversion for many files. If you need to convert an entire album or podcast series, use FFmpeg or Audacity's batch mode. Online tools usually cap the number of files you can upload at once or queue them one at a time, making them impractical for large batches.
Keep the original MP3. WAV files are roughly ten times larger than MP3 files. Converting an entire music library from MP3 to WAV will multiply your storage needs by a factor of ten. Only convert what you actually need for editing, CD burning, or specific software. For archival listening, keep the MP3.
Verify playback in the target application. Before deleting the source MP3, test the WAV file in your DAW, CD burning software, transcription tool, or whatever application you're ultimately using. Confirm it imports correctly and plays as expected. If you need to convert back, PDF Guru's WAV to MP3 tool handles the reverse conversion.