
Every device, browser, and platform speaks MP4. Whether you need to upload a video to YouTube, share a clip on Instagram, or send a recording to a colleague, MP4 ensures universal playback. But if you're wondering how to convert video to MP4, the answer isn't one-size-fits-all. The fastest, highest-quality method depends on what format your video is now—and surprisingly, sometimes the best "conversion" is simply renaming the file.
This guide walks through every practical path: online tools for quick jobs, native Mac and Windows methods, and iPhone-specific workflows that prevent the problem at its source.
Why convert your video to MP4?
MP4 has become the de facto standard for digital video. Here's why converting to this format solves most compatibility headaches:
Universal playback compatibility. MP4 plays on every modern device—smartphones, tablets, laptops, smart TVs, game consoles, and web browsers. No matter where your audience views the file, they won't encounter codec errors or missing-plugin warnings.
Platform upload requirements. YouTube, Vimeo, Instagram, TikTok, LinkedIn, Facebook, and most content management systems either require MP4 or strongly prefer it. Upload forms often reject MOV, MKV, or AVI files outright, forcing you to convert before posting.
Seamless video editing workflows. Most editing software—from beginner apps like iMovie and Clipchamp to professional suites—works best with MP4 input. Importing an exotic format may trigger errors, missing audio tracks, or sluggish timeline performance.
Hassle-free file sharing. When you send someone an MP4, you're guaranteeing they can open it. Recipients on unfamiliar devices or operating systems won't need to install special players or hunt for codec packs.
One important clarification: MP4 isn't automatically "higher quality" than other formats. Many videos labeled .MOV or .MKV already contain MP4-compatible content—H.264 video and AAC audio—inside a different wrapper. In those cases, learning how to convert video to MP4 means performing a fast container swap, not a slow quality-degrading re-encode.
How to identify your video format first
Before you rush to convert, spend thirty seconds checking what you actually have. Video files have two layers: the container (the file extension like .mov, .mkv, .avi, .wmv) and the codec (the internal encoding that actually plays back—H.264, HEVC, VP9, MPEG-4).
The extension tells you the box. The codec tells you what's inside the box. If your codec is already MP4-compatible, you can skip the slow re-encode and do an instant, lossless container swap instead.
On Mac: Open Finder, select your video file, press Command+I (or right-click and choose Get Info). Expand the "More Info" section and look for the "Codecs" line. You'll see something like "H.264, AAC" or "HEVC, AAC."
On Windows: Right-click the file, choose Properties, and click the Details tab. Scroll to the Video and Audio sections to see codec names. Alternatively, open the file in VLC Media Player, go to Tools > Codec Information, and check the Codec Details box.
Why this matters: if your video shows H.264 video and AAC audio, you already have MP4-compatible content. Conversion will be nearly instant. If you see HEVC, DTS, VP9, or other codecs, you'll need to re-encode, which takes longer and may slightly reduce quality.

How to convert video to MP4 using PDF Guru
For quick conversions of smaller files, PDF Guru's any video converter offers a straightforward browser-based workflow. The entire process happens in four steps:
- 1Open the appropriate converter page. PDF Guru offers dedicated tools for specific formats—convert MOV to MP4 for iPhone footage or MKV to MP4 for Matroska files, as these give better-tuned output than the general converter.
- 2Upload your video file by dragging it onto the page or clicking the upload button.
- 3The tool converts automatically—no settings to configure, no format dropdowns to navigate.
- 4Download the MP4 once processing finishes.
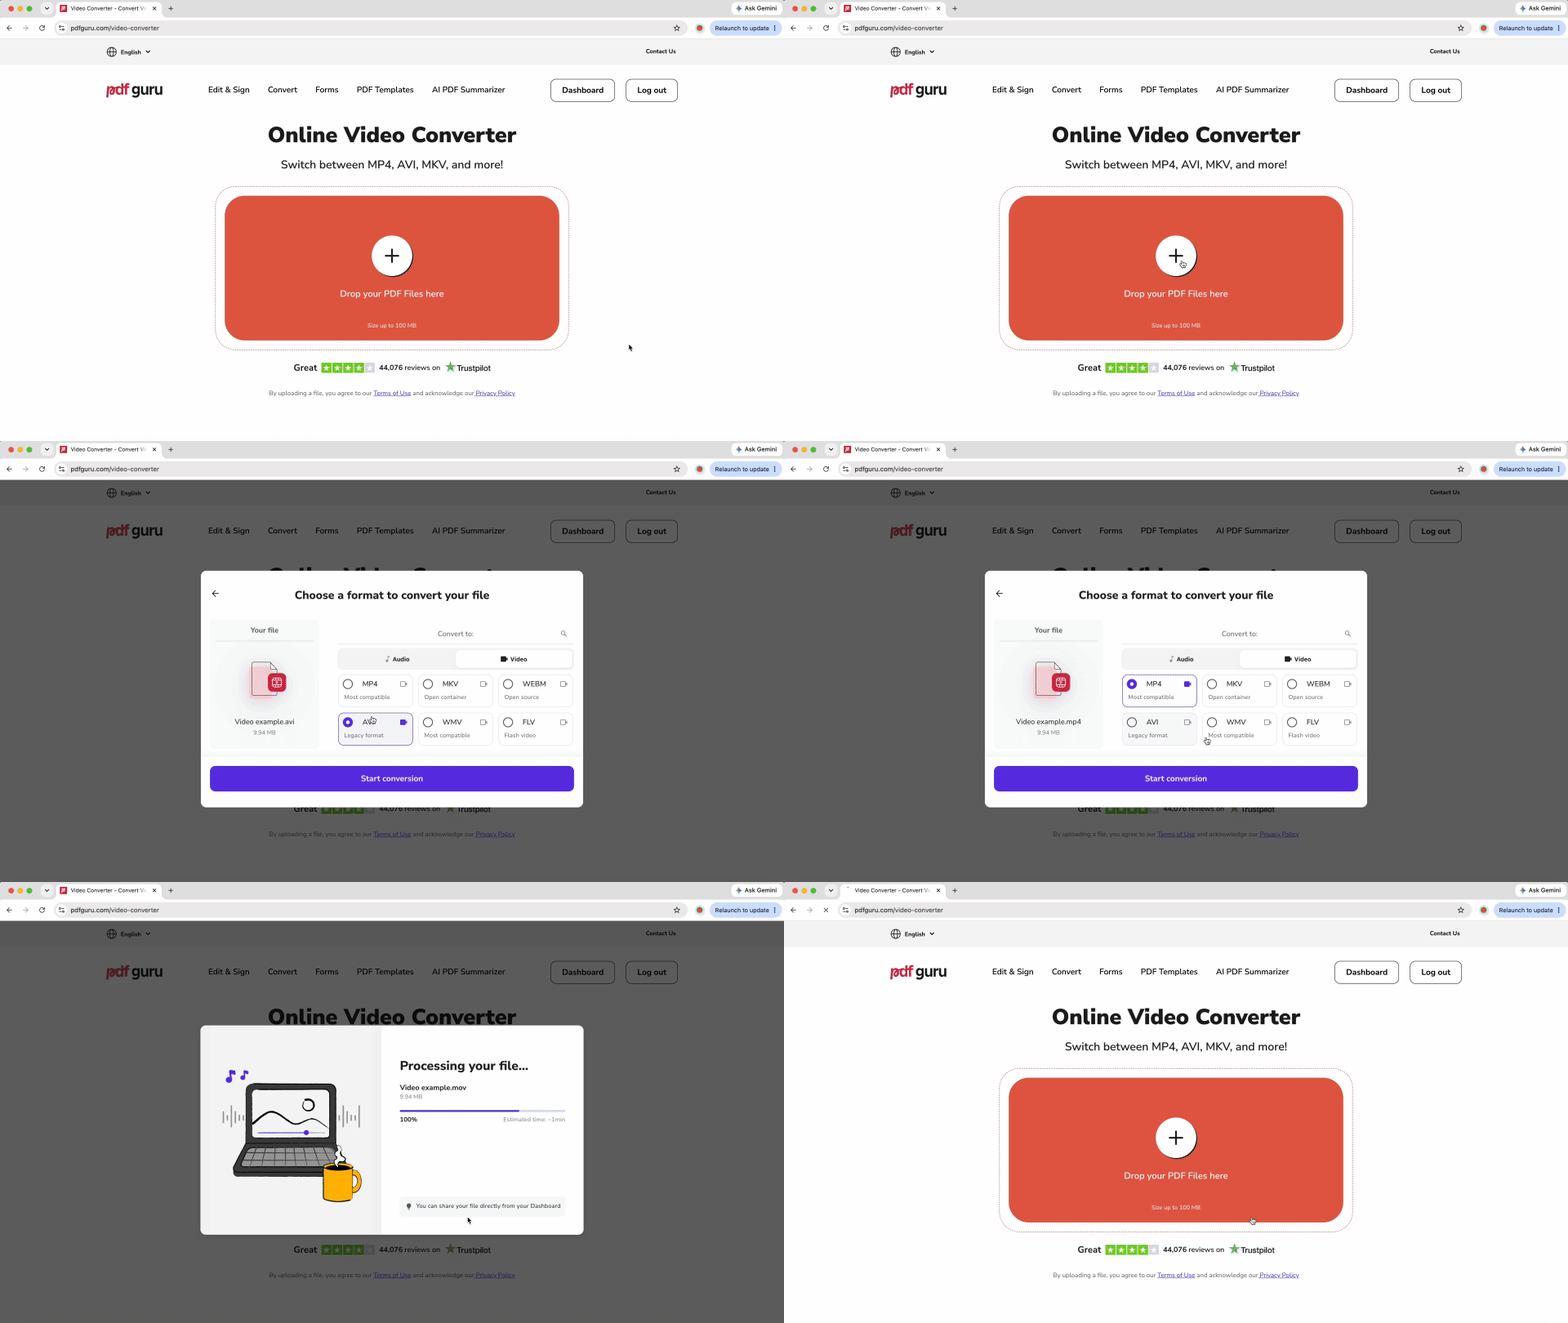
The current file size limit is 100 MB. If you need to convert video to MP4 for larger files—full-length recordings, 4K footage, or multi-hour projects—the desktop methods below handle files of any size without upload restrictions.
How to convert video to MP4 on Mac
Mac users have three excellent paths, ranging from instant renaming to full-featured conversion apps.
Rename .MOV to .MP4 (fastest for H.264 files)
If you verified using Get Info that your .MOV file uses the H.264 codec—common for iPhone videos shot in "Most Compatible" mode and most screen recordings—you can simply rename the extension. Apple officially endorses this method because the underlying content is already MP4-compatible; only the wrapper differs.
- 1Select the file in Finder.
- 2Press Return to enter rename mode (or Control-click and choose Rename).
- 3Change the extension from .mov to .mp4.
- 4Confirm the change when prompted.
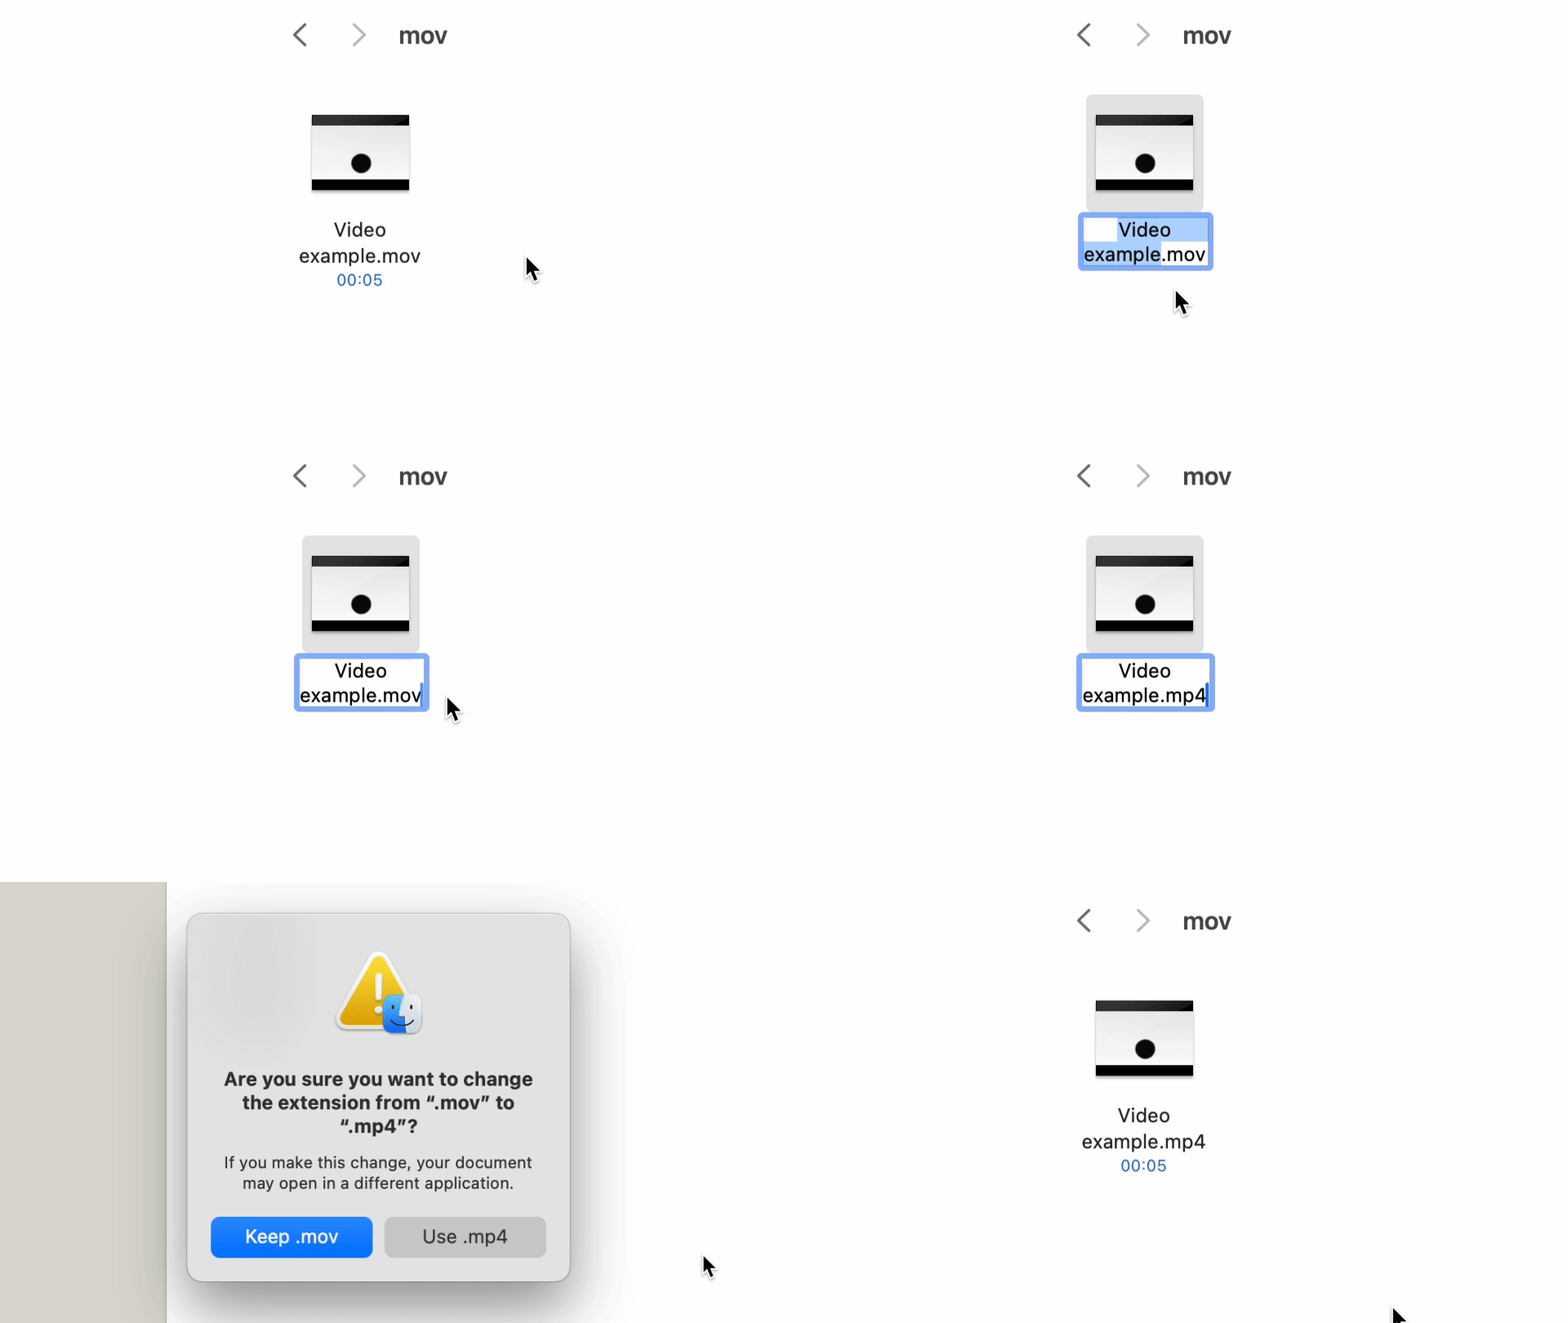
The file plays identically before and after. No conversion happens; you've just relabeled the container.
Using iMovie
iMovie ships with every Mac and handles most Apple-compatible formats: MOV, M4V, MP4, and certain MPEG files.
- 1Launch iMovie and create a new Movie project.
- 2Click Import Media and select your video.
- 3Drag the clip onto the timeline.
- 4
- 5Set your desired resolution and click Save.
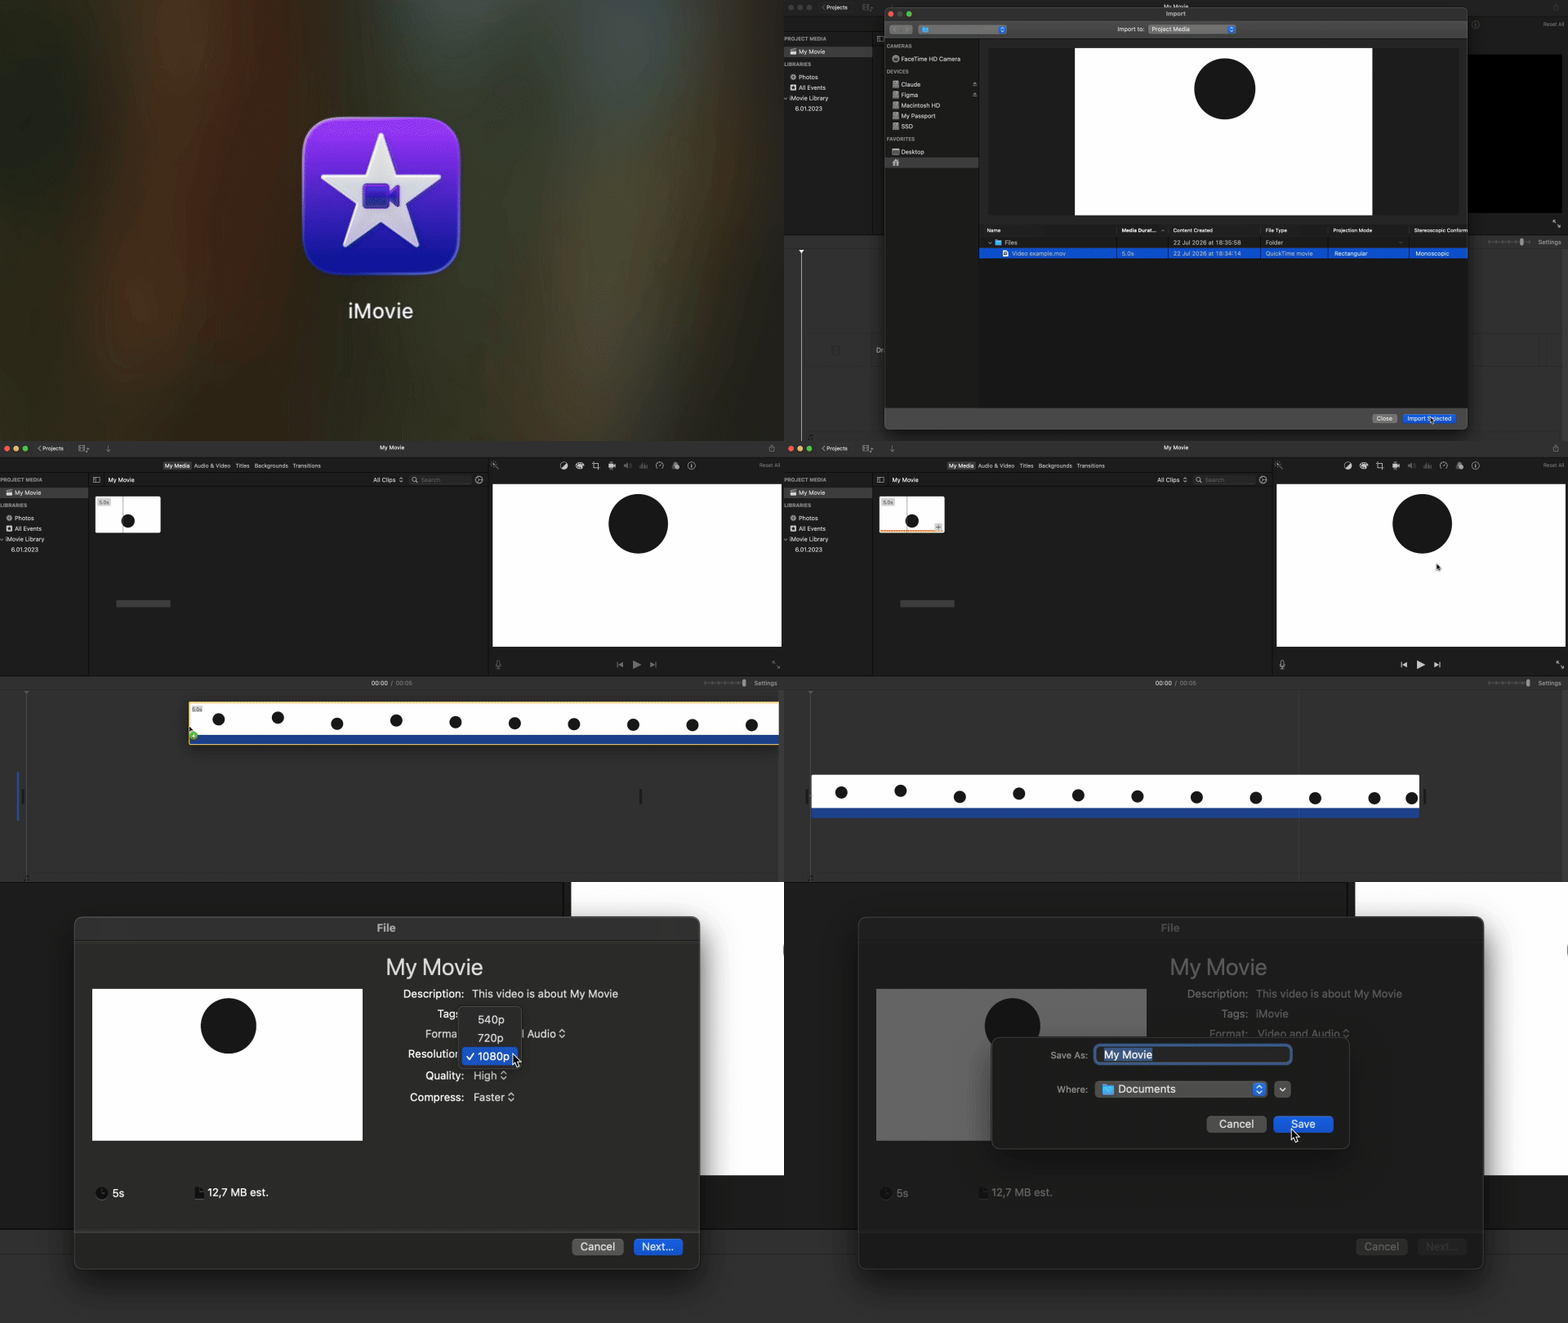
iMovie exports in H.264 + AAC MP4 by default. The output is optimized for Apple devices but plays on all devices.
Using VLC Media Player
VLC handles formats iMovie cannot, including MKV, WMV, FLV, and WebM. If you're figuring out how to convert video to MP4 from an exotic source, VLC is your best desktop option.
- 1Download and install VLC.
- 2Open VLC and go to File > Convert/Stream.
- 3Click Open Media and select your video.
- 4In the Profile dropdown, choose "Video - H.264 + MP3 (MP4)."
- 5Click Save as File, choose a destination, and click Save.
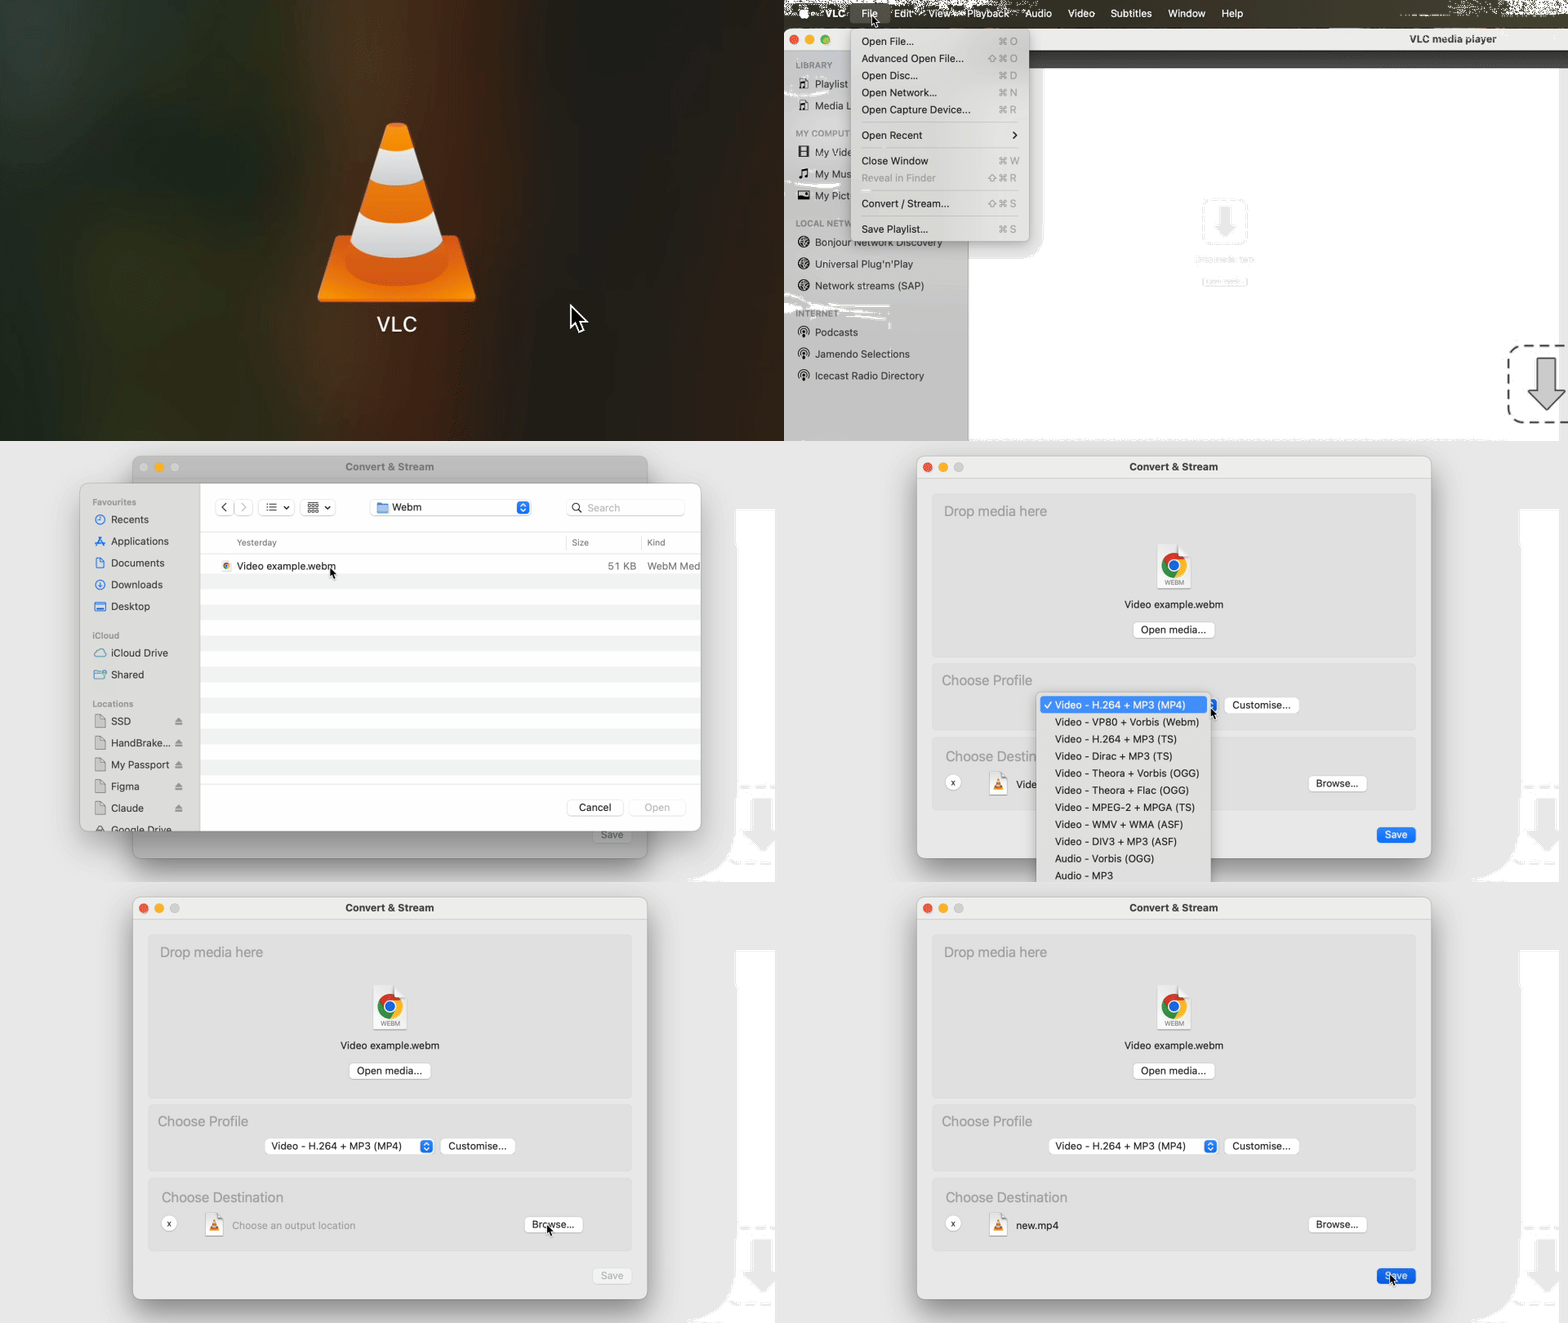
VLC re-encodes everything, so conversion takes time proportional to file length.
How to convert video to MP4 on Windows
Windows offers built-in tools for most users, plus powerful alternatives for advanced needs.
Microsoft Clipchamp (built into Windows 11)
Clipchamp ships pre-installed on Windows 11 and exports every project as MP4 by default—no format selection needed.
- 1Press the Windows key, type "Clipchamp," and launch the app.
- 2Click Create a new video.
- 3Click Import media and select your video file.
- 4Drag the clip onto the timeline at the bottom.
- 5Click Export, choose your resolution (1080p for most cases), and save.
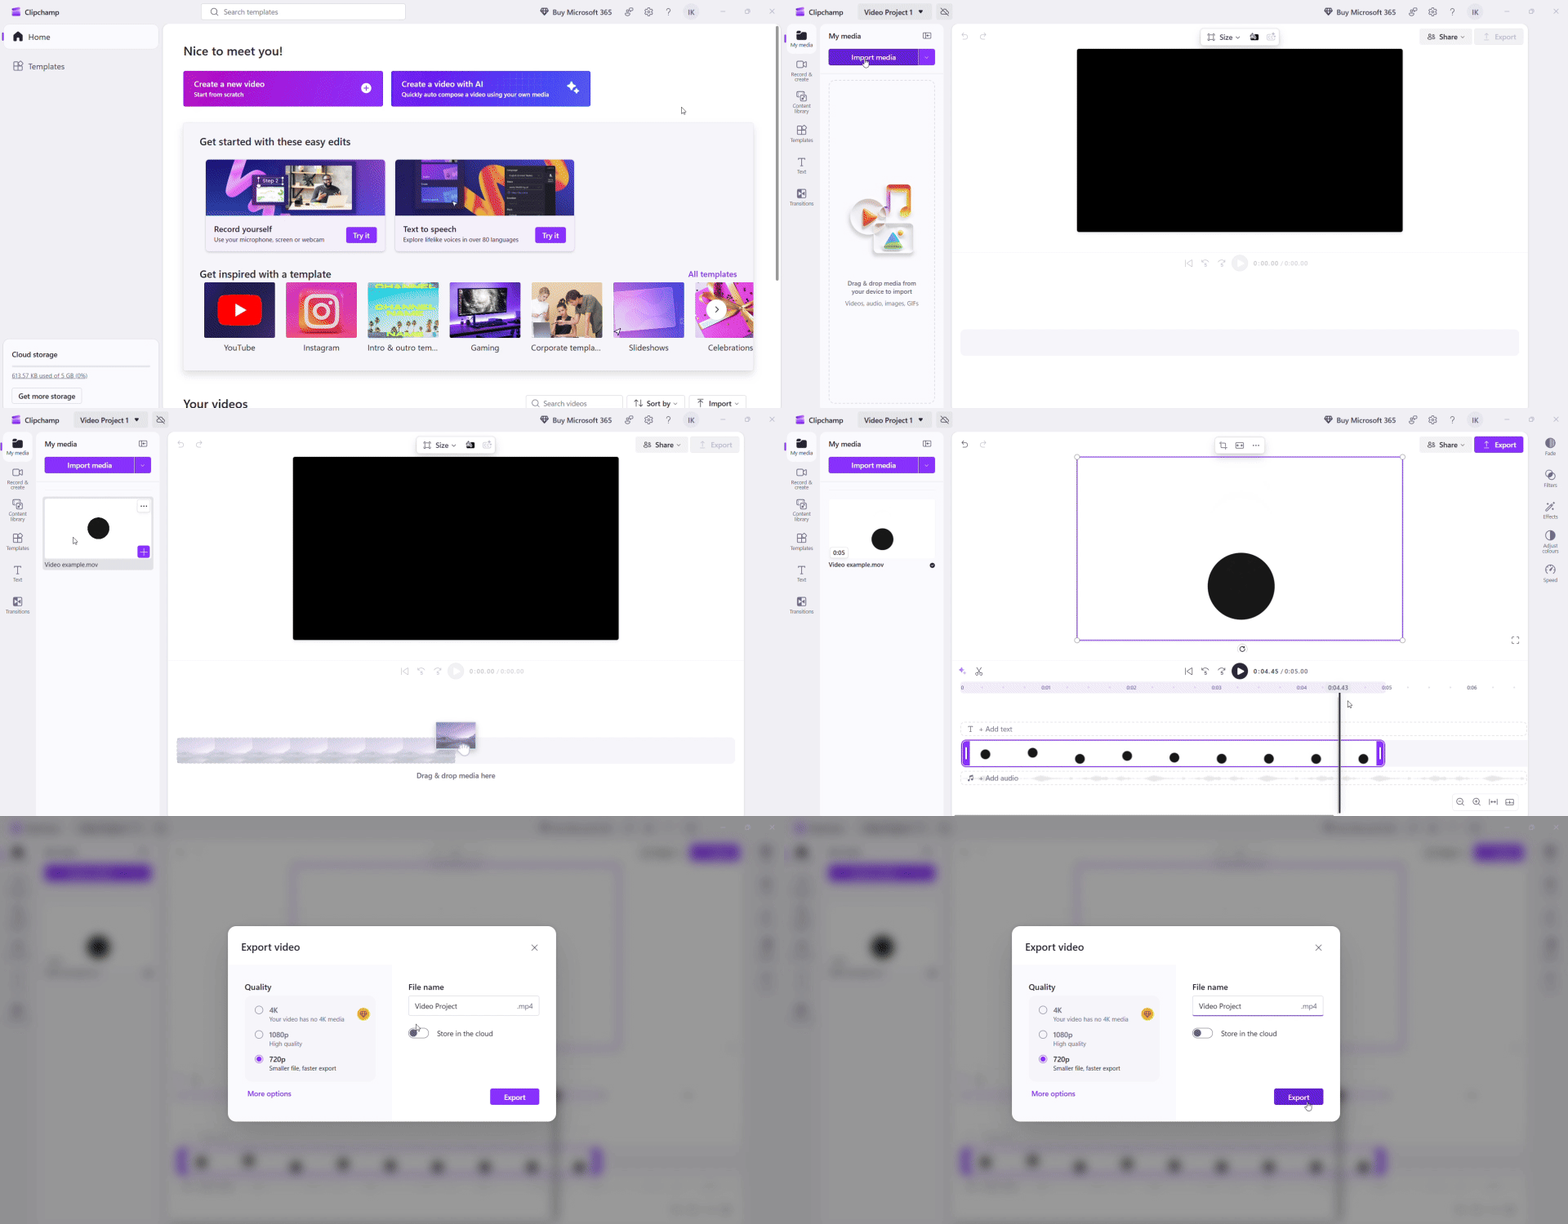
All Clipchamp exports produce high-quality H.264 MP4 files.
VLC Media Player
VLC works identically on Windows and Mac, but Windows users must remember one critical step: manually typing the .mp4 extension.
- 1Install VLC from videolan.org.
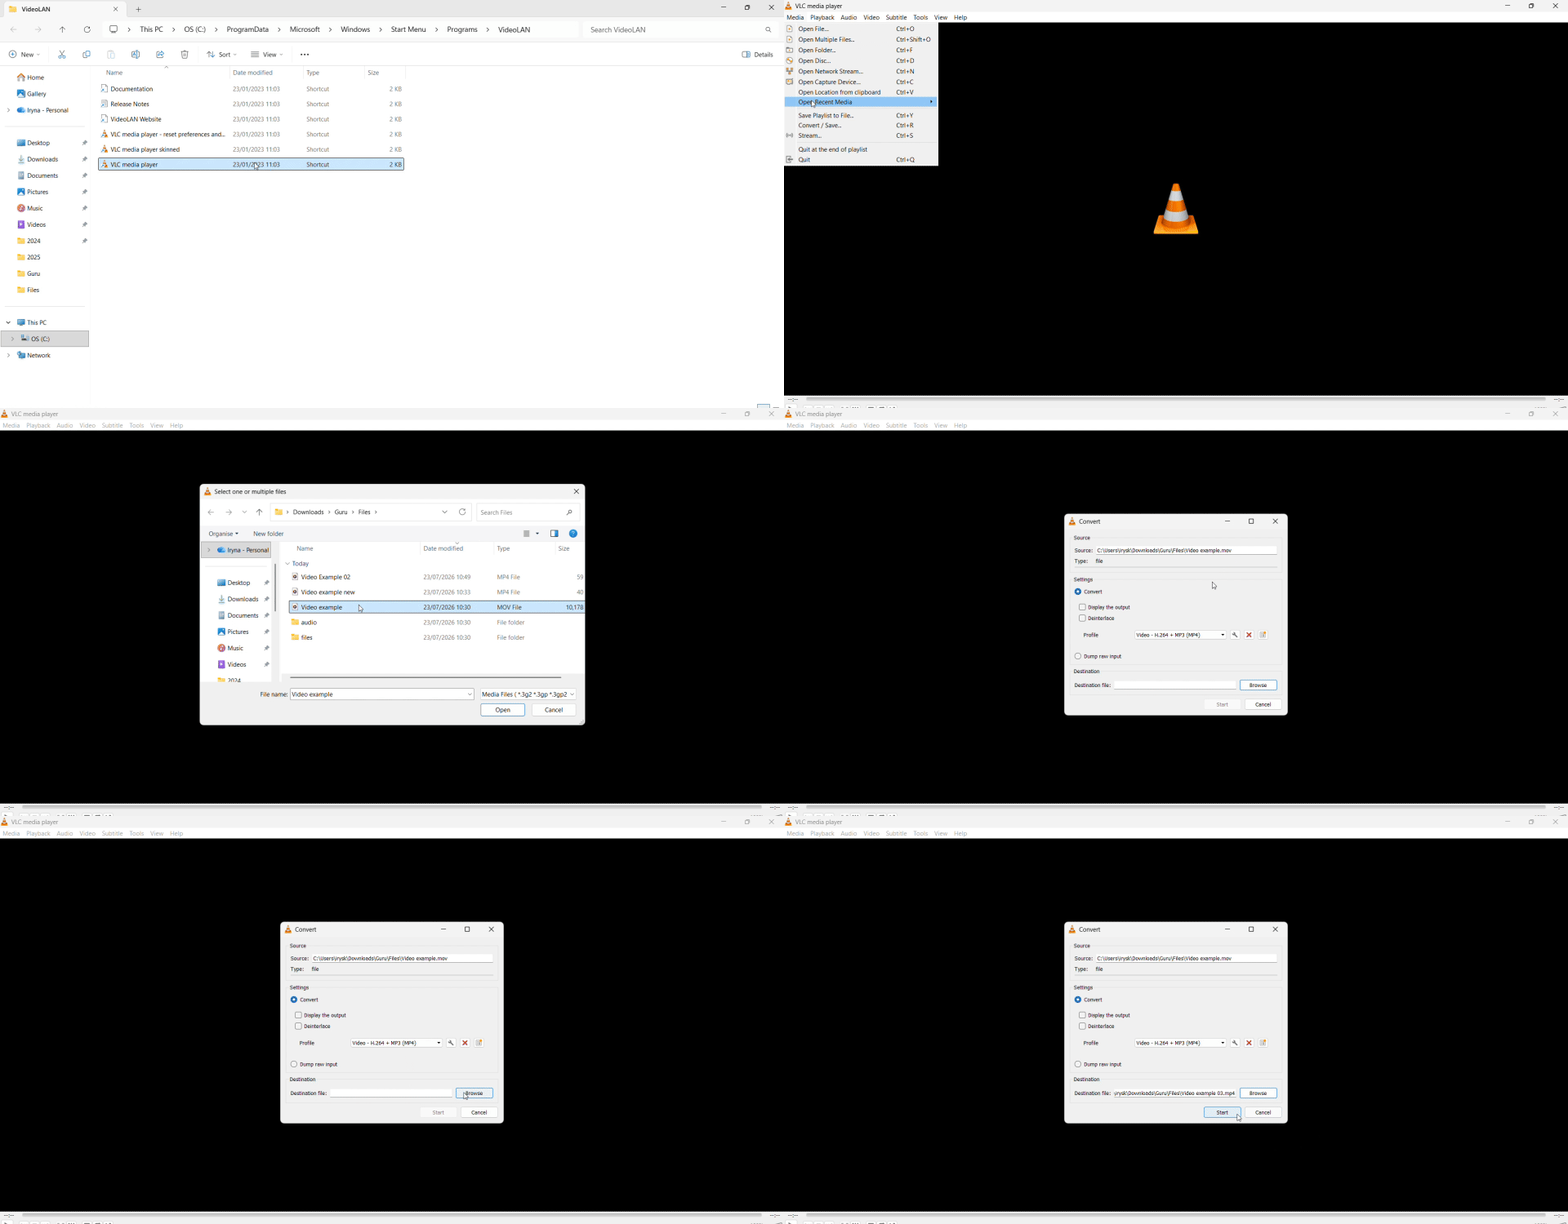
- 2Open VLC and press Ctrl+R (or go to Media > Convert/Save).
- 3Click Add, select your video, then click Convert/Save.
- 4In the Profile dropdown, choose "Video - H.264 + MP3 (MP4)."
- 5Click Browse to set the destination. Type the filename including .mp4 (e.g., "myvideo.mp4")—VLC may not append the extension automatically.
- 6Click Start.
HandBrake
HandBrake is purpose-built for video transcoding and offers presets for every common use case. Unlike VLC's remux option, HandBrake always re-encodes, which makes it ideal when you want to shrink file size or change the codec.
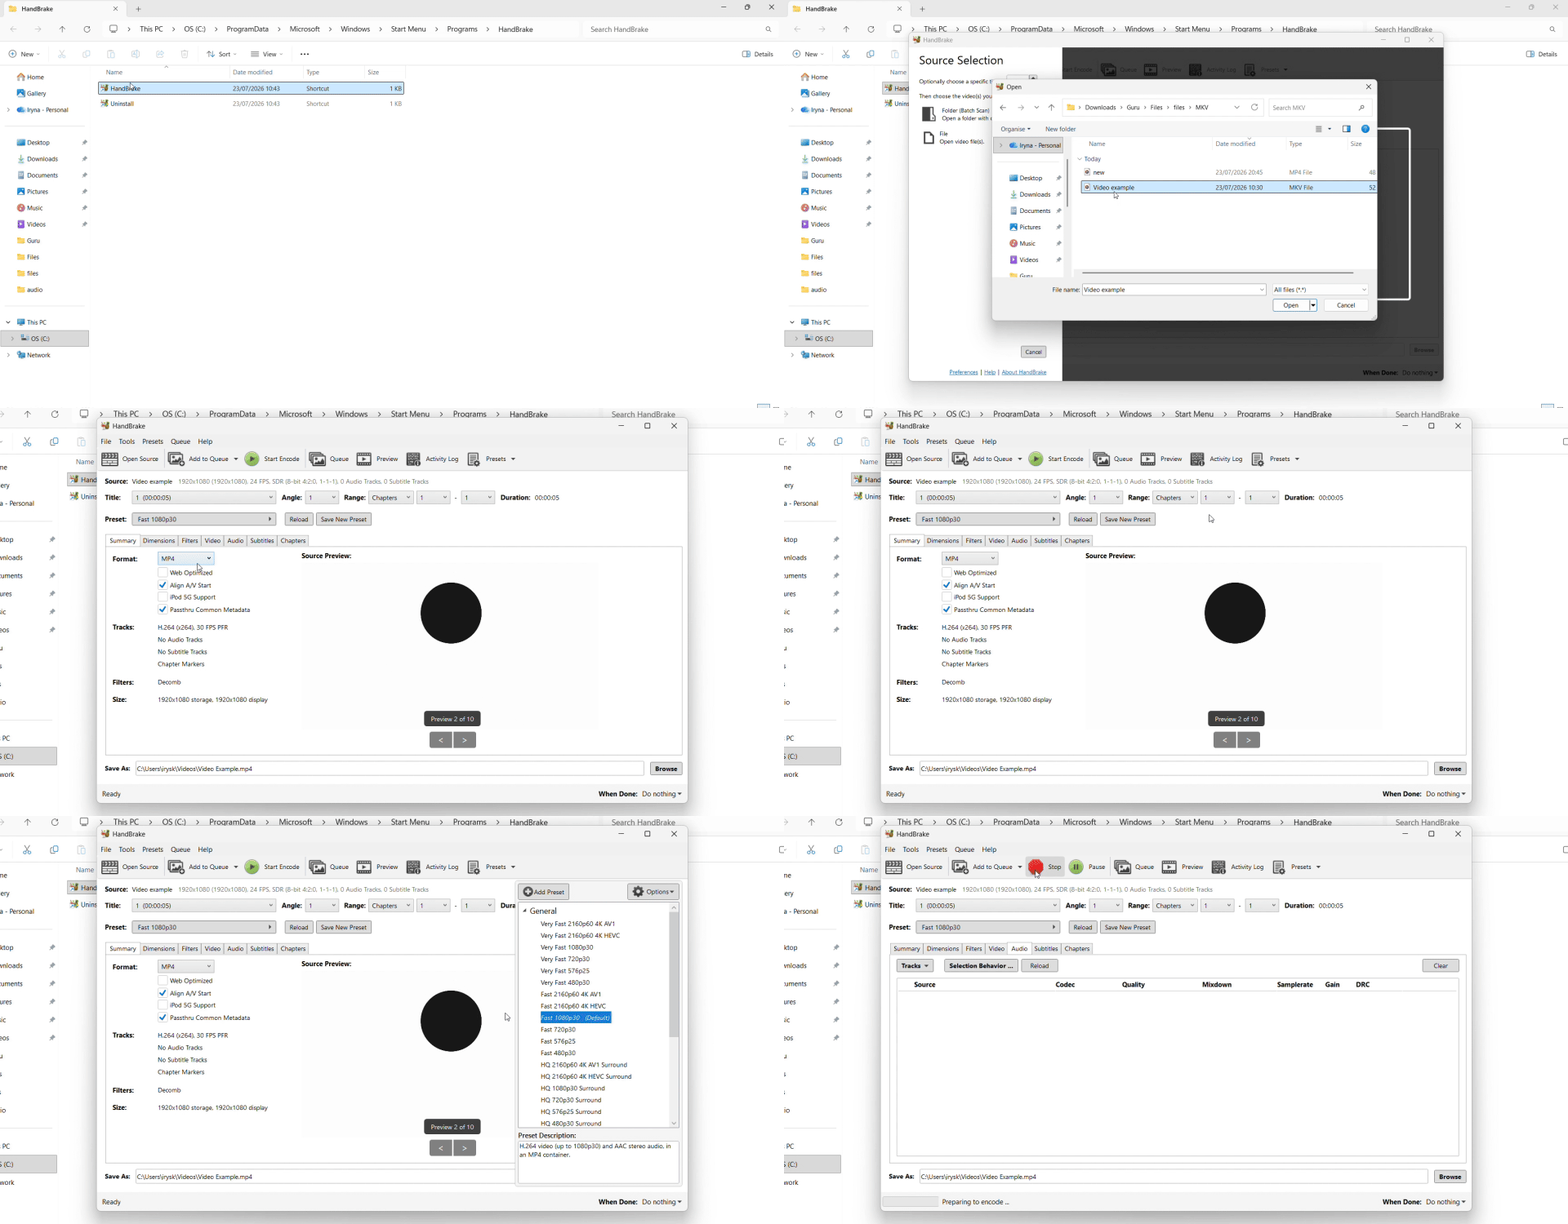
- 1Download HandBrake from handbrake.fr.
- 2Launch the app and click Open Source to select your video, or drag it onto the window.
- 3Ensure the Format dropdown shows "MP4."
- 4Choose a preset from the right panel—"Fast 1080p30" works for most HD videos.
- 5Click Start Encode at the top.
How to convert iPhone video to MP4
iPhones running iOS 11 or newer record video in HEVC (H.265) inside a .MOV container by default. This High Efficiency format maximizes storage savings but creates compatibility nightmares—HEVC won't play natively on most Windows PCs, older Macs, or web browsers.
Prevent the problem at the source. Before recording your next video, open Settings > Camera > Formats and switch from "High Efficiency" to Most Compatible. From that point forward, your iPhone records in H.264 + AAC inside .MOV—fundamentally MP4-compatible content that plays everywhere.
For existing iPhone videos
Quick rename on Mac (H.264 files only): If you already transferred the video to a Mac and Get Info confirms the H.264 codec, rename the .mov extension to .mp4. Apple Support officially endorses this method for H.264-encoded MOV files—the content doesn't change, only the label.
Convert after transferring to a computer:
- Mac: Use the rename trick (for H.264), iMovie, or VLC.
- Windows: Use Clipchamp or VLC as described above.
iMovie on iPhone: Open the video in iMovie for iOS, tap the Share icon, and choose Save Video. The app exports in MP4-compatible H.264 format.
AirDrop auto-conversion note: When you AirDrop an iPhone video to a non-Apple device (Android phone, Windows PC), iOS sometimes auto-converts HEVC to H.264 during transfer. The recipient gets an MP4-compatible file without manual conversion.
If you frequently need to convert iPhone video to MP4, changing the Camera format setting once solves the issue permanently.
Turn iPhone videos into shareable MP4 files\ Upload file
How to convert video to MP4 online
Online converters appeal to users who need cross-device access—Mac, Windows, Chromebook, iPad, Android—and prefer not to install desktop software. Browser-based tools require no admin rights, no downloads, and work identically on every operating system.
Before uploading to any online service, check these four factors:
File size limit. Most converters cap uploads at 100 MB to 1 GB. That's sufficient for short clips, screen recordings, and social media posts, but rejects full-length recordings or 4K footage. PDF Guru's tools have a 100 MB limit; for larger files, use the desktop methods earlier in this guide.
Privacy policy. Review how long files stay on the server and whether the service shares data with third parties. If you need to convert video to MP4 for private recordings—work meetings, interviews, family videos with identifying information—use desktop software instead.
Watermark or signup walls. Some converters add branding to your output. Read the fine print before uploading.
HTTPS encryption. Verify the URL starts with "https://" to ensure your upload is encrypted in transit.
For quick, straightforward conversions of smaller files, PDF Guru offers a clean browser-based workflow with format-specific converters for MOV and MKV sources.
Tips for better video to MP4 conversion
Always identify your source format and codec first. This single step determines whether you need a two-second rename or a twenty-minute re-encode. Open Get Info (Mac) or Properties (Windows) and check the Codecs field before choosing a conversion method.
Try a lossless container swap for H.264 content. Most iPhone .MOV files shot in "Most Compatible" mode and many MKV downloads already contain H.264 video and AAC audio—MP4-compatible codecs wrapped in a non-MP4 container. Renaming the extension (Mac) or using VLC's remux option preserves 100% of the original quality and finishes in seconds.
iPhone users: enable Most Compatible format now. Open Settings > Camera > Formats and select Most Compatible. This prevents HEVC recording and ensures every future video is MP4-compatible from the moment you press record. You'll avoid the entire how to convert iPhone video to MP4 question going forward.
Keep the original video file until verification. After conversion, play the new MP4 on your target device—the TV, tablet, or web browser where it will actually be used. Verify all audio tracks play correctly, subtitles appear if needed, and the video runs smoothly. Only then delete the original.
For batch conversion of many files, use desktop tools. If you need to convert video to MP4 for dozens of clips, HandBrake, VLC, and FFmpeg handle queues efficiently. Most online converters cap batch uploads or queue large jobs for hours—desktop software processes files sequentially on your machine without upload time.