
If you're wondering how to convert M4A to MP3, you're likely facing a compatibility issue. Your M4A audio file won't play on your car stereo, Android device, or an older MP3 player. MP3 remains the universal standard after 30+ years, while M4A is Apple's format that not every device understands. The good news: conversion takes minutes with the right tool, whether you're on Mac, Windows, or using a browser-based converter.
Why convert M4A to MP3?
M4A is an excellent audio format, but it doesn't work everywhere. Here's when you need to know how to convert M4A to MP3:
Device compatibility is the most common reason. Older car stereos, budget MP3 players, basic smart speakers, and some Android devices don't handle M4A reliably. They're designed for MP3, and anything else simply won't play.
Sharing without playback problems matters when you send audio files to others. Recipients on unfamiliar devices won't have issues with MP3, while M4A might not open at all on their system.
Upload platform requirements force the conversion. Older podcast hosts, certain content management systems, and legacy audio platforms accept only MP3. If the upload form rejects your M4A file, you need to convert it.
MP3 is the universal standard that works everywhere. It's been the audio format for three decades, and nearly every device manufactured since the 1990s plays MP3 files without question.
One honest caveat: at the same bitrate, M4A's AAC codec typically sounds better than MP3. This conversion trades quality for compatibility — it's not an audio upgrade; it's a practical solution to device limitations.

How to convert M4A to MP3 using PDF Guru
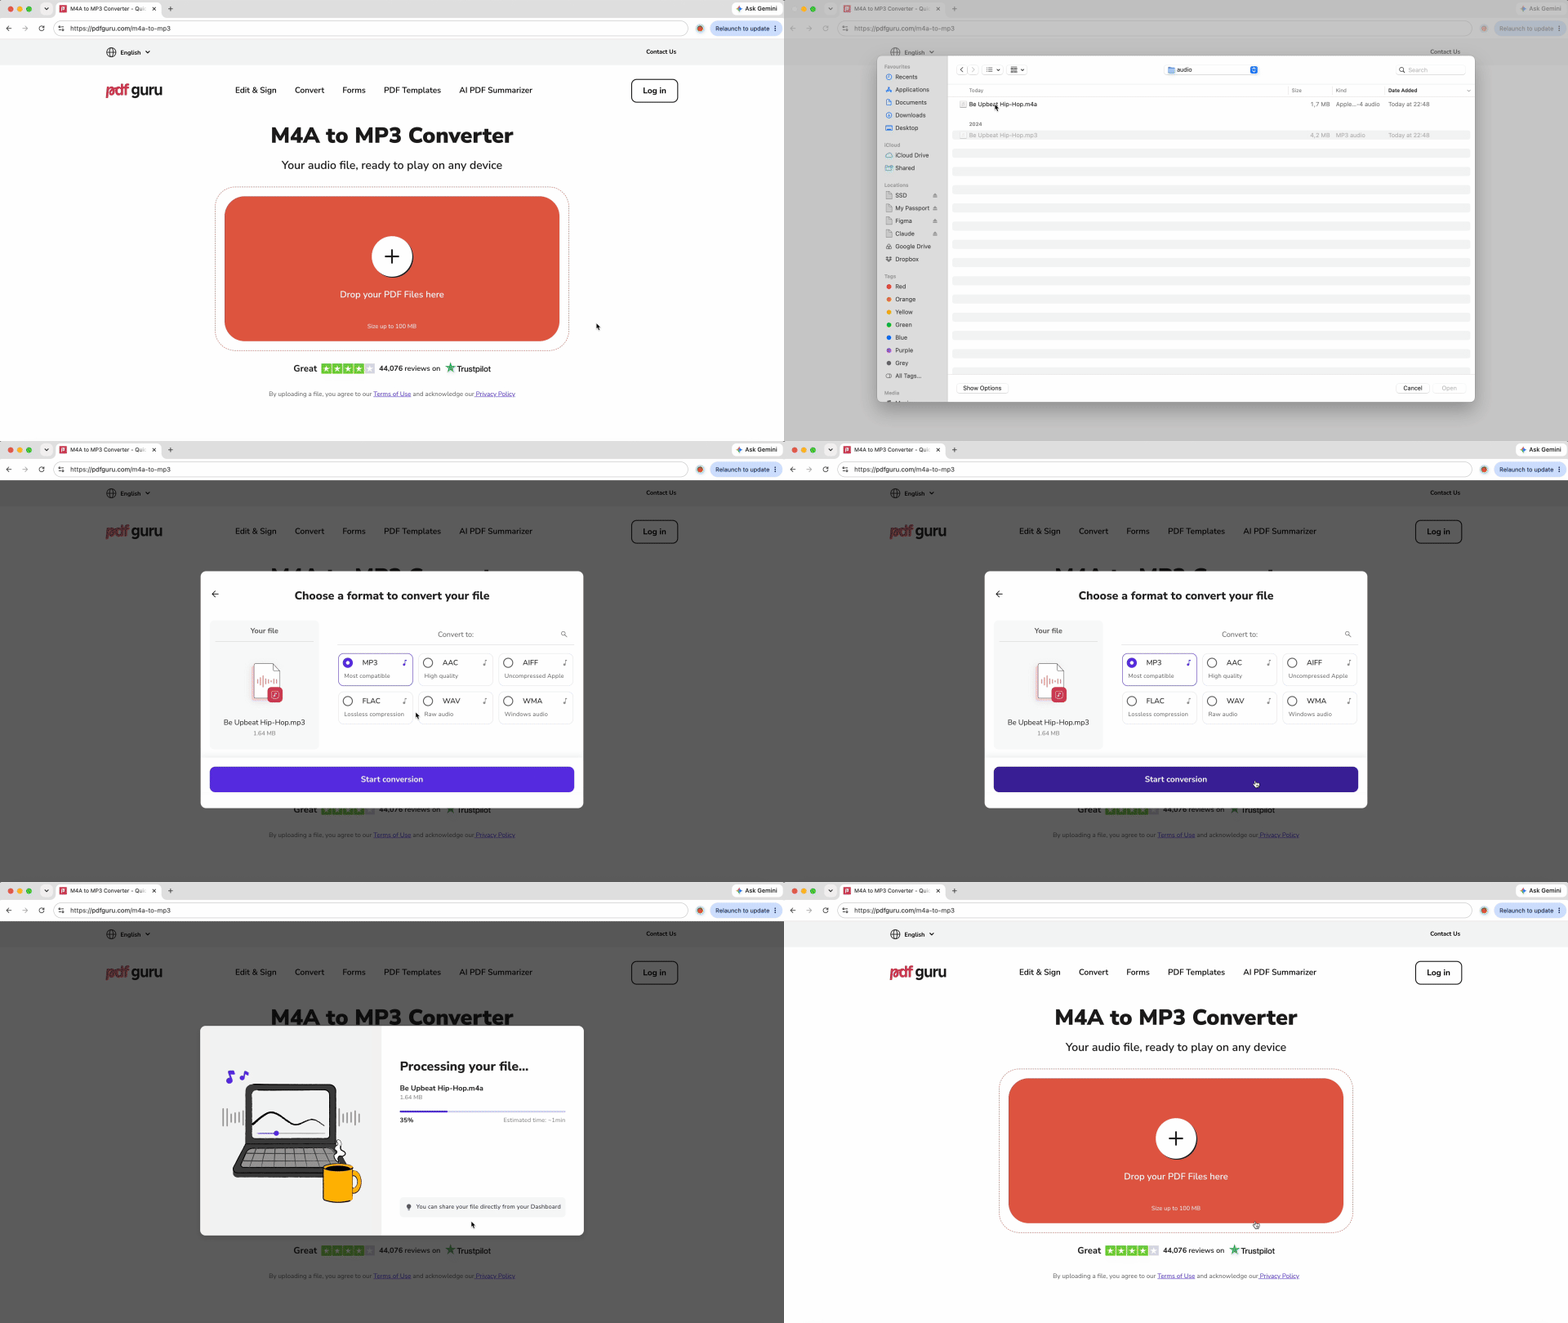
Convert M4A to MP3 with PDF Guru's browser-based tool — it works on Mac, Windows, Linux, iPhone, and Android without installing desktop software.
Here are the steps:
- 1Open the converter page in your browser.
- 2Upload your M4A file by dragging it into the upload area or clicking the upload button to select it from your device.
- 3The tool automatically re-encodes the audio as MP3 with no settings to configure.
- 4Download the converted MP3 file once the conversion completes.
The conversion is fully automatic — you don't select bitrates or adjust quality settings manually. The tool handles the re-encoding process and delivers a standard MP3 file ready for playback on any device.
Browser-based conversion offers clear advantages when you don't want to install desktop software or change your Apple Music app settings. It works on any device with internet access, including Chromebooks, tablets, and smartphones. The tool supports M4A files up to 100 MB, which covers most music tracks, podcast episodes, and voice memos.
How to convert M4A to MP3 on Mac
macOS includes three native methods for conversion, all built into the operating system. Choose the method that fits your workflow best.
Apple Music app
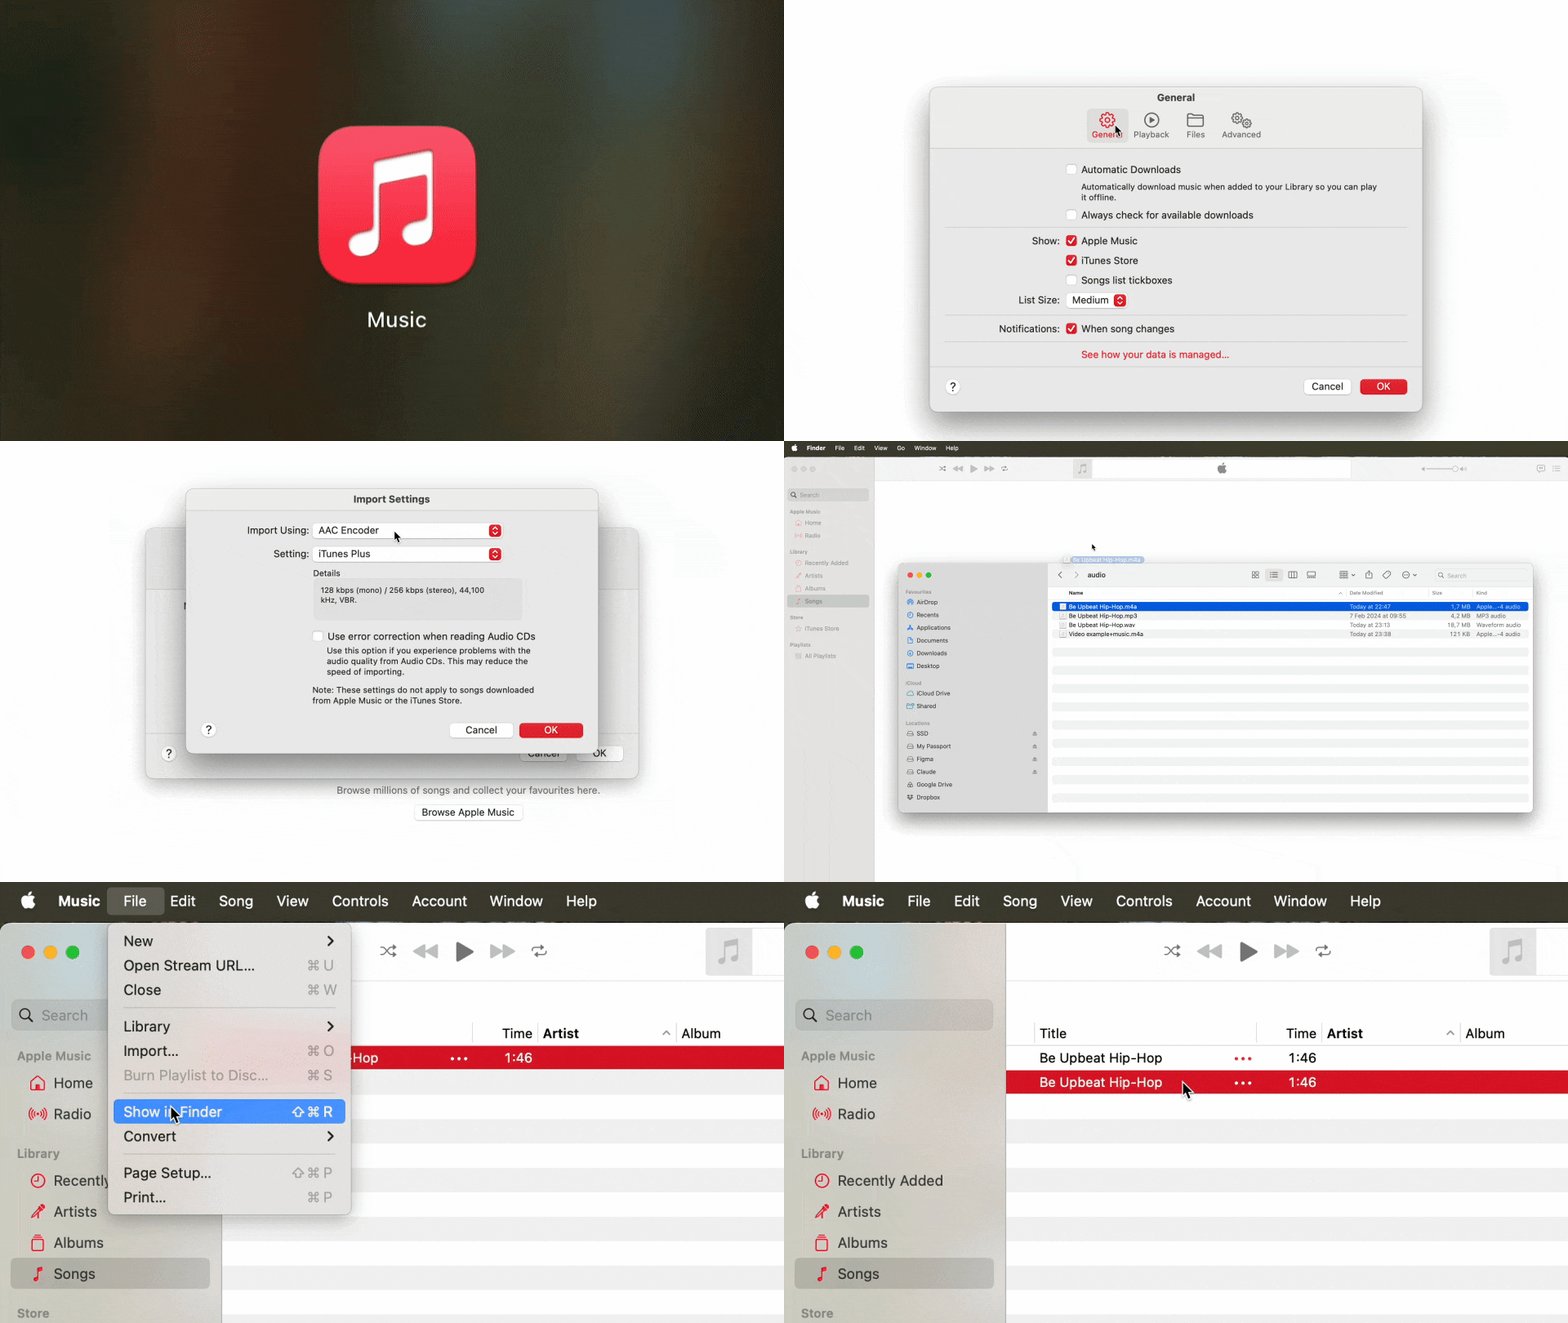
If you're running macOS Ventura or later and want to know how to convert M4A to MP3 on Mac, the Apple Music app is the fastest route.
- 1Open Apple Music and go to Music > Settings in the menu bar.
- 2Click the Files tab, then click Import Settings.
- 3Set "Import Using" to MP3 Encoder from the dropdown menu.
- 4Click OK to save the setting.
- 5Drag your M4A file from Finder into the Apple Music library window.
- 6Select the file you just added in your library.
- 7Go to File > Convert > Create MP3 Version.
- 8The new MP3 file appears next to the original in your library.
- 9Right-click the MP3 file and choose Show in Finder to locate it on your hard drive.
The MP3 file is now ready to copy to any device or upload to any platform.
iTunes
If you're running an older version of macOS, you'll use iTunes instead of the Apple Music app. The workflow is nearly identical.
- 1Open iTunes and go to iTunes > Preferences in the menu bar.
- 2Click the General tab, then click Import Settings.
- 3Set "Import Using" to MP3 Encoder.
- 4Click OK to save.
- 5Drag your M4A file into the iTunes library.
- 6Select the file, then go to File > Convert > Create MP3 Version.
The converted MP3 appears in your library next to the original M4A file.
GarageBand
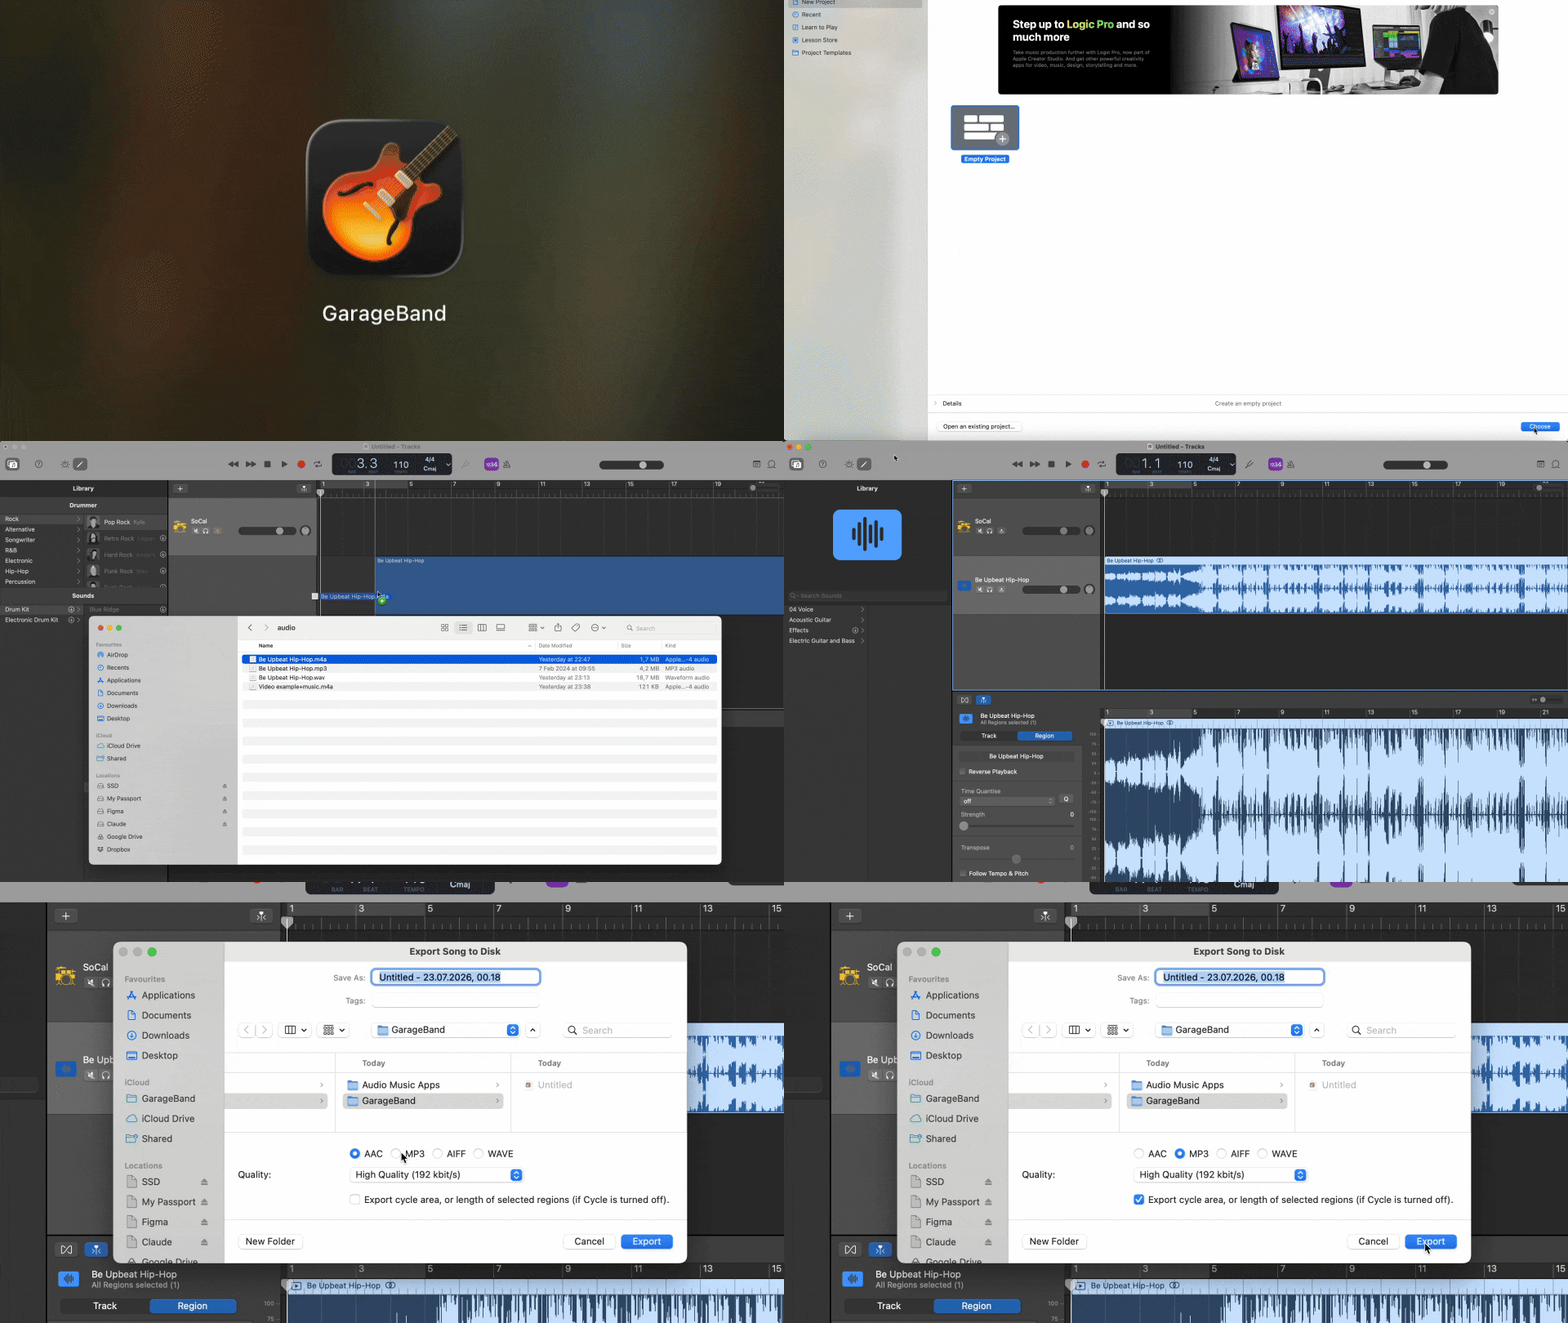
GarageBand offers an alternative method if you don't want to modify your Music app import settings.
- 1Open GarageBand and select File > New.
- 2Choose Empty Project, then click Choose.
- 3Drag your M4A file directly into the Tracks area.
- 4
- 5Select the track containing your audio.
- 6
- 7Select MP3 as the format and choose your preferred quality setting.
- 8Select "Export cycle area, or length of selected regions (if Cycle is turned off)."
- 9Click Export and choose where to save the file.
GarageBand is particularly useful for batch conversions when you create an Automator Quick Action. Right-click any M4A file in Finder, choose your custom Quick Action, and the conversion runs automatically.
How to convert M4A to MP3 on Windows
Windows offers several conversion methods, from media players to professional audio editors. Here's how to convert M4A files to MP3 on different Windows tools.
VLC Media Player
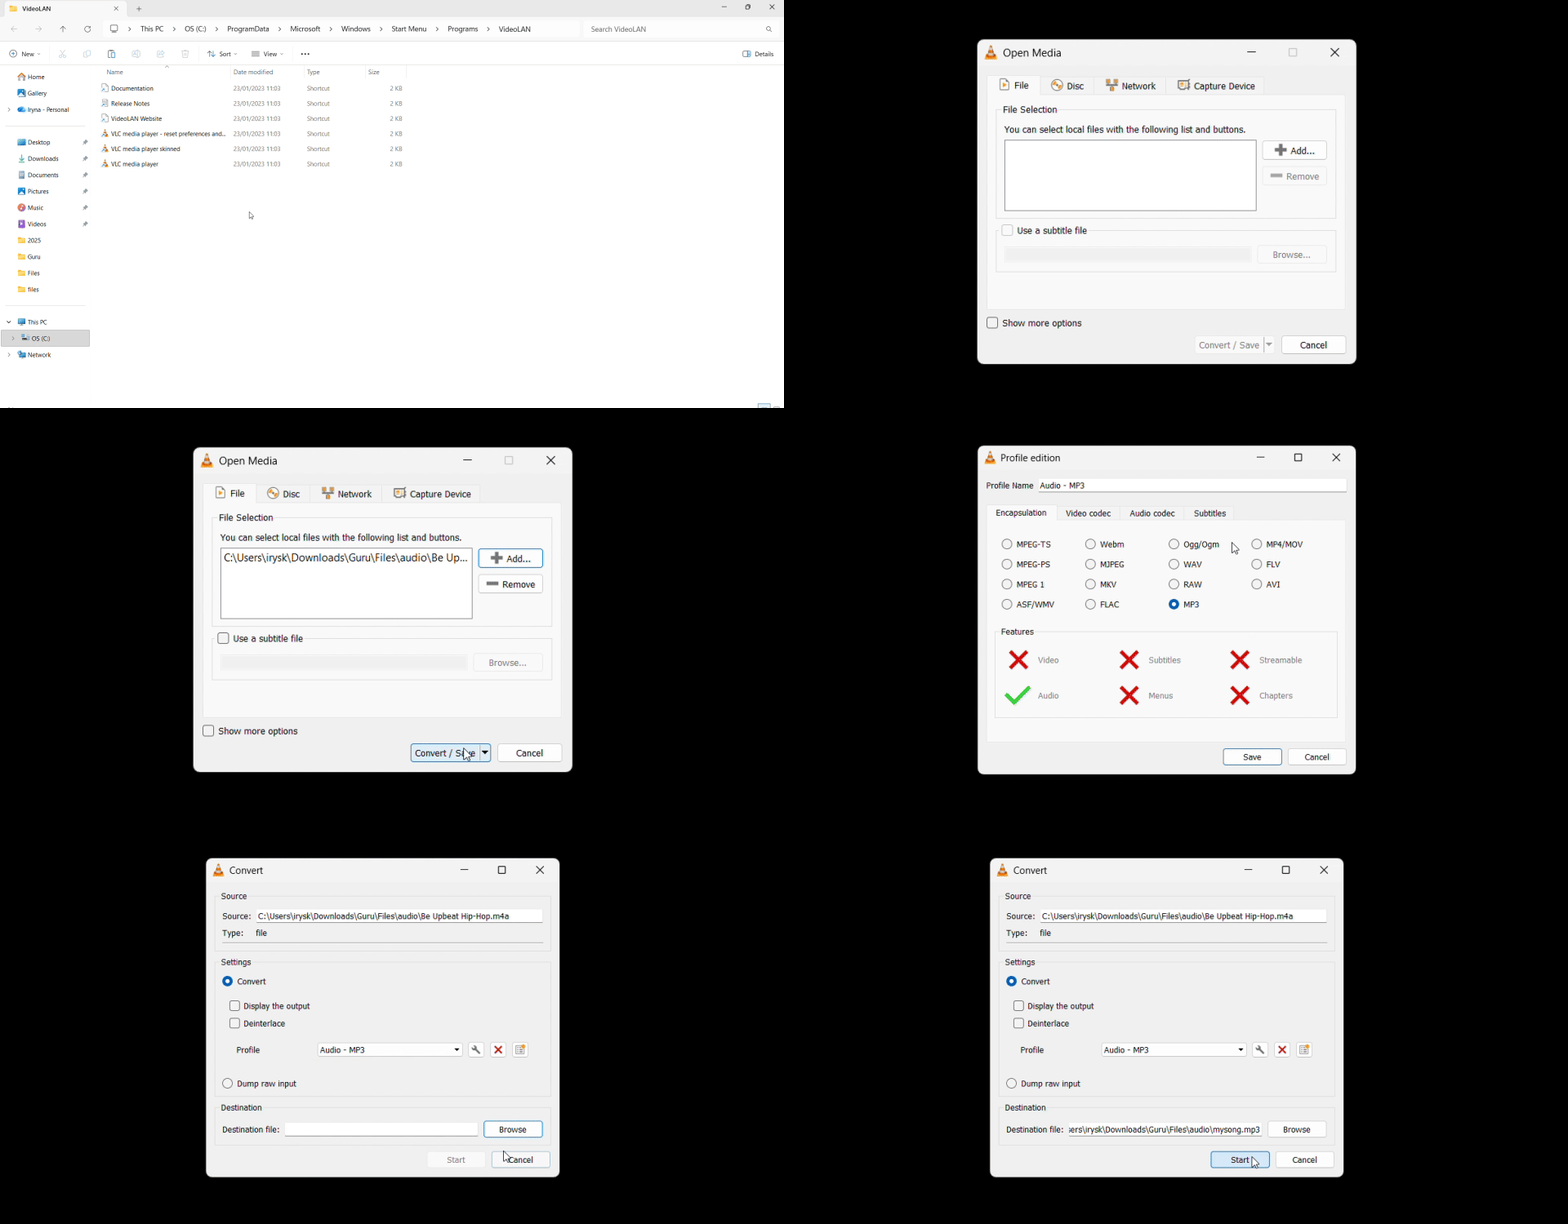
VLC is an open-source media player that includes powerful conversion features. If you need to know how to convert M4A to MP3 on Windows, VLC is the most reliable method.
- 1Download and install VLC Media Player if you don't already have it.
- 2Open VLC and go to Media > Convert/Save (or press Ctrl+R).
- 3
- 4Click the Convert/Save button at the bottom.
- 5Under Profile, select Audio - MP3 from the dropdown.
- 6For better quality control, click the wrench/spanner icon next to the Profile dropdown to edit the selected profile.
- 7Go to the Audio codec tab and set Bitrate to 192 kbps for general use or 320 kbps for music archiving.
- 8Click Save to close the profile editor.
- 9Click Browse to choose where to save your output file.
- 10Type the full filename including the extension — for example, "mysong.mp3" — in the Save As field. VLC may not automatically append .mp3 to your output filename, and if you omit the extension, Windows won't know how to open the file.
- 11Click Start to begin the conversion.
VLC processes the file and saves the MP3 to your chosen location.
iTunes or Apple Music for Windows
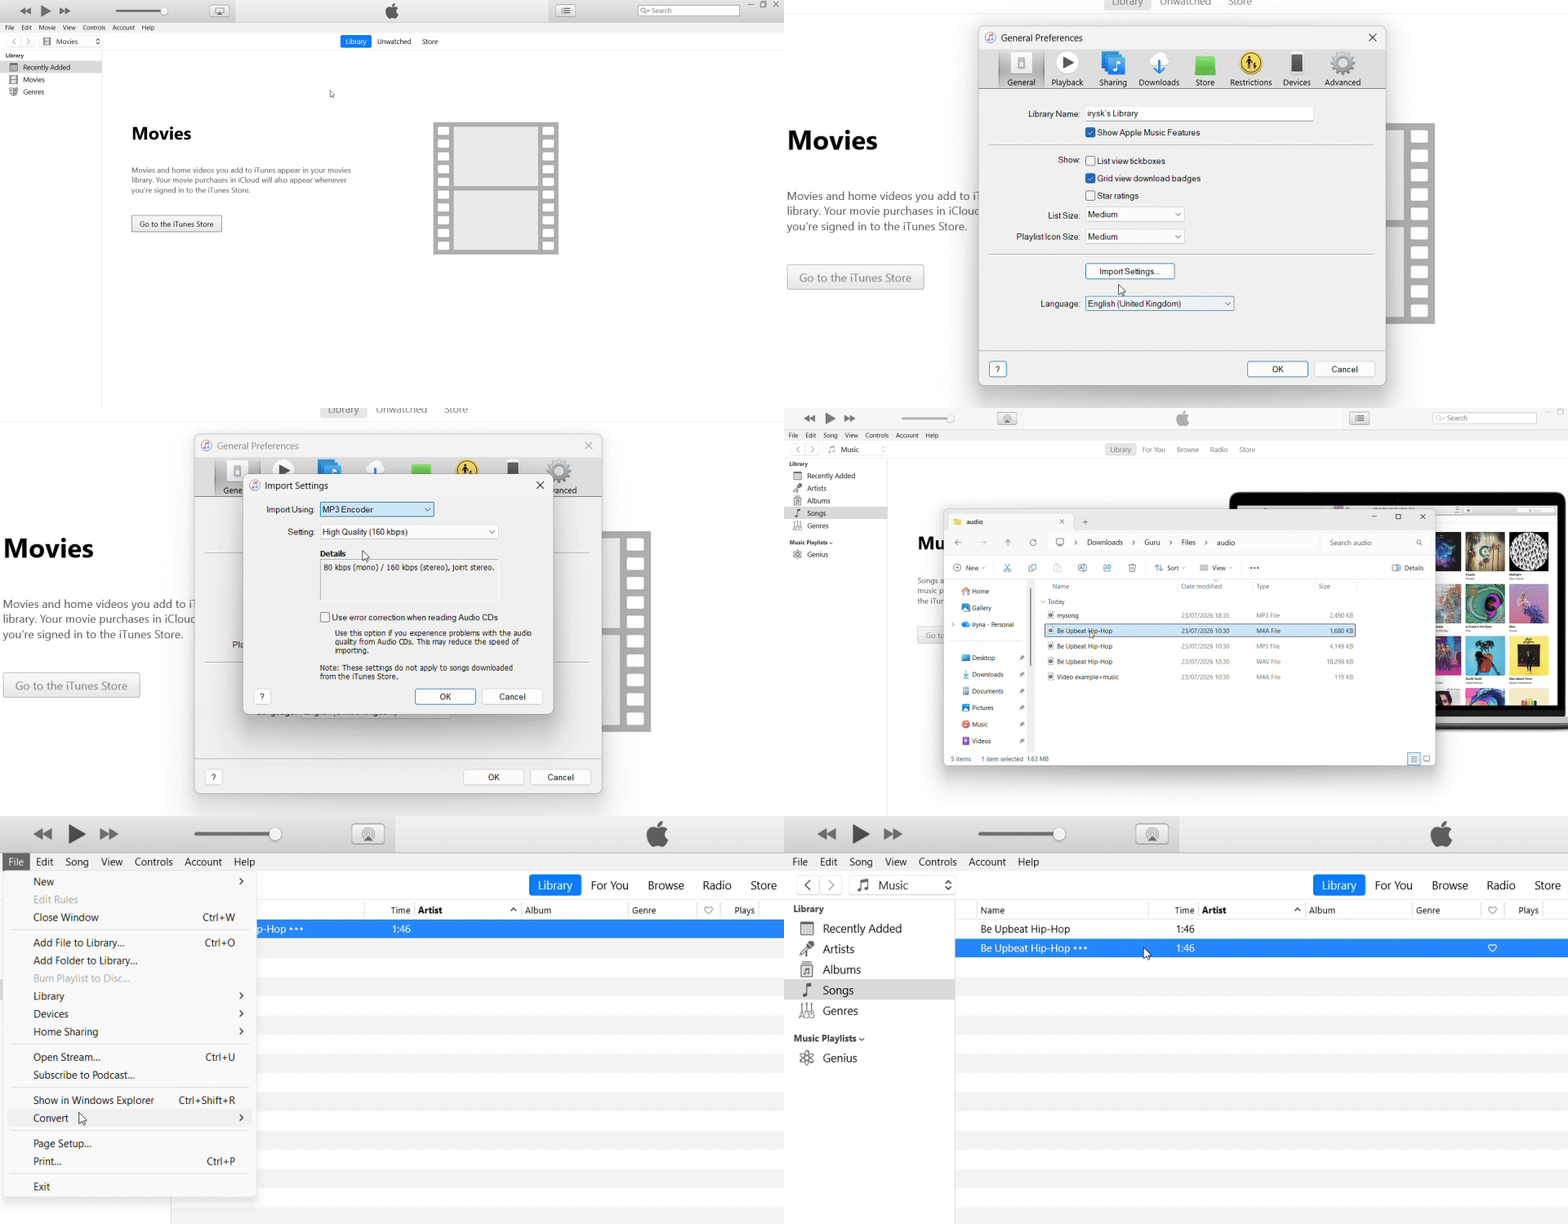
Apple's music apps are available for Windows through the Microsoft Store. The conversion workflow mirrors the Mac process.
- 1Install iTunes or Apple Music from the Microsoft Store if you don't have it.
- 2Open the app and go to Edit > Preferences.
- 3Click the General tab, then click Import Settings.
- 4Set "Import Using" to MP3 Encoder.
- 5Click OK to save.
- 6Drag your M4A file into the library.
- 7Select the file, then go to File > Convert > Create MP3 Version.
The converted MP3 appears in your library and can be found by right-clicking it and choosing Show in Windows Explorer.
Audacity

Audacity is an open-source audio editor that handles conversion along with editing capabilities.
- 1Download and install Audacity if you don't have it.
- 2Open Audacity and go to File > Open.
- 3Select your M4A file.
- 4Go to File > Export Audio.
- 5Set the format dropdown to MP3.
- 6Choose your quality settings and click Export.
Recent Audacity versions include the LAME MP3 encoder by default, so you don't need to install additional components.
FFmpeg
If you're comfortable with command-line tools, FFmpeg offers fast, scriptable conversion.
Open Command Prompt or PowerShell and run:
ffmpeg -i input.m4a -codec:a libmp3lame -b:a 192k output.mp3Replace "input.m4a" with your source filename and "output.mp3" with your desired output name. The -b:a 192k parameter sets the bitrate to 192 kbps; adjust as needed.
Windows Media Player cannot convert M4A to MP3
This is a critical clarification because many users search for this method first and encounter frustration.
Windows 11 includes two versions of Windows Media Player: the new WMP app from the Microsoft Store and the Legacy Windows Media Player. Neither can convert M4A files to MP3.
The new Windows Media Player is a playback-only application with no conversion features. Legacy Windows Media Player includes a "Rip" feature, but it only works on audio CDs — it cannot convert M4A files already in your library to MP3 format.
Both versions will play M4A files, but if you need to know how to convert M4A to MP3 on Windows, you must use VLC, iTunes, Audacity, or another tool. Windows Media Player simply doesn't have the capability.
How to convert M4A to MP3 online
Online converters offer cross-device flexibility. They work on Mac, Windows, Chromebook, iPad, and Android without installing software, making them ideal for occasional one-off conversions or when you don't have admin rights to install desktop applications.
Users choose online tools when they need quick access from any device. A student on a school Chromebook, an employee on a locked-down work PC, or someone using a friend's computer can convert files without changing system settings or downloading software.
Before uploading your M4A file to any online converter, check these five factors:
- 1Privacy policy and file deletion timeline — Confirm how long files remain on the server after conversion. Responsible services delete uploads within hours.
- 2Maximum file size — Most online converters cap uploads at 100 to 500 MB. Long audiobooks or lossless ALAC files may exceed these limits.
- 3Watermarks and signup requirements — Some tools add audio watermarks to conversions or gate downloads.
- 4HTTPS encryption during upload — Your browser's address bar should show a padlock icon. Unencrypted uploads expose your files in transit.
- 5Batch conversion support — If you have multiple files, check whether the tool queues them or requires separate uploads.
An important privacy tip: never upload private voice memos, confidential meeting recordings, or sensitive audio to any online tool, even those with strong privacy policies. Online conversion means your audio passes through a third-party server. For sensitive content, use a desktop method that keeps files on your device.
PDF Guru offers an online audio converter that works in any modern browser. The M4A to MP3 tool processes files without manual configuration and supports conversion on any device with internet access.
Will converting M4A to MP3 lose quality?
Yes, converting M4A to MP3 causes some quality loss. Here's why and how to minimize it.
Both M4A (using the AAC codec) and MP3 are lossy formats, meaning they compress audio by discarding information your ears are less likely to notice. When you convert M4A to MP3, you're re-encoding one lossy format into another lossy format. This adds an additional compression step, and each compression cycle discards more audio data.
The technical reality: if you start with M4A at 256 kbps AAC and convert it to MP3 at 256 kbps, the MP3 will sound slightly worse than the original M4A because you've applied compression twice.
Here's how to minimize quality loss when you convert M4A to MP3:
Use a high output bitrate. Set your MP3 encoder to 192 kbps for general listening or 256 to 320 kbps for music you want to preserve at near-original quality. Lower bitrates introduce audible artifacts like metallic ringing on cymbals or muddy vocals.
Match or exceed the source M4A bitrate. Right-click your M4A file and check Properties (Windows) or Get Info (Mac) to see its bitrate. If your source is 128 kbps AAC, converting to 128 kbps MP3 is reasonable. Converting to 96 kbps MP3 guarantees audible quality loss.
Don't set MP3 bitrate higher than the source. If your M4A is 128 kbps, encoding the MP3 at 320 kbps won't improve quality. MP3 cannot reconstruct audio information that AAC already compressed away. You'll just create a larger file with no quality benefit.
Always keep the original M4A file until you've confirmed the MP3 plays correctly on your target device. Once you delete the M4A, you can't recover the lost quality.
One special case to mention: DRM-protected M4P files (purchased from the iTunes Store before 2009) cannot be converted by standard tools. These files have digital rights management that prevents conversion. You'll need to play them back and re-record the audio, or re-download unprotected versions from Apple Music if you have an active subscription.
Tips for better M4A to MP3 conversion
These five strategies help you maintain quality and streamline your workflow when you convert an M4A file to MP3.
Match bitrate to content type. Not all audio needs the same quality level. Use 128 kbps for voice memos and podcasts where speech clarity matters more than fidelity. Use 192 to 256 kbps for general music listening. Reserve 320 kbps for archival purposes or when you're preserving music you care about deeply. Higher bitrates create larger files, so balance quality against storage space and upload speed.
Keep the original M4A file until you verify the MP3. Don't delete the source file immediately after conversion. Play the MP3 on the target device — your car stereo, MP3 player, or Android phone — to confirm it sounds acceptable and plays without errors. Once you delete the M4A, you can't recover the audio quality you lost in conversion.
Use desktop software for batch conversion of many files. If you need to convert 50 or more M4A files, use Apple Music, iTunes, VLC, Audacity, or FFmpeg. Online tools often limit batch size or queue uploads slowly. Desktop software processes multiple files faster and doesn't require uploading gigabytes of audio to a server.
Check metadata tags after conversion. Some conversion methods strip or alter ID3 tags (the embedded information like artist name, album title, track number, and album artwork). After converting, open the MP3 file in your media player and verify this information carried over correctly. If tags are missing, use an MP3 tag editor to restore them.
Consider whether you truly need MP3. If you don't strictly need MP3 compatibility, keep the M4A file. At the same file size, AAC sounds better than MP3. Only convert when you've confirmed your target device won't play M4A. For lossless archiving, consider converting M4A to FLAC or WAV to MP3 only when MP3 compatibility is essential.