
WAV and MP3 serve different purposes in the audio world. WAV files are the gold standard for recording and editing because they preserve every detail of the original sound, but their massive file sizes make them impractical for everyday listening, sharing, and storage. Understanding how to convert WAV to MP3 helps you strike a balance between quality and convenience, giving you files that sound excellent on headphones, car stereos, and streaming platforms while taking up a fraction of the space.
Why convert WAV to MP3?
The differences between WAV and MP3 go beyond technical specifications. Each format makes different trade-offs, and understanding what you gain (and what you give up) helps you decide when to convert.
File size is the most dramatic difference. WAV files are 5 to 10 times larger than MP3 files. A typical 3-minute song stored as WAV occupies around 30 MB, while the same song at 192 kbps MP3 quality takes only 3 MB. A full album in WAV can easily consume several gigabytes of storage, which adds up quickly when you're building a music library or archiving podcast episodes.
Compatibility is another major factor. MP3 has been the universal audio standard for more than 25 years. Every car stereo, smart speaker, MP3 player, streaming platform, and smartphone manufactured in recent decades plays MP3 files without hesitation. WAV is supported by most devices, but it's inefficient on portable hardware and often requires more processing power to decode during playback.
Metadata support matters when you organize music libraries. MP3 files support ID3 tags, which store artist names, song titles, album information, release years, and cover artwork. Most music apps use these tags to sort and display your collection. WAV's metadata support is extremely limited, and most music software ignores whatever tags WAV does carry, leaving your files unorganized.
Sharing and email become frustrating with WAV files. Large attachments exceed email size limits or take too long to upload to cloud storage. MP3 files upload quickly and stay within reasonable file-size boundaries for most platforms.
It's important to be honest about the trade-off: WAV is the higher-quality format because it's uncompressed. When you figure out how to convert WAV files to MP3, you're trading a small amount of audio quality for significant gains in file size, compatibility, and metadata support. For most listening situations, the quality difference is imperceptible.

How to convert WAV to MP3 using PDF Guru
PDF Guru's WAV to MP3 converter runs entirely in your browser, which means it works on Mac, Windows, Linux, iPhone, and Android without installing software. The process is fully automatic and requires no configuration.
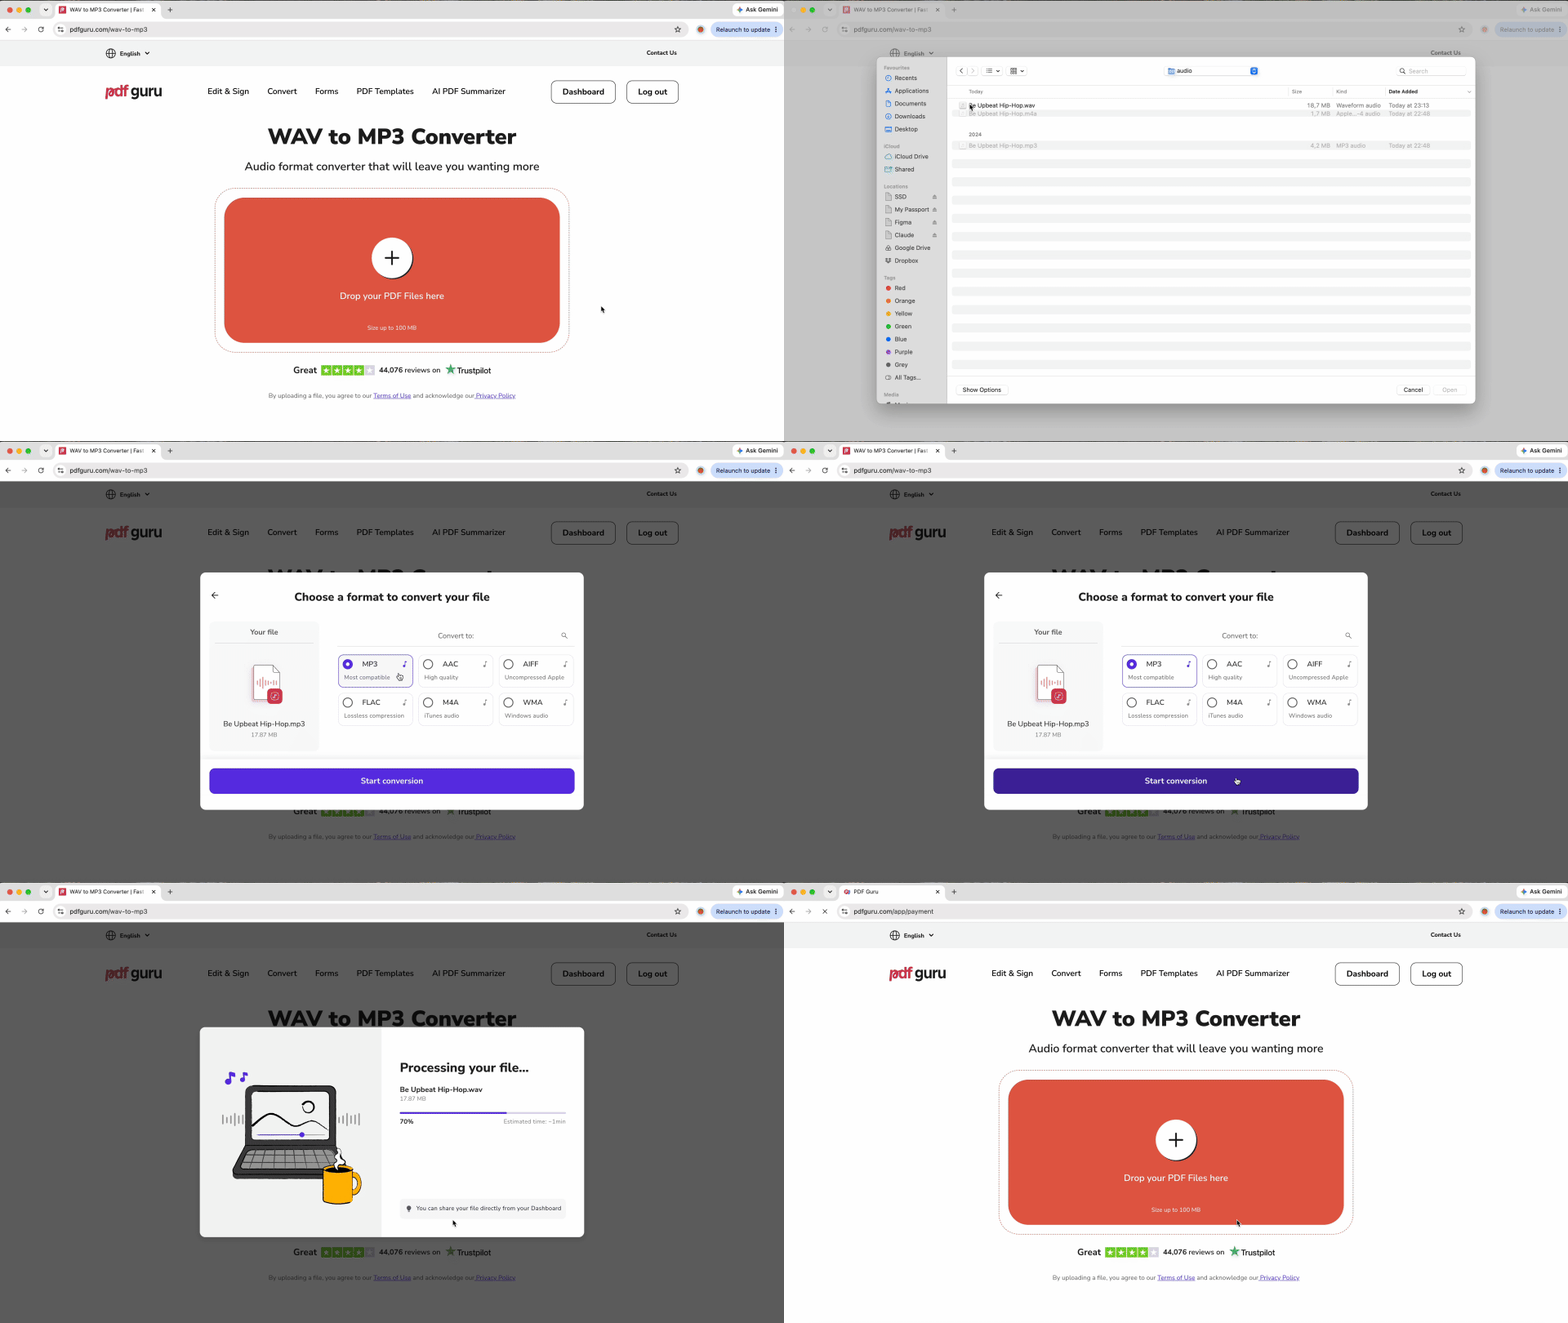
- 1Open the converter page in any modern browser.
- 2Upload your WAV file by dragging it into the upload area or clicking the upload button to select it from your device.
- 3The tool encodes the audio as MP3 automatically without requiring you to choose settings or bitrates.
- 4Download the converted MP3 file once the encoding finishes.
The browser-based approach works well for quick one-off conversions, especially when you're working on a device where you can't install desktop software. However, WAV files are inherently large by nature. One hour of CD-quality WAV audio is roughly 600 MB, and full albums or long recordings frequently exceed typical online file-size limits. If you're converting large files or batches of recordings, the desktop methods described below handle those scenarios more efficiently.
How to convert WAV to MP3 on Mac
Mac users have three native options for converting audio, all available at no cost or already installed.
Apple Music app
The Apple Music app is the easiest method on modern macOS because it's already installed and requires no additional software. This is the simplest way to learn how to convert WAV to MP3 on Mac.
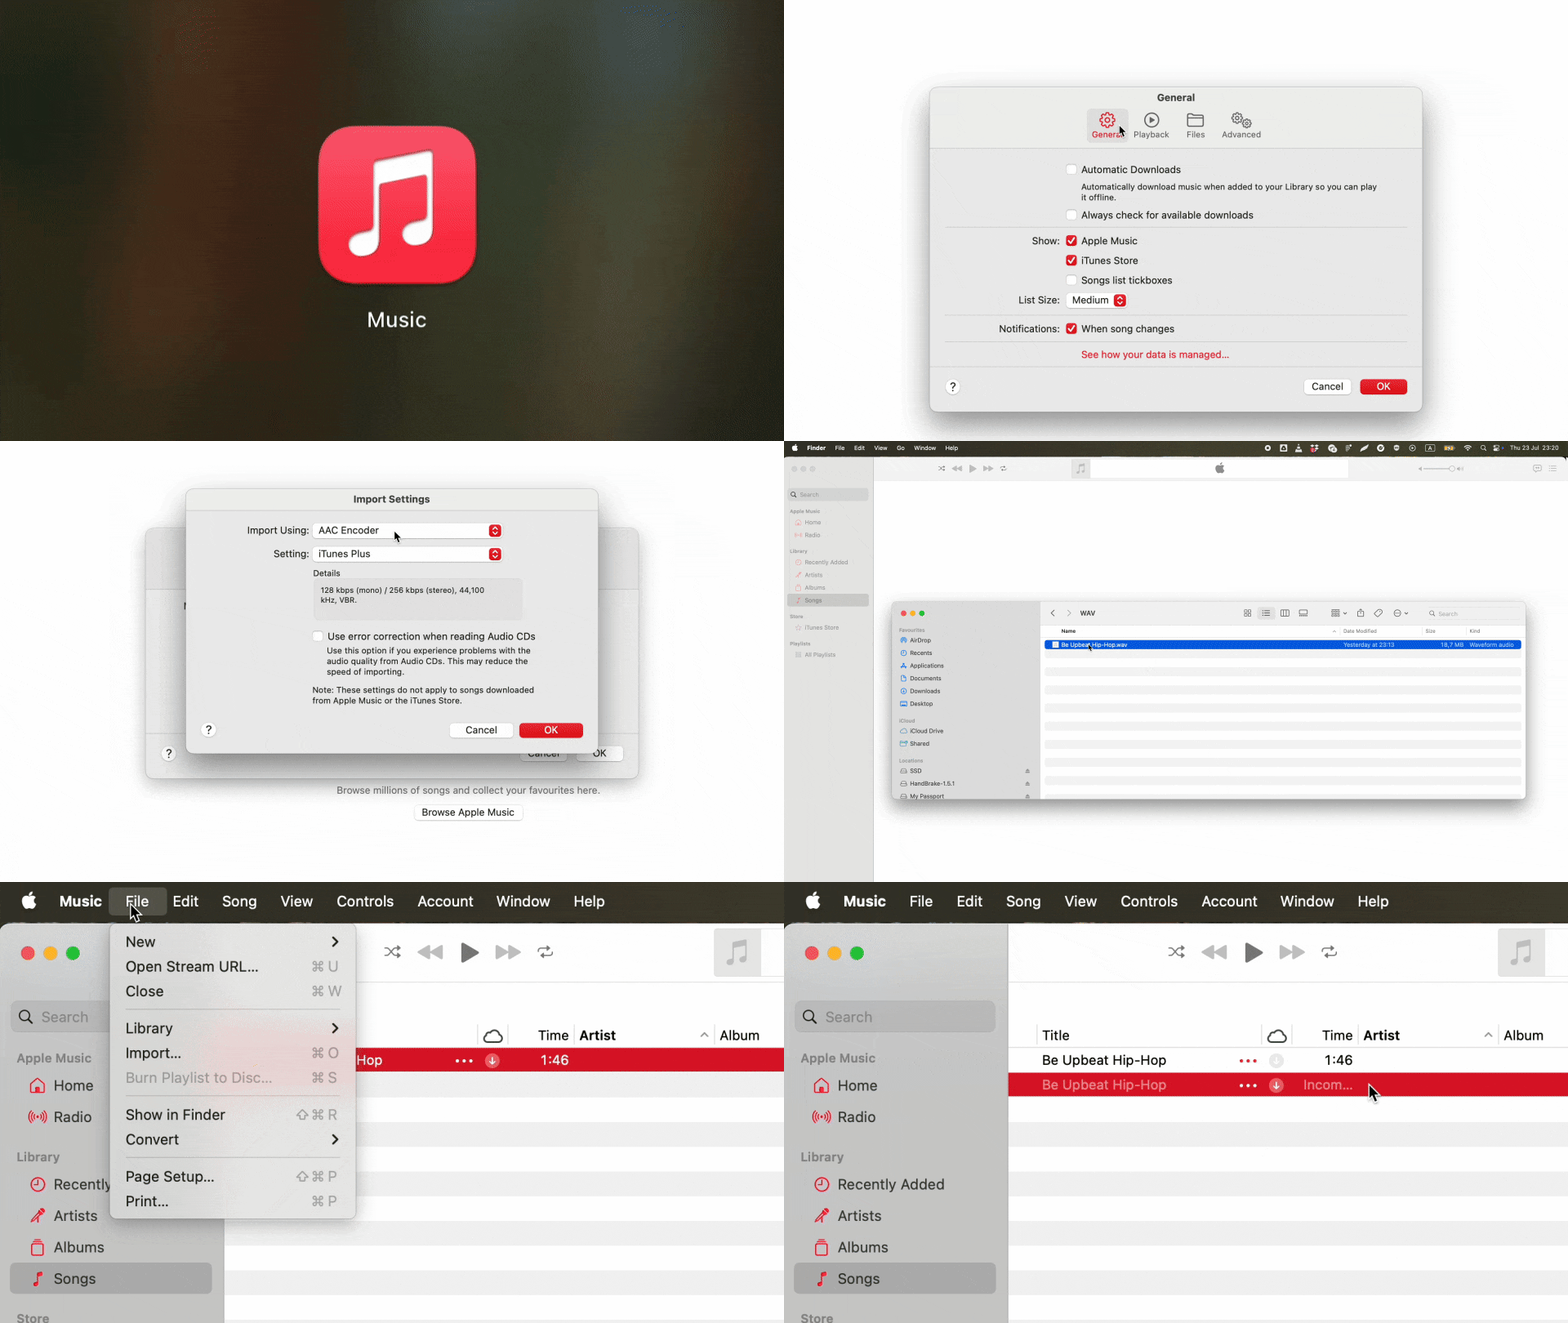
- 1Open the Music app.
- 2Go to Music > Settings and select the Files tab.
- 3Click Import Settings.
- 4Set "Import Using" to MP3 Encoder.
- 5Under "Setting," choose Higher Quality (256 kbps) for general use, or click Custom to select 320 kbps for pristine quality.
- 6Click OK to save your settings.
- 7Drag your WAV file from Finder into the Apple Music library.
- 8Select the file in your library, then go to File > Convert > Create MP3 Version.
- 9The MP3 appears next to the original WAV file in your library.
- 10Right-click the MP3 and choose "Show in Finder" to access the converted file.
One common troubleshooting issue: if File > Convert is grayed out, the file is stored only in iCloud and isn't available locally. Right-click the file and select "Make Available Offline" first, then try the conversion again.
GarageBand
GarageBand is pre-installed on most Macs and provides a straightforward export process for users who prefer not to use the Music app.
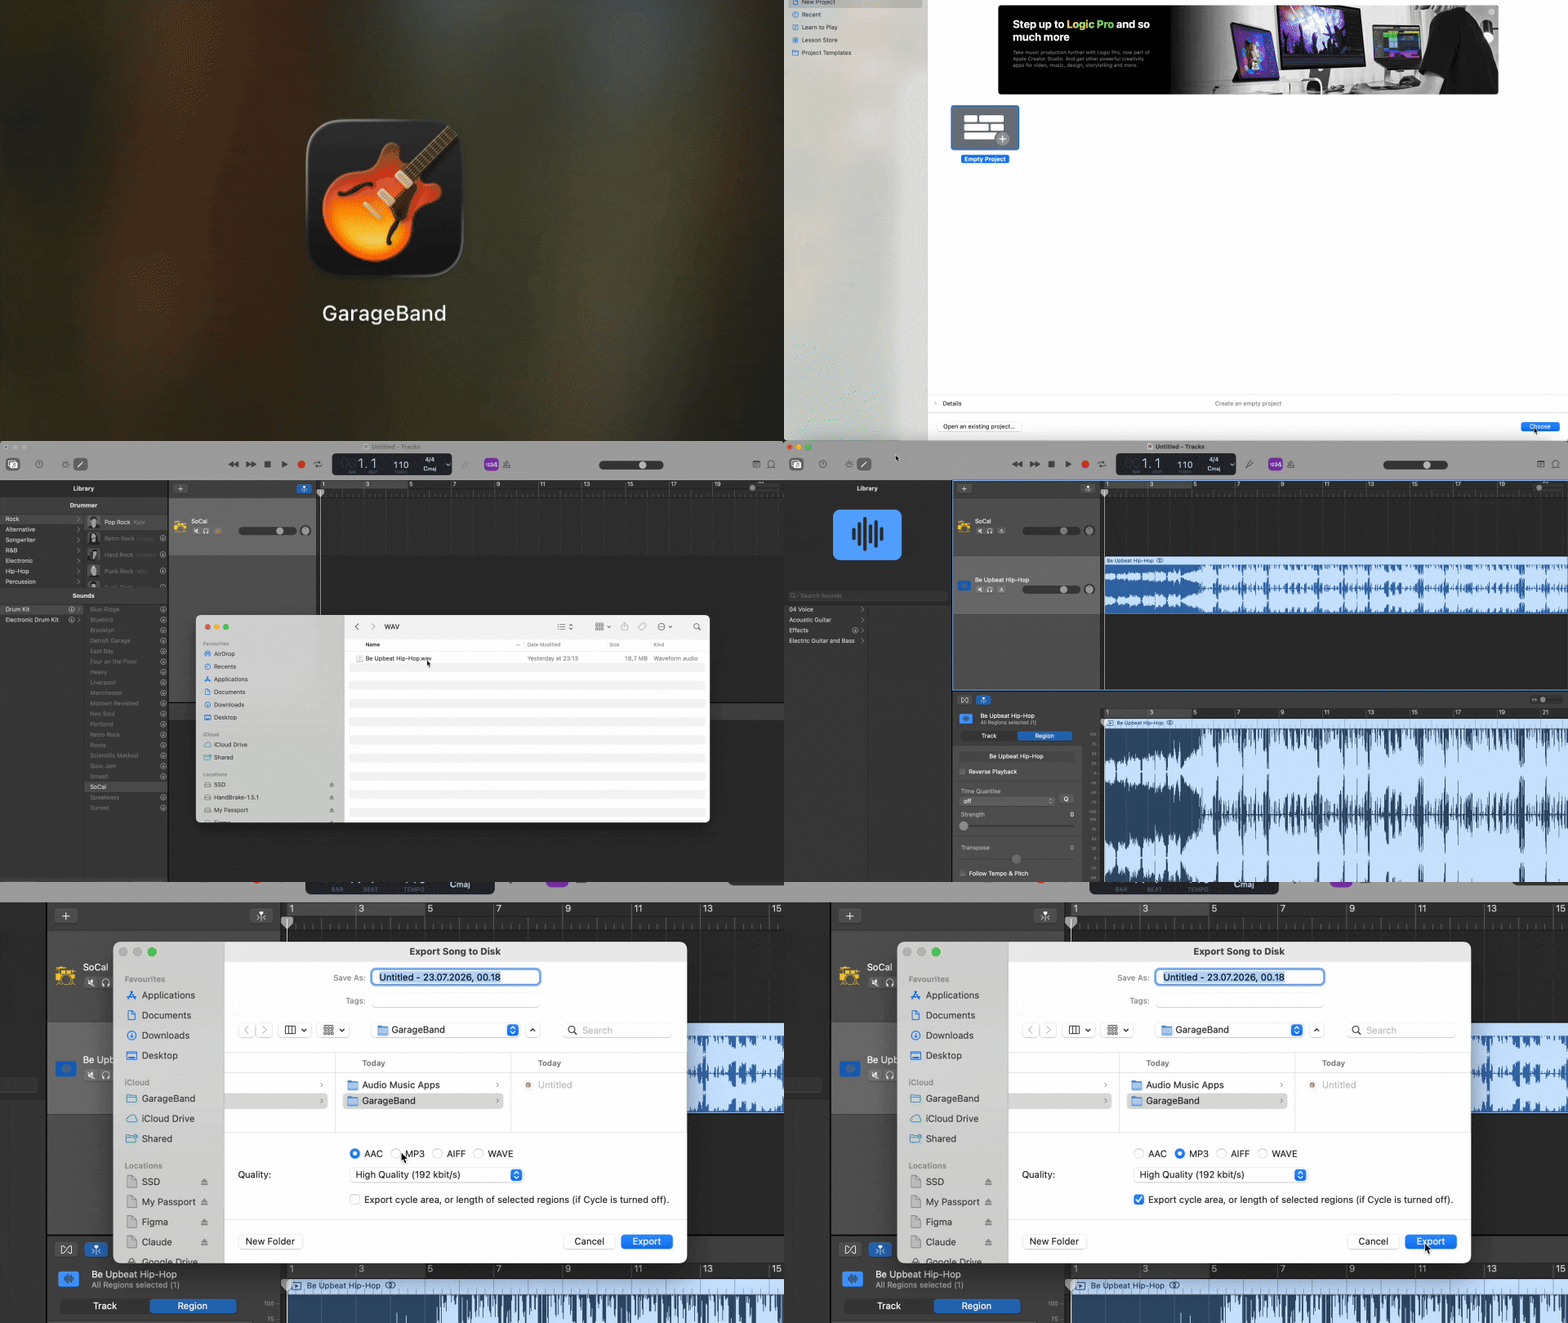
- 1Open GarageBand and choose File > New, then select Empty Project and click Choose.
- 2Drag your WAV file from Finder into the Tracks area.
- 3
- 4Select MP3 as the format.
- 5Choose quality: High Quality (192 kbps) for general use or Higher Quality (256 kbps) for music.
- 6Click Export and choose where to save the file.
Audacity
Audacity is an open-source audio editor that handles single-file conversions reliably. Modern versions of Audacity include the LAME MP3 encoder by default, so you don't need to install anything separately.

- 1Download and install Audacity if you don't have it.
- 2Go to File > Open and select your WAV file.
- 3Go to File > Export Audio.
- 4Set the format to MP3.
- 5Choose your desired bitrate (192–320 kbps for music).
- 6Click Export.
Audacity processes one file at a time. If you need to convert multiple WAV files in a batch, see the FFmpeg tip in the Tips section below.
How to convert WAV file to MP3 file in Windows 11
Windows 11 users have several options available at no cost, but it's important to understand a critical limitation with Windows Media Player before exploring the methods that actually work.
Windows Media Player cannot convert WAV to MP3
Many users assume Windows Media Player can handle this task because it's built into Windows, but Windows Media Player cannot directly convert WAV files to MP3 in Windows 11. As one frustrated member of the Microsoft Tech Community put it, "trying to use Windows Media Player to convert WAV to MP3 is about as likely as getting it to make your morning coffee."
There is a theoretical workaround: burn your WAV files to an audio CD using Windows Media Player, then use the Rip Music feature to import them back as MP3. However, this requires a CD burner, blank discs, and patience. The same forum thread describes this approach as "like using a sledgehammer to crack a nut." For modern users looking to convert WAV files to MP3 in Windows 11, it's far simpler to install one of the tools below.
VLC Media Player
VLC is a powerful media player that includes conversion tools. It's the most reliable option for Windows 11 users.
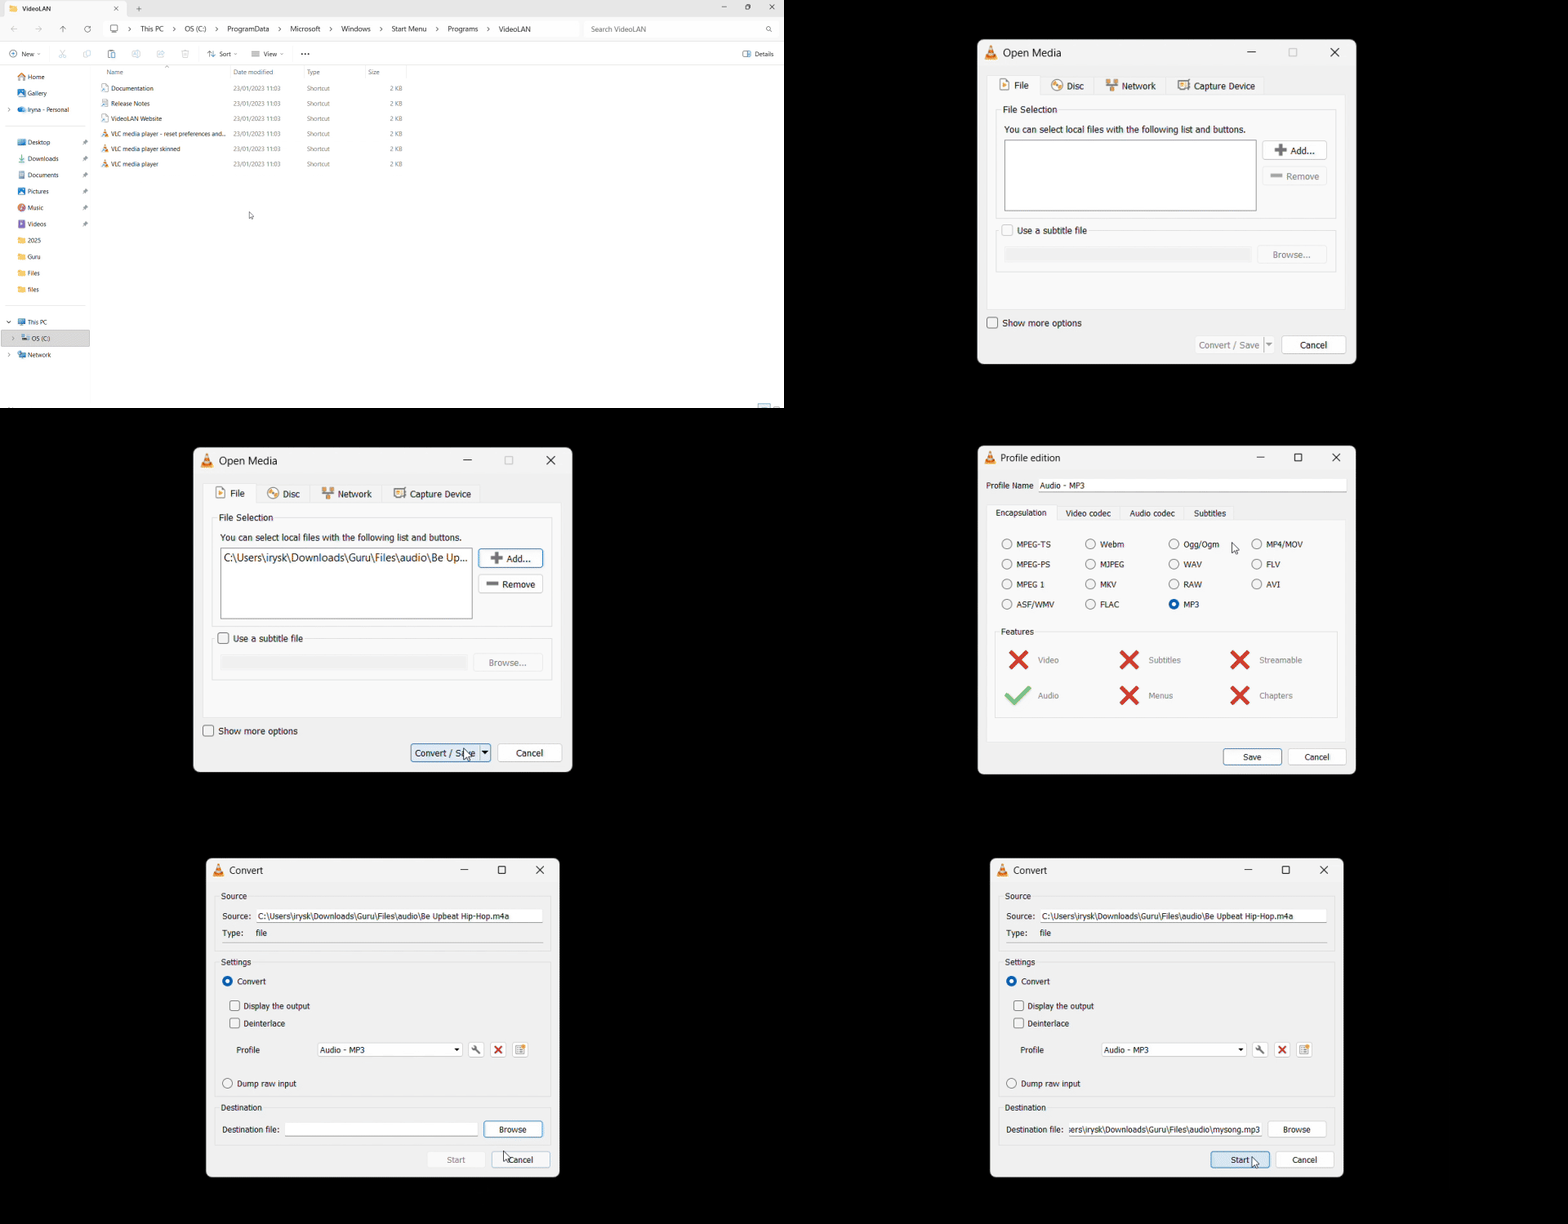
- 1Download and install VLC Media Player if you don't have it.
- 2Open VLC.
- 3Go to Media > Convert/Save (or press Ctrl+R).
- 4Click Add and select your WAV file.
- 5Click Convert/Save at the bottom.
- 6Under Profile, select "Audio - MP3."
- 7Click the wrench icon (Edit Selected Profile) to open the profile editor.
- 8Go to the Audio codec tab.
- 9Set Bitrate to 192 kbps for general use or 320 kbps for music or archival purposes.
- 10Click Save.
- 11Click Browse to choose where to save the output file.
- 12Type the full filename including the .mp3 extension (for example, "myfile.mp3"). VLC may not automatically append the extension, and if you skip this step, Windows won't recognize the file type.
- 13Click Start.
Audacity
Audacity on Windows works the same way as on Mac and includes the LAME MP3 encoder.

- 1Download and install Audacity.
- 2Go to File > Open and select your WAV file.
- 3Go to File > Export Audio.
- 4Set the format to MP3.
- 5Choose a bitrate between 192 kbps and 320 kbps for music.
- 6Click Export.
Audacity handles single files only. For batch conversions, use FFmpeg (described below).
iTunes / Apple Music for Windows
Apple offers a version of its Music app for Windows through the Microsoft Store. It works identically to the Mac version.
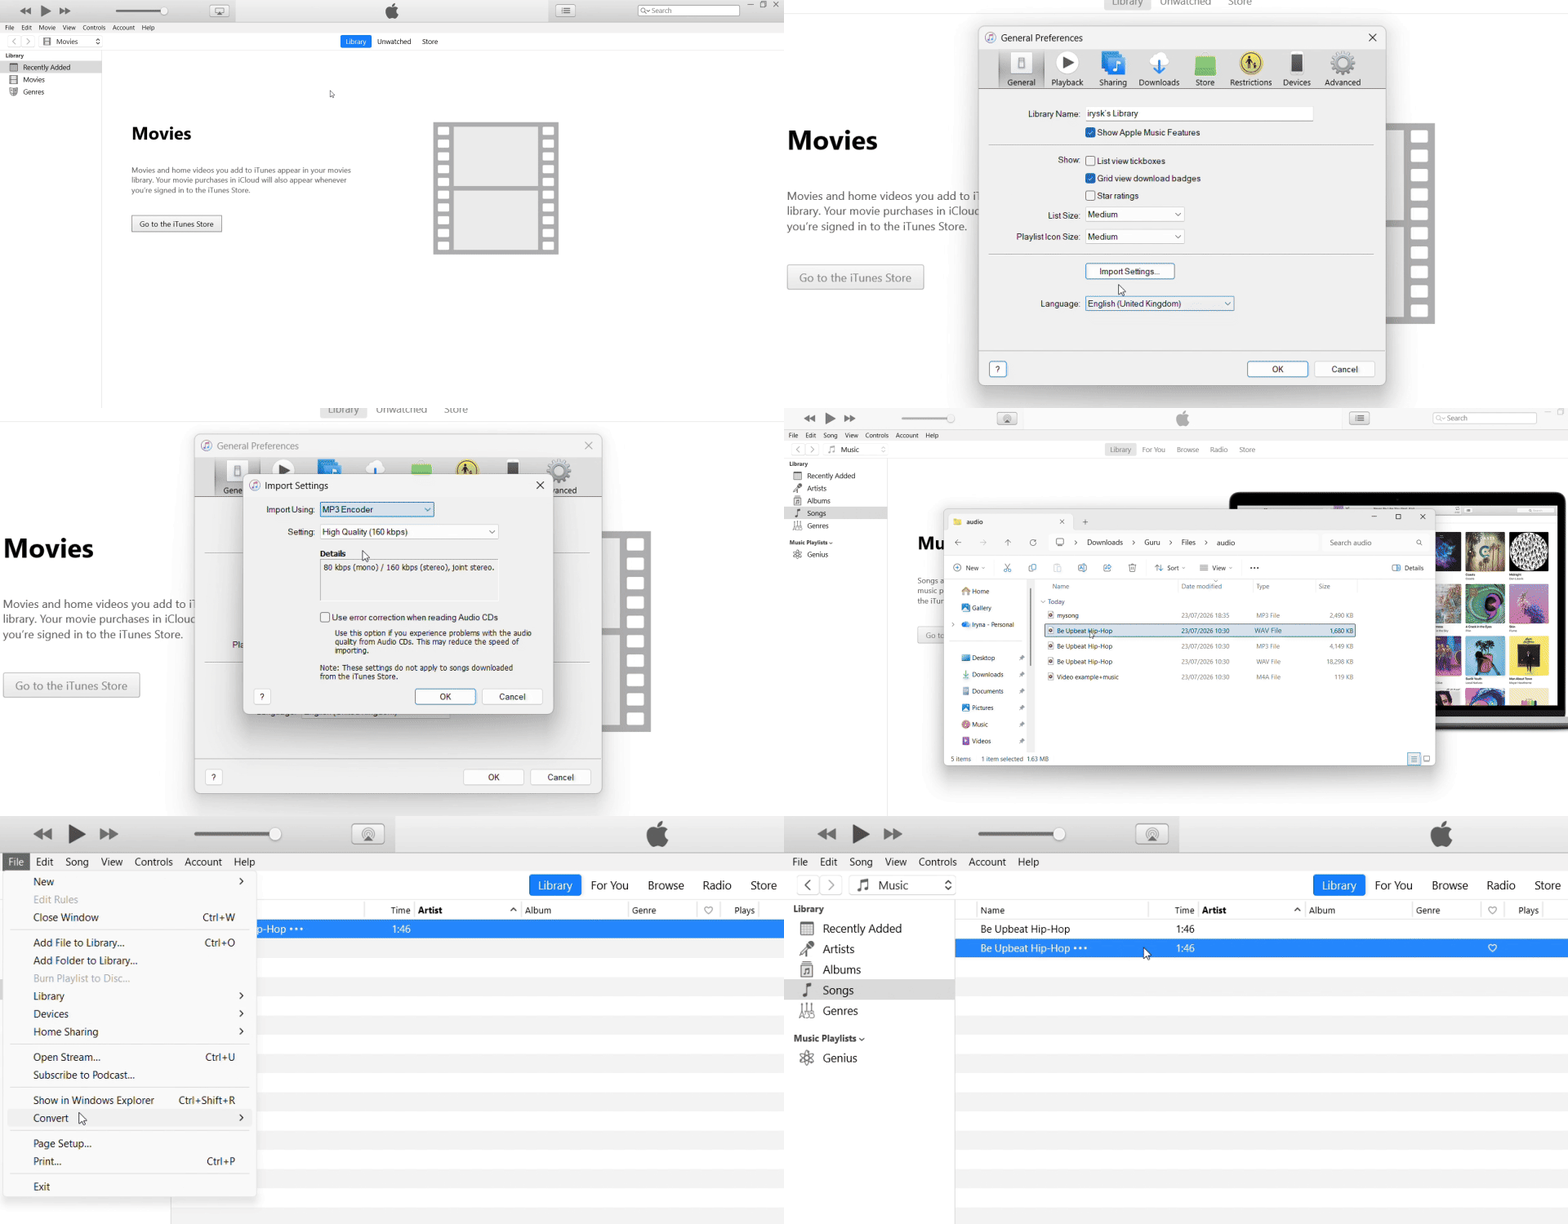
- 1Download and install Apple Music for Windows from the Microsoft Store.
- 2Open the app.
- 3Go to Edit > Preferences > General > Import Settings.
- 4Set "Import Using" to MP3 Encoder.
- 5Click OK.
- 6Drag your WAV file into the library.
- 7Select the file.
- 8Go to File > Convert > Create MP3 Version.
FFmpeg (command-line for batch conversions)
FFmpeg is a command-line tool favored by power users because it's the fastest option for converting multiple files. After installing FFmpeg, you can convert a single file with this command:
ffmpeg -i input.wav -codec:a libmp3lame -b:a 192k output.mp3Replace "input.wav" with your filename and "output.mp3" with your desired output name. Adjust the bitrate (192k) as needed.
How to convert WAV to MP3 online
Online converters offer cross-platform convenience without requiring software installation. They work on any device with a modern browser, including Chromebooks, iPads, and Android tablets where you may not have admin rights to install desktop software. When you need a one-off conversion, an online tool is often the fastest path.
However, not all online converters are created equal. Before you upload your file, check these five factors:
File size limits matter more for WAV than for most audio formats because WAV files are large by nature. Most online tools cap uploads at 100 MB to 1 GB. A single 5-minute song in CD-quality WAV is around 50 MB, and a full album or long podcast recording can easily exceed these limits.
Privacy policies and file deletion timelines vary widely. Some platforms delete files within hours; others keep them for days or don't specify a timeline. If you're converting anything sensitive, this matters.
Watermarks or signup walls can interrupt your workflow. Some tools add watermarks to conversions or impose other restrictions.
HTTPS encryption during upload protects your files in transit. Make sure the tool uses a secure connection.
Batch conversion support is useful when you have multiple files, though many online tools process only one file at a time.
One critical privacy tip: never upload unreleased music, confidential interview recordings, or private voice memos to any online tool. For sensitive content, use one of the local methods described above.
PDF Guru offers a browser-based converter that works across all platforms and provides automatic file deletion for added privacy. For users who prefer a local workflow with no file-size limits, the desktop tools above remain the better choice.
Choosing the right bitrate for MP3
Bitrate determines the balance between file size and audio quality when you convert WAV to MP3. Higher bitrates preserve more detail but create larger files. Lower bitrates save space but may introduce audible artifacts, especially in music with complex instrumentation.
64–96 kbps is appropriate for voice-only content like podcasts, audiobooks, lectures, and voice memos, where small file size matters more than fidelity. Music at this bitrate sounds noticeably compressed.
128 kbps has long been the "good enough" standard for casual listening. It's the smallest file size for music that still sounds reasonable, though audiophiles and anyone listening on quality headphones will notice compression artifacts.
192 kbps strikes a solid balance for music on most devices. It's the minimum recommended bitrate for music libraries and sounds clean in the vast majority of listening situations.
256 kbps delivers high quality with very few audible artifacts. Most listeners are satisfied at this level, and the file size remains manageable.
320 kbps is the maximum MP3 bitrate. It's used for music libraries, audiophile listening, and archival purposes where you want to preserve as much detail as possible while still benefiting from compression.
One important caveat: setting a higher MP3 bitrate cannot add detail that wasn't already in the WAV file. The WAV is the highest quality. Converting a 192 kbps MP3 to 320 kbps doesn't improve the sound; it just makes the file larger.
For music, aim for 192 kbps as a minimum and 320 kbps for pristine quality. Keep in mind that 320 kbps MP3 files are roughly 2.5 times larger than 128 kbps files, but they're still 4 to 5 times smaller than the source WAV.
Tips for better WAV to MP3 conversion
These practical tips help you avoid common pitfalls and achieve the best results when converting a WAV file to MP3.
Match bitrate to content. Use 96 kbps for voice-only content, such as podcasts or audiobooks. For general music listening, 192–256 kbps is a good balance. For archival or audiophile use, go with 320 kbps. Don't over-encode: a higher bitrate can't improve quality beyond what the source WAV contains.
Keep the original WAV file as your master archive. MP3 conversion is lossy and one-way. Once you convert to MP3, you cannot recover the original uncompressed quality. If storage space allows, keep the WAV as your master and generate MP3 copies as needed.
Add ID3 metadata after conversion. WAV files rarely carry artist, title, album, or artwork information, so your MP3 will likely have no tags by default. Use an MP3 tag editor to add metadata after converting. This makes your music library organized and searchable.
For batch conversion of many WAV files, use FFmpeg or audio software with batch mode. Audacity processes single files only. If you're on Mac or Linux and need to convert an entire folder of WAV files, this FFmpeg batch command will convert all files in the current directory:
for i in *.wav; do ffmpeg -i "$i" "${i%.*}.mp3"; doneWindows users can achieve similar results with a batch script or by using VLC's batch conversion feature.
Verify the MP3 plays correctly and that all metadata is transferred before deleting the original WAV file. Sometimes conversions fail silently, or metadata doesn't carry over as expected. A quick playback test and metadata check save you from losing your only copy of important recordings.
If you frequently need to convert MP3 to WAV for editing or mastering work, PDF Guru's audio file converter handles conversions in both directions.