Ever downloaded a perfect image only to find it stamped with a watermark? Whether you're sharing a product shot or a vacation memory, there are times when you simply need to take a watermark off a photo before posting it. But how do you do it without damaging the image, and what should you know before starting?
This guide will help you learn how to remove watermarks from photo files on both iOS and Android devices, with clear step-by-step instructions.
How to get rid of watermarks on photos with PDF Guru

You can delete watermarks from photos using our online tool. Here are the steps to follow:
- 1
- 2Wait a minute while our AI-powered engine is removing the watermark.
- 3Review the result and hit Download.
Our logo removal process is quick, usually taking just a few seconds. However, it might take a little longer if the file has a complex layout, such as layered graphics or overlapping text.
How to remove copyright from a photo
Short answer: only if you own the rights. Otherwise, it's illegal.
If you are the creator of the image or have been granted full copyright ownership, you are free to edit, crop, or remove elements such as watermarks. However, if you do not own the copyright, removing a watermark or copyright notice can be considered copyright infringement, even for personal use.
Copyright is a legal right that protects creators automatically, often marked with the © symbol, the word “Copyright,” or “Copr,” followed by a year and the owner’s name. For example: © 2025, Jane Doe.
If you plan to use copyrighted files the right way, do the following:
- 1Buy a license. You can contact the copyright owner and pay for the rights to use the image.
- 2Ask for a clean copy. After paying for the rights, ask the owner to provide a copyright-free copy.
Remember, removing a copyright notice from a photo and pretending it’s yours is illegal and could get you into trouble. The right thing to do is to respect the creator and get his/her permission before using it.
How to edit out watermarks manually
If the watermark is placed at the top or bottom of your photo, you can try manual editing with PDF Guru’s editor. Here’s what you need to edit out watermarks:
- 1
- 2
Now your file is watermark-free. If you need to take things further, you can easily add an image to a PDF to enhance your project or prepare it for high-quality sharing.
How to remove a watermark from a photo on Mac

You can use the Photos app on a Mac to remove watermarks, but keep in mind it’s only good for simple cases. On complex images, such edits may be noticeable.
- 1Open your photo in the Photos app on your Mac.
- 2Click Edit in the top-right corner, then open the Clean Up tab and select the Retouch tool from the right sidebar.
- 3Use the size slider to make the brush big enough to cover the watermark.
- 4Brush over the watermark. The app will try to blend it with the surrounding area.
- 5When you’re done, click Done to save your changes.
How to remove a watermark from a photo on iPhone

You can remove a watermark from a photo on an iPhone using the built-in Photos app. However, this editing feature is only available on iOS 18 or later.
Here’s what you need to do:
- 1Open the Photos app and choose the image with the watermark.
- 2Tap Edit in the top-right corner.
- 3Select Crop & Cleanup.
- 4Drag your finger over the watermark to highlight it.
- 5Tap Done to save the edited photo.
Most devices already have simple built-in programs to remove watermarks, which is great for basic fixes. For more advanced file processing, consider using the PDF Guru tool.

How to remove a watermark from a photo on Android
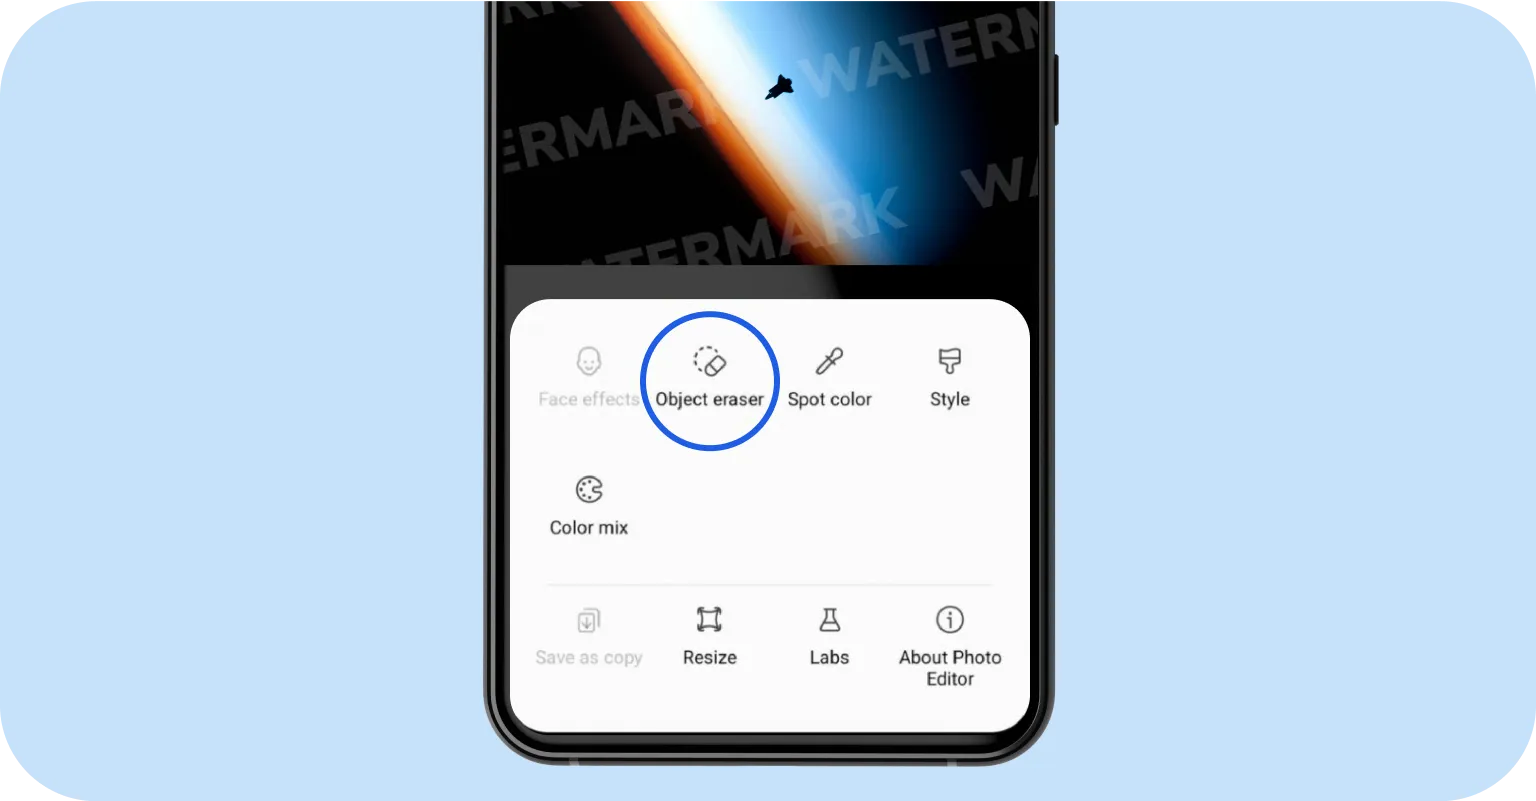
To remove a watermark from a photo on Android, you can use the built-in Gallery app available on Samsung Galaxy devices. Here’s how it works:
- 1Open your photo in the Gallery app.
- 2Tap the Edit icon to enter editing mode.
- 3Select Object Eraser from the editing tools.
- 4Tap or draw around the watermark to select it.
- 5Tap Erase to remove the selected watermark.
- 6Save the edited image to your device.
If you’re using a different phone model, try another watermark removal tool such as Snapseed. It’s available for download in the Google Play Store.
- 1Open Snapseed and add the photo you want to edit.
- 2Go to the Tools section and choose Healing.
- 3Use your finger to brush over the watermark. The app will clean it up for you and fill in the background.
- 4Review the result and save your photo.
Final thoughts
Now that you know several methods, removing watermarks from pictures should be much easier. We recommend testing all these tools to find out which ones work best for your images.
If you need to convert your image to a compatible format, our Converter makes it easy to turn files into JPG, PNG, BMP, or PDF — formats fully supported by our watermark photo remover.


