
If you're wondering how to convert MP4 to MP3, you have several reliable options depending on your device. Whether you're extracting audio from a music video, podcast, lecture recording, or any other video file, the process is straightforward once you know which tool to use. This guide covers native methods for Mac and Windows, plus a browser-based solution that works on any device.
Why convert MP4 to MP3?
Converting video files to an audio-only format offers several practical advantages:
- Dramatically smaller file sizes — Extracting just the audio track can reduce file size by 90% or more, freeing up storage space on your phone and saving mobile data when transferring files.
- Universal compatibility — MP3 plays on virtually every device, including car stereos, smart speakers, older phones, streaming platforms, and gaming consoles that may not support video formats.
- Perfect for audio content — When you only need the sound from podcasts, lectures, audiobooks, or music videos, MP3 provides exactly what you need without the unnecessary video data.
- Compatible with audio tools — Transcription software and audio editing programs like Audacity work seamlessly with MP3 files, making them ideal for content creation and editing workflows.

How to convert MP4 to MP3 using PDF Guru
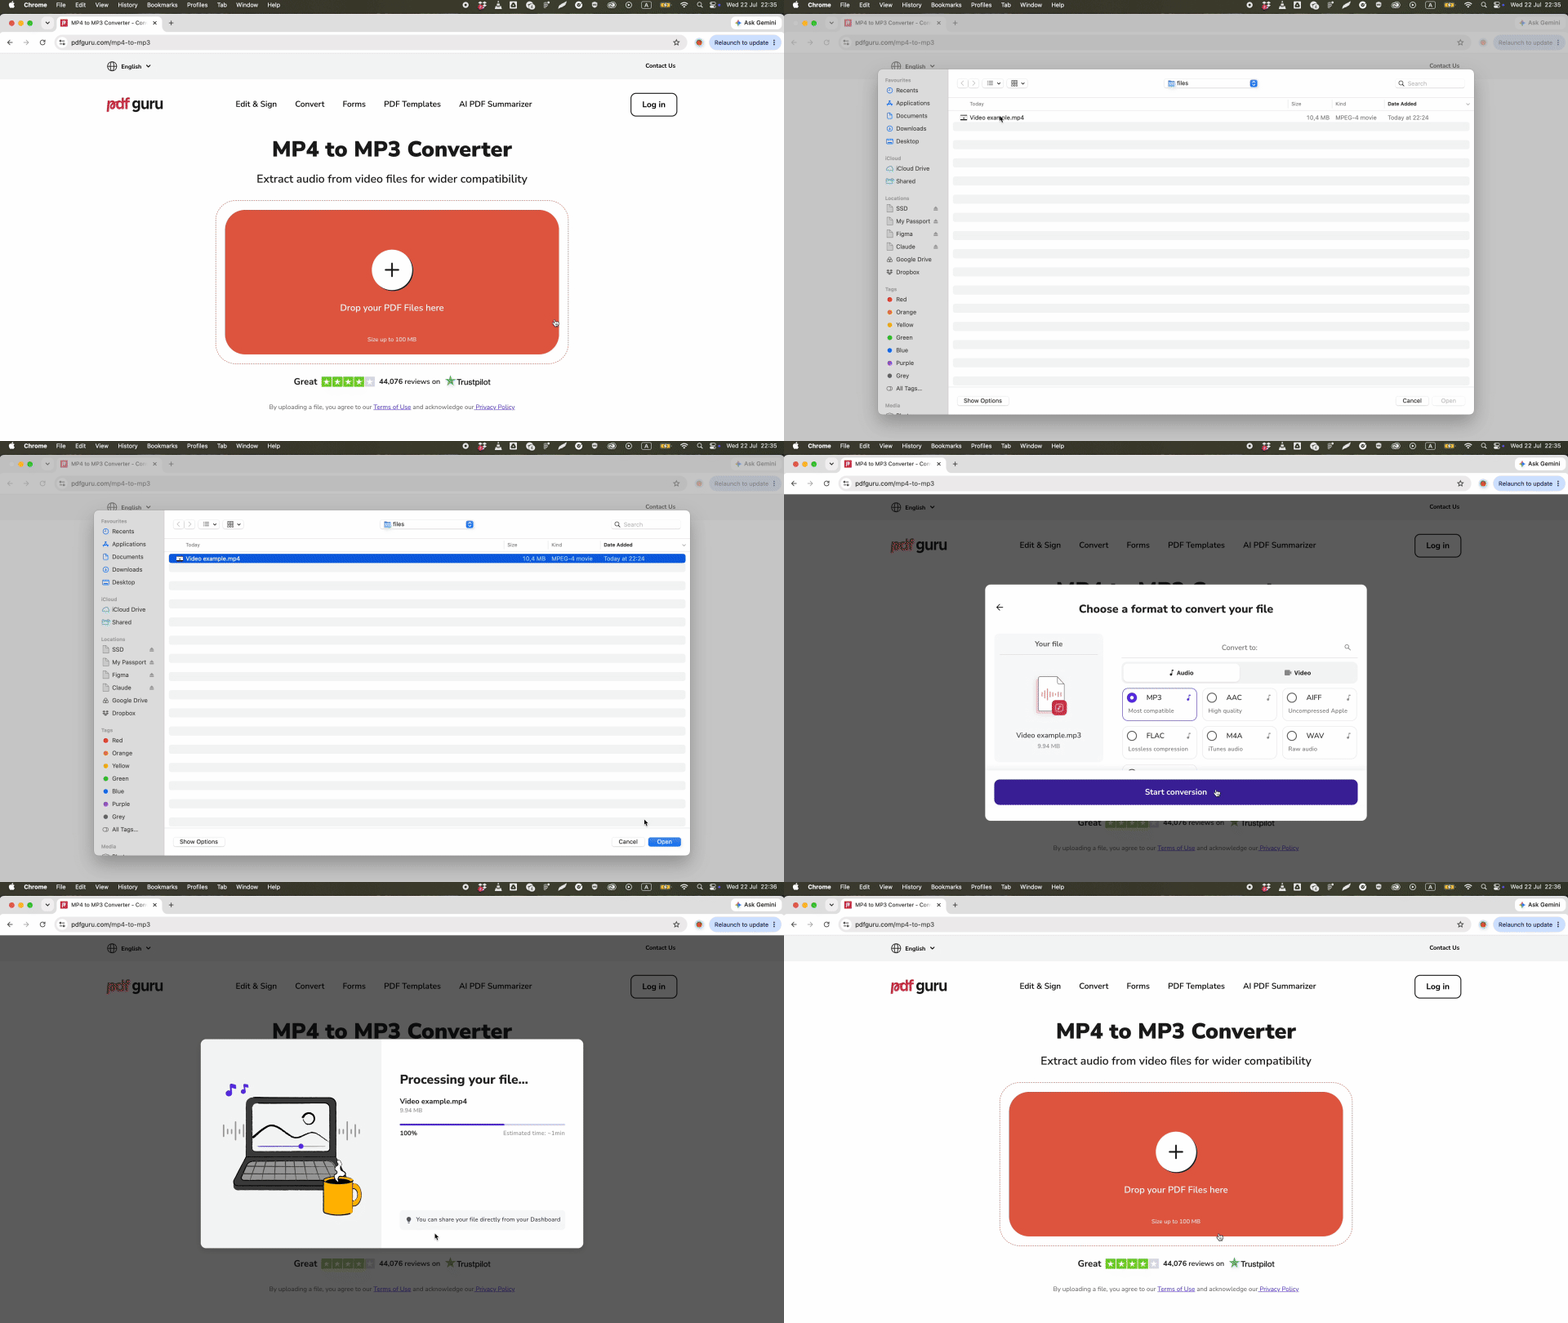
The quickest way to convert any MP4 file to MP3 is through a browser-based converter that works on any device:
- 1
- 2Upload your MP4 file by dragging it onto the page or clicking the upload button to select it from your device.
- 3The tool automatically extracts the audio track and re-encodes it as an MP3 file — no settings to configure or technical knowledge required.
- 4Download the converted MP3 file when the conversion completes.
This method works in any modern browser on Mac, Windows, Linux, iPhone, and Android devices. The conversion runs automatically with no manual bitrate or codec selection, making it ideal when you need a simple, reliable process. Note that files larger than 100 MB may need to be trimmed or compressed before uploading — full-length concerts or lengthy lecture recordings sometimes exceed this limit.
How to convert MP4 to MP3 on Mac
Mac users have three native methods for converting MP4 to MP3, each suited to different workflows.
QuickTime Player and Music app
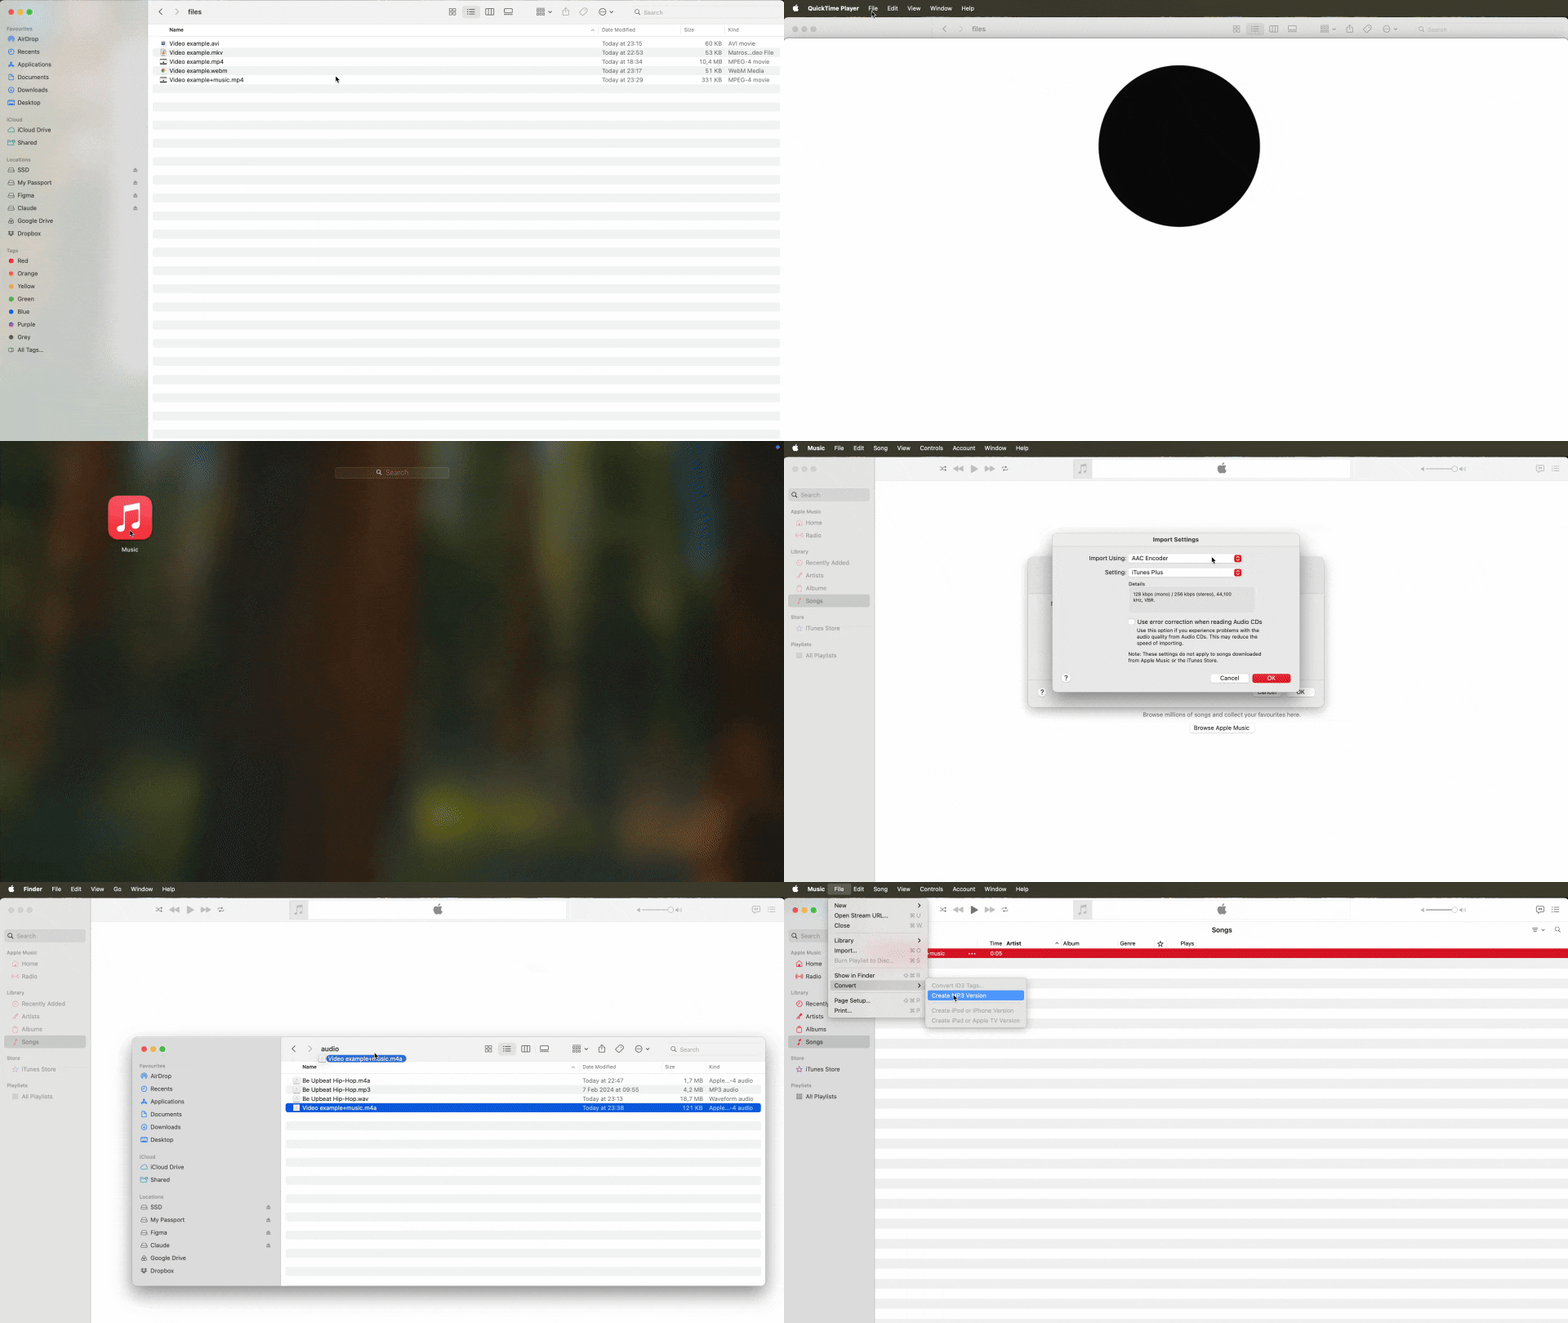
This is the standard two-step method built into macOS:
- 1Open your MP4 file in QuickTime Player.
- 2Select File > Export As > Audio Only and save the file.
- 3Open the Music app and go to the top menu bar: Music > Settings.
- 4In the General tab, click Import Settings.
- 5Set "Import Using" to MP3 Encoder and click OK.
- 6Drag your exported M4A file into your Music app library.
- 7Click on the file in your library to select it, then go to the top menu and choose File > Convert > Create MP3 Version.
QuickTime Player cannot export directly to MP3 format — it only exports to M4A, which is why this two-step process exists. The Music app handles the final conversion from M4A to MP3.
VLC Media Player on Mac

VLC offers a simpler one-step alternative if you need to convert MP4 to MP3 on Mac without the multi-step process:
- 1Download and install VLC Media Player if you don't already have it.
- 2Click File > Convert / Stream from the top menu.
- 3Click Open media... and select your MP4 file.
- 4In the "Choose Profile" section, select Audio - MP3.
- 5Click Save as File, then click Browse to name your file and choose where to save it. (Make sure the file extension ends in
.mp3). - 6Click Save.
Quick Finder method
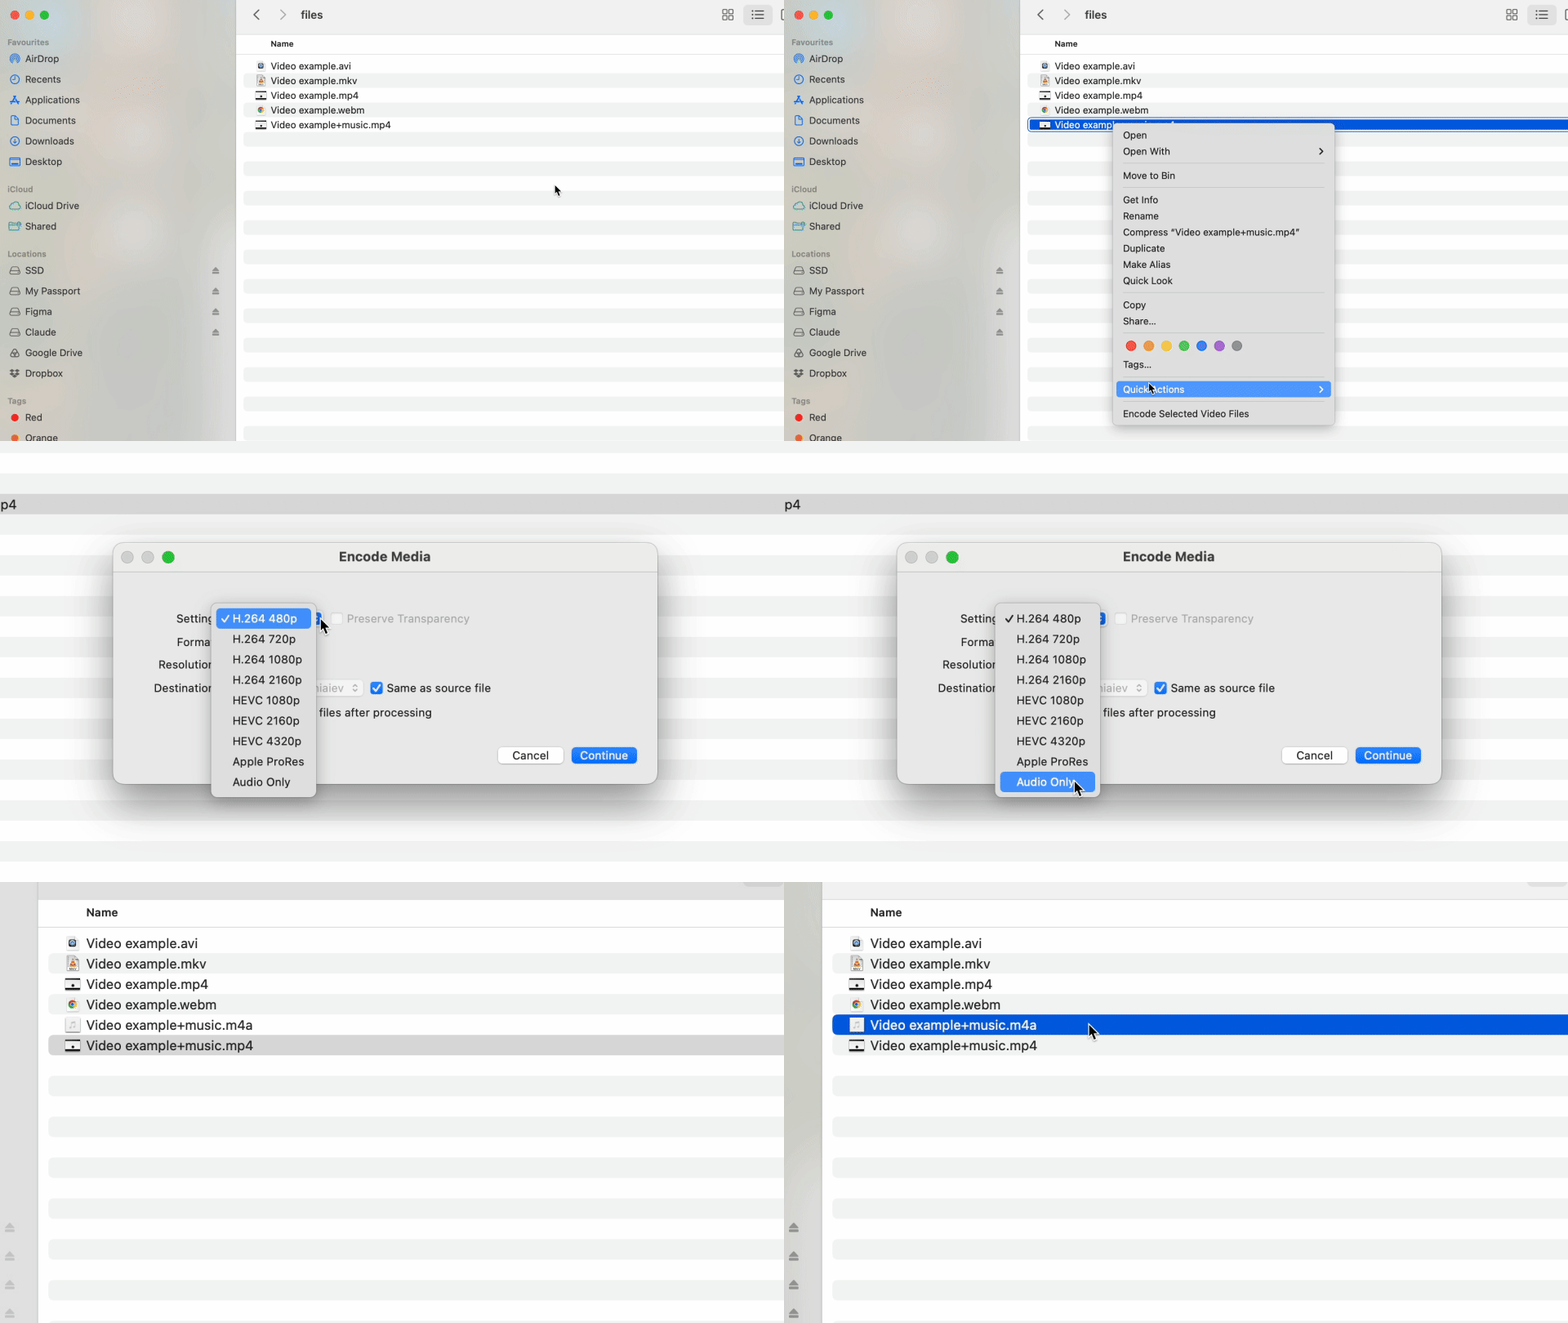
For casual users, macOS includes a basic conversion option:
- 1Right-click your MP4 file in Finder.
- 2Hover over Quick Actions and select Encode Selected Video Files.
- 3In the setting dropdown, change Setting to Audio Only and click Continue.
This method produces an M4A file, not MP3, so you'll still need to use the Music app conversion process described above to complete the conversion to MP3 format.
How to convert MP4 to MP3 on Windows
Windows users have several conversion methods available, from desktop software to command-line tools.
VLC Media Player
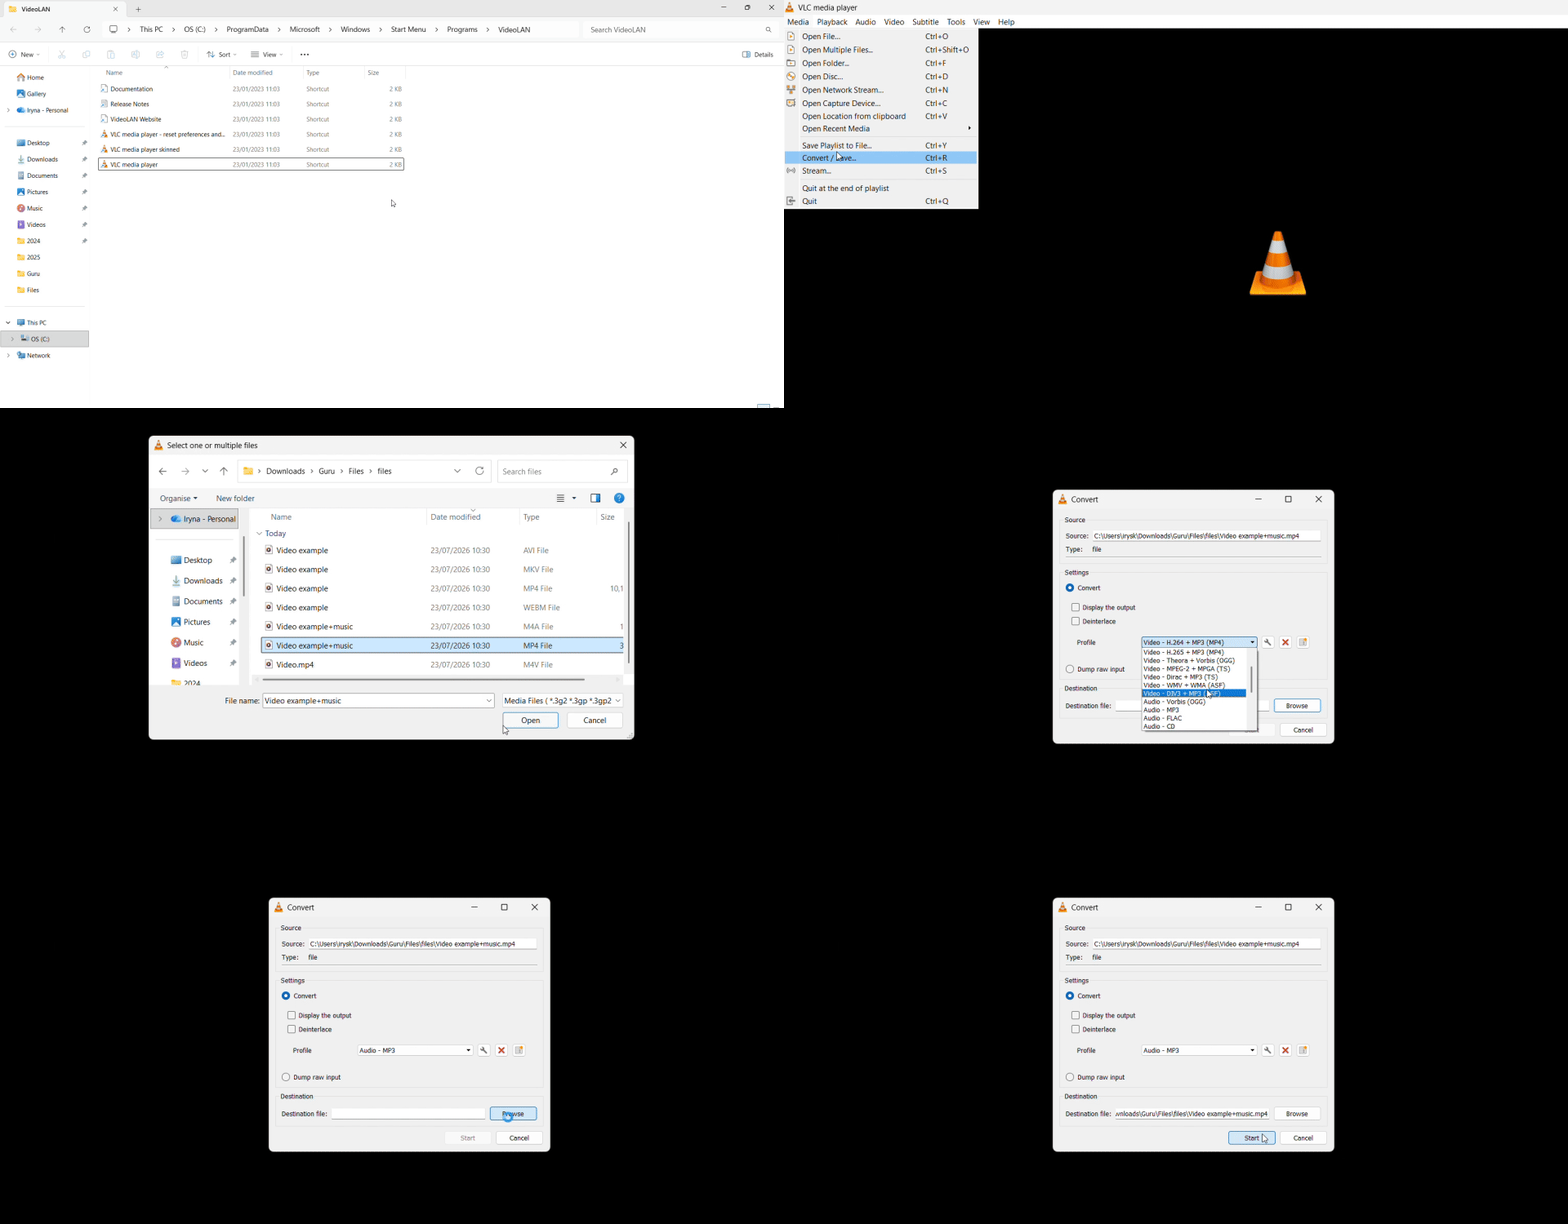
VLC is the most reliable method if you need to convert MP4 to MP3 on Windows:
- 1Download and install VLC Media Player if it's not already on your system.
- 2Open VLC and select Media > Convert/Save (or press Ctrl+R).
- 3Click "Add" and select your MP4 file.
- 4Click "Convert/Save" at the bottom.
- 5In the Profile dropdown, select "Audio - MP3."
- 6Click the wrench icon to edit the profile to adjust the bitrate — 192 kbps works well for general use, while 320 kbps is best for music.
- 7Click "Browse" to choose where to save your file, and type "filename.mp3" in the Save As field.
- 8Click "Start."
VLC does NOT automatically append the .mp3 extension to your output file. You must manually type the complete filename with the .mp3 extension, or the file will save without an extension and won't play correctly.
iTunes for Windows
While Apple has split its apps on modern platforms, the official version of iTunes for Windows remains the only native Apple tool that handles local MP3 encoding:
- 1Download and install iTunes from the Microsoft Store.
- 2Open iTunes and go to Edit > Preferences.
- 3On the General tab, click Import Settings.
- 4Set the "Import Using" dropdown to MP3 Encoder, choose your preferred quality setting, and click OK.
- 5Drag and drop your MP4 file from File Explorer directly into your iTunes library.
- 6Click the file in your library to highlight it, then go to the top menu and select File > Convert > Create MP3 Version.
FFmpeg (command line)
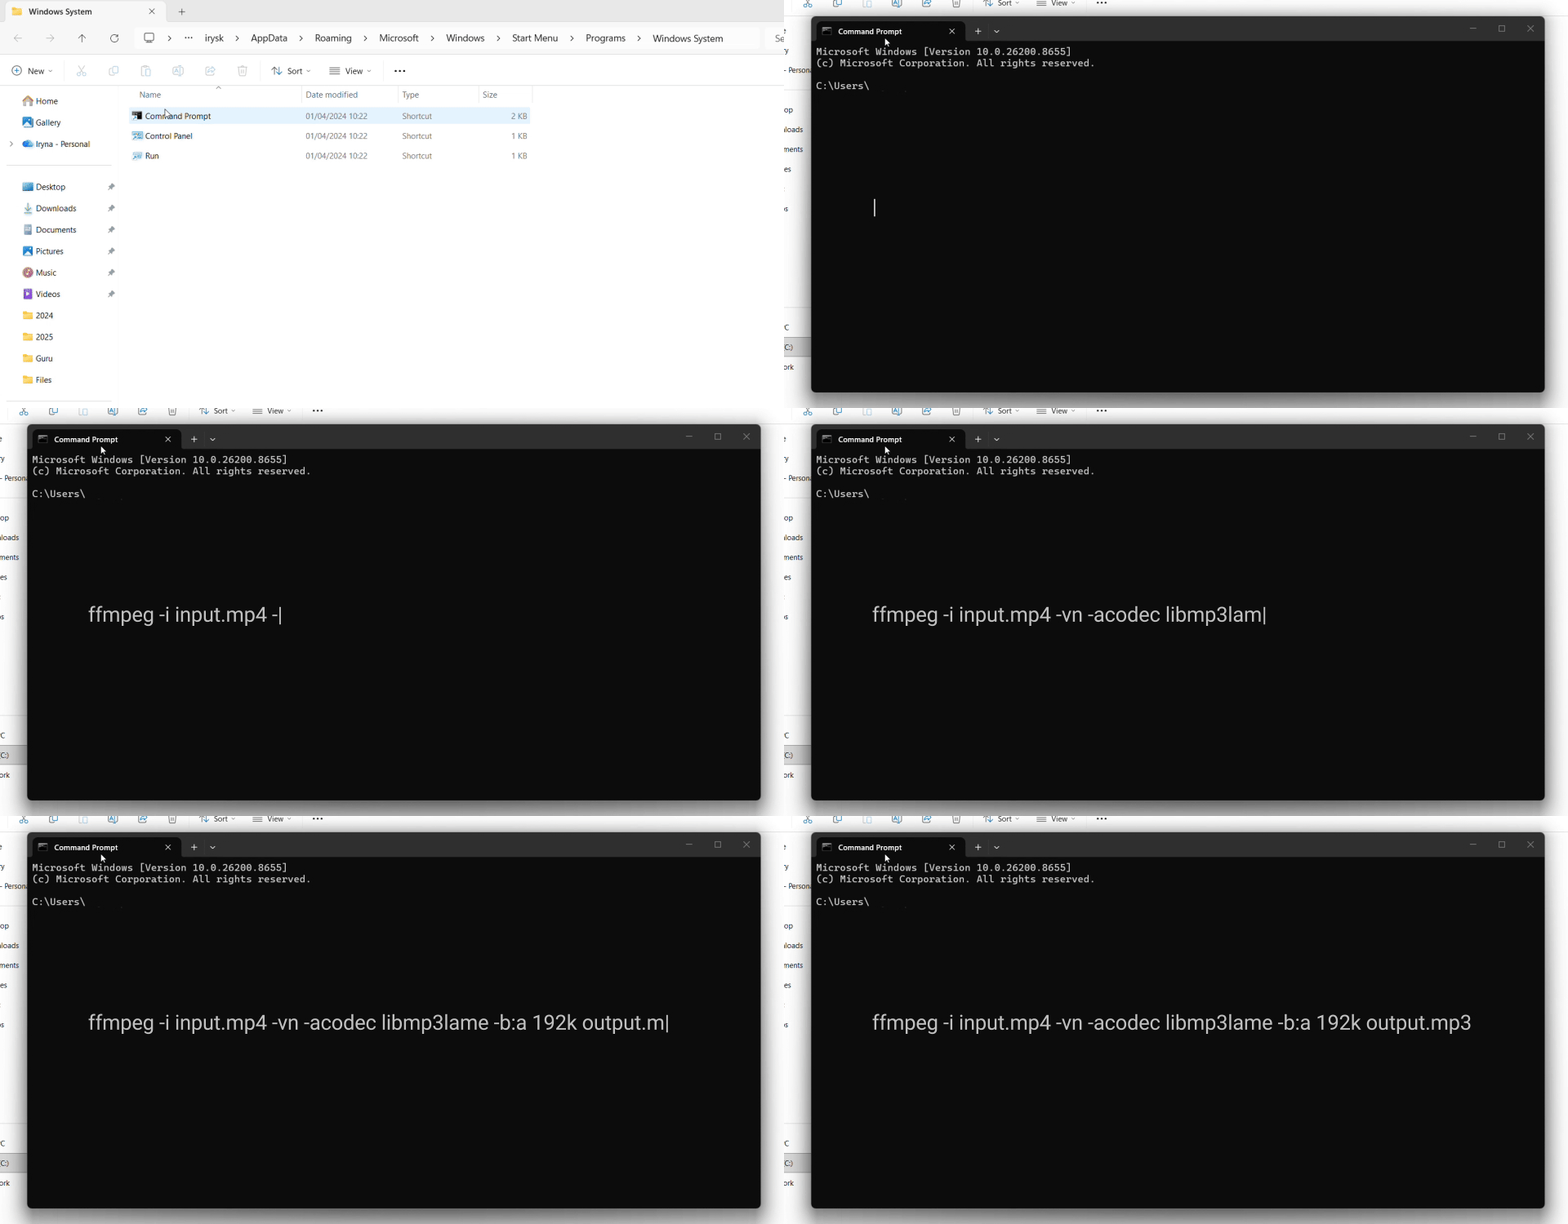
Advanced users comfortable with command-line tools can use FFmpeg:
- 1Install FFmpeg on your system.
- 2Open Command Prompt or PowerShell.
- 3Run:
ffmpeg -i input.mp4 -vn -acodec libmp3lame -b:a 192k output.mp3
Replace "input.mp4" with your source file path and "output.mp3" with your desired output location.
Windows Media Player cannot convert MP4 to MP3
Windows Media Player does NOT convert video files to audio format. Its "Rip" function is designed exclusively for extracting audio from physical CDs, not for converting downloaded MP4 files. This is a common misunderstanding that leads users to waste time searching for a feature that doesn't exist.
How to convert MP4 to MP3 online
Online converters offer cross-device convenience without requiring software installation. If you need to convert MP4 to MP3 on a Chromebook, mobile device, or work computer with restricted software policies, a browser-based tool is the most practical option.
Before uploading files to any online converter, check these five factors:
- 1Privacy policy — Verify whether the service uses encryption during upload and how long files are retained on their servers.
- 2Maximum file size — Most online tools limit uploads to 100-500 MB, which may restrict conversion of full-length videos or high-quality recordings.
- 3Watermarks or signup requirements — Some platforms add watermarks to output files or require account creation for basic features.
- 4HTTPS encryption — Ensure the site uses secure connections during upload to protect your files in transit.
- 5Bitrate control — Check whether you can select output quality or if the tool uses a fixed bitrate setting.
Never upload sensitive recordings — such as confidential interviews, private meetings, or proprietary content — to online conversion tools. For standard use cases like music videos or public lectures, PDF Guru offers a safe, automatic conversion option with encrypted handling. The platform's audio converter supports various formats beyond MP4, making it a versatile tool for different file types.
Choosing the right bitrate for MP3
Selecting the appropriate bitrate ensures you balance audio quality against file size for your specific use case.
64-96 kbps — Suitable for voice-only content like podcasts, audiobooks, lectures, and files destined for transcription services. Speech remains clear and intelligible at these lower bitrates.
128 kbps — The standard "good enough" quality for casual music listening. This bitrate produces the smallest music file size while maintaining acceptable quality for most listeners on typical playback devices.
192 kbps — A solid balance for music on most devices. This bitrate delivers noticeably better quality than 128 kbps without creating excessively large files.
256-320 kbps — Maximum MP3 quality, used for music libraries and archival listening where you want the best possible fidelity within the MP3 format's limitations.
Setting a higher output bitrate than your source MP4's audio bitrate does NOT improve quality. MP3 cannot reconstruct audio data that wasn't present in the original file. For example, if your source MP4 contains 128 kbps AAC audio, exporting to 320 kbps MP3 simply creates a bigger file with the same audible quality as a 128 kbps MP3. The extra data is filler that wastes storage space.
Tips for better MP4 to MP3 conversion
Follow these practical tips to optimize your conversion workflow and results:
Match bitrate to content type — Use 96 kbps for voice recordings and podcasts, and 192-256 kbps for music. This ensures efficient file sizes without sacrificing necessary quality.
Keep the original MP4 until you've verified the MP3 plays correctly on your target device. Conversion errors occasionally occur, and you'll want the source file available if you need to re-convert.
Use desktop software for batch conversion — When you need to convert multiple files, desktop tools like VLC, FFmpeg, and iTunes handle batches efficiently. Online tools typically limit batch conversion to paying subscribers or throttle processing speed. For single-file needs in a browser, the video converter provides a convenient alternative.
Add metadata tags after conversion — Use an MP3 tag editor to add artist, title, album, and track information. Proper tagging keeps your audio library organized and enables correct sorting on playback devices.
Consider lossless formats for specific needs — If you require perfect audio preservation (rare for most users), convert to WAV or FLAC instead of MP3. MP3 is always lossy, meaning it discards audio data to achieve compression. Lossless formats maintain complete audio fidelity but create much larger files.