
Whether you're compiling scanned receipts for an expense report or organizing screenshots into a single document, knowing how to combine images into one PDF saves time and makes sharing easier. Instead of attaching dozens of separate photo files to an email, you can send one clean, professional document where each image appears as its own page in the order you choose.
How to combine photos into one PDF using PDF Guru
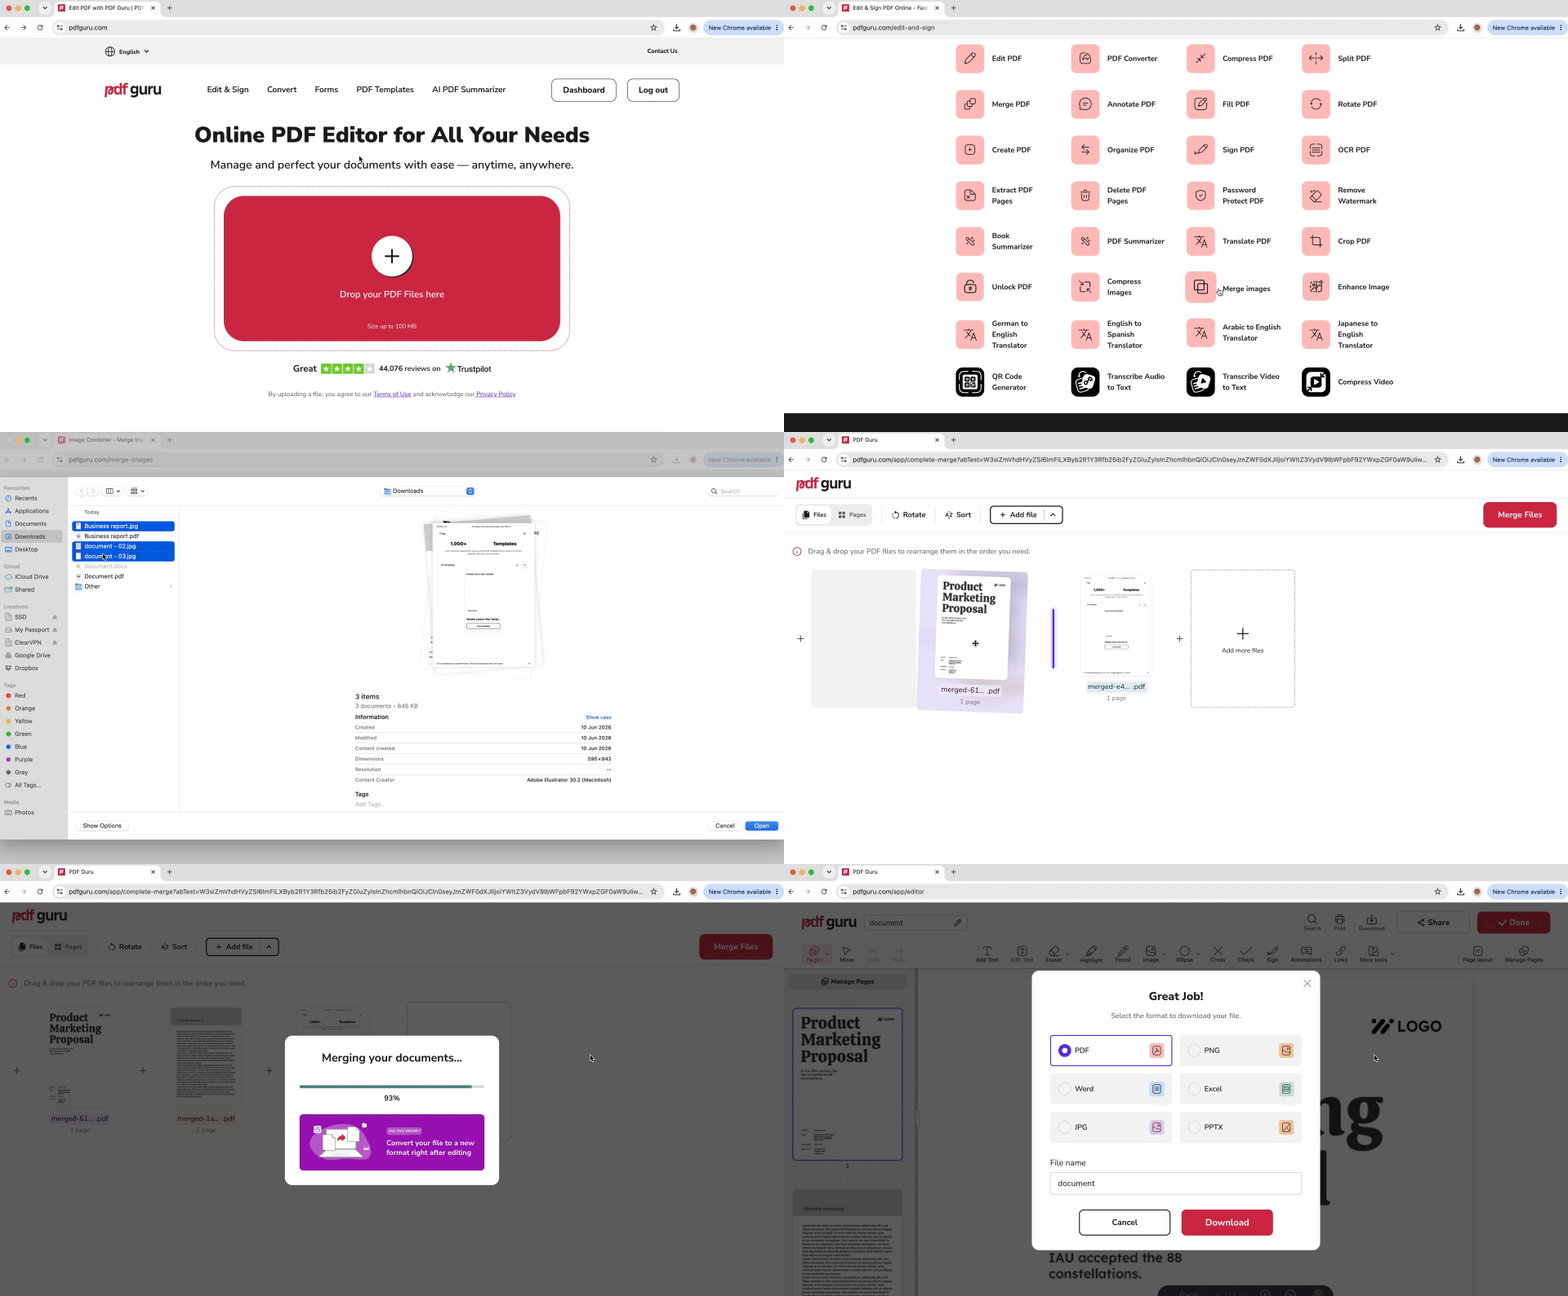
If you need to combine photos into PDFs quickly and easily, PDF Guru's Merge Images tool works directly in your browser on any device.
- 1
- 2
- 3Drag and drop the thumbnails to arrange your images in the desired order.
- 4
- 5Download the merged PDF file to your computer or device.
Each uploaded image becomes a separate page in the final PDF, preserving the original quality and resolution. You can reorder pages by dragging thumbnails before conversion, ensuring your document flows logically from start to finish. This makes it easy to combine JPGs into a single PDF for presentations, reports, or personal photo albums.
If you need to handle individual images first, PDF Guru's convert JPEG to PDF tool has you covered. It also supports PNG, TIFF, and WebP formats.

How to combine pictures into one PDF on Windows
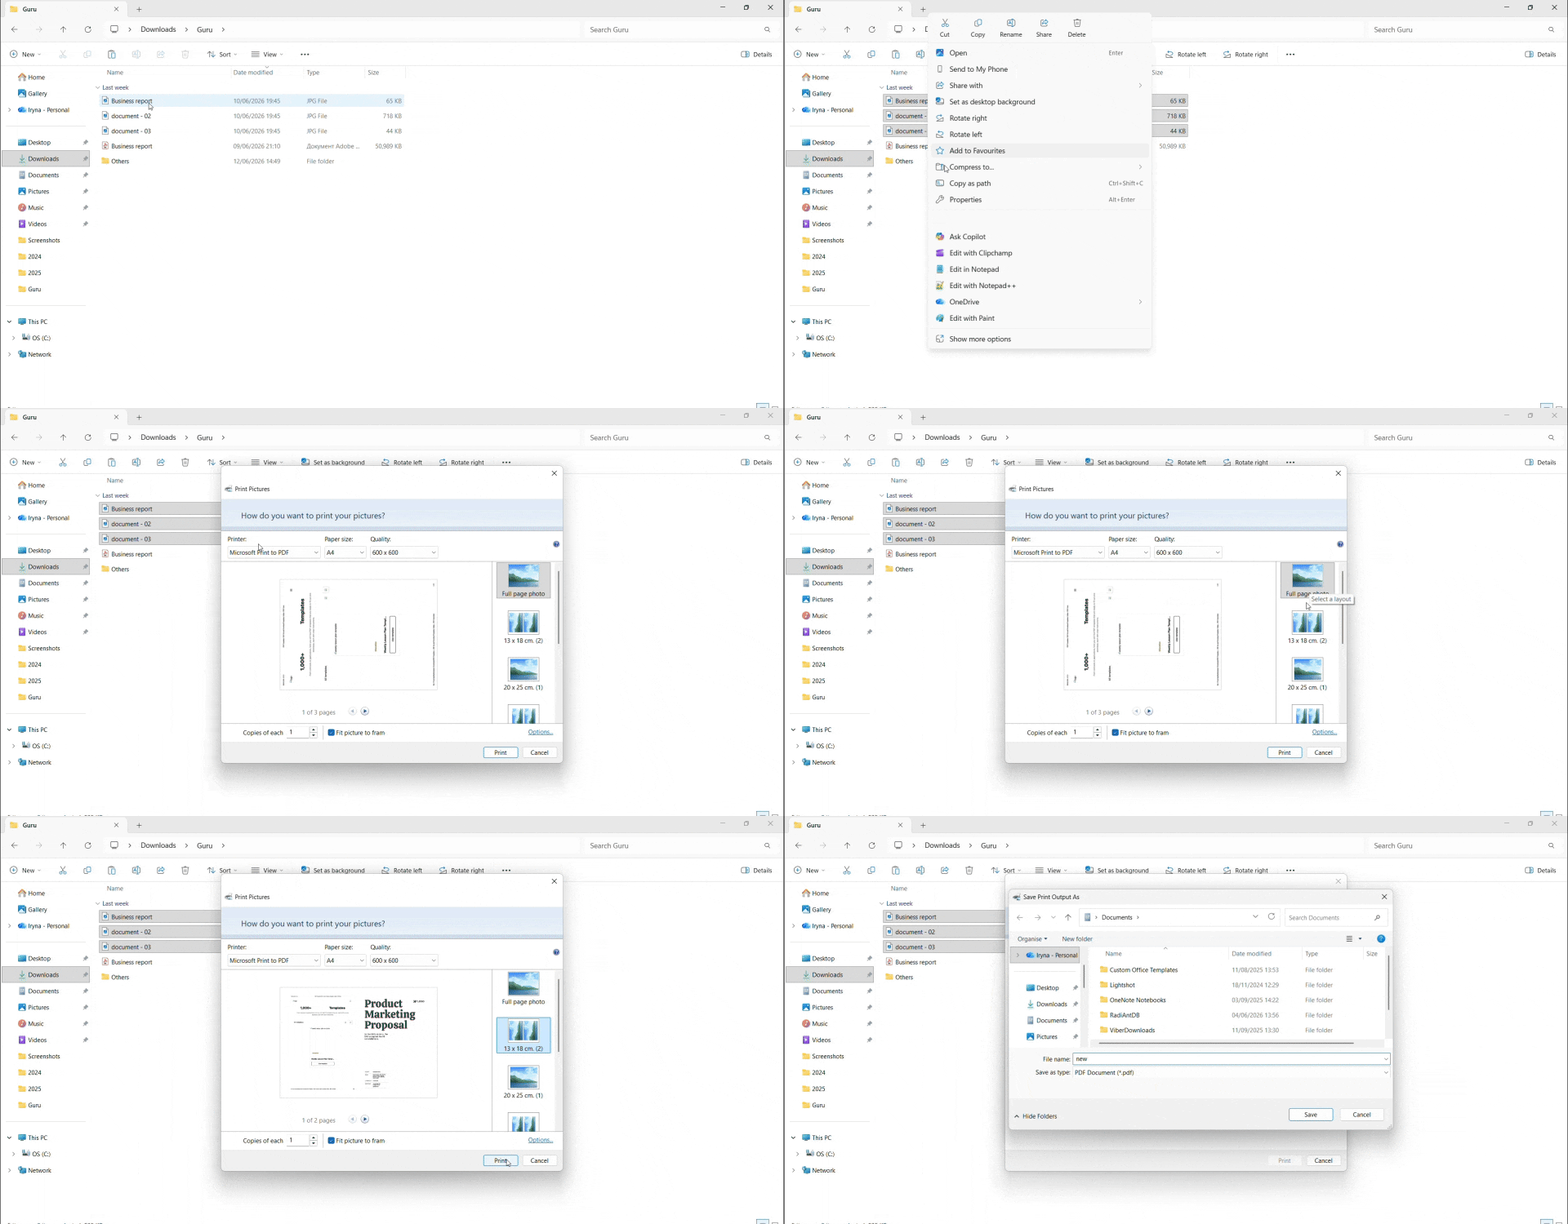
Windows 10 and 11 include a built-in feature called Microsoft Print to PDF that lets you combine pictures into a PDF without installing any third-party software. It's a good option when you need a quick solution and don't require advanced editing.
One thing to sort out before you begin: make sure your images are in the right order in File Explorer. The dialog will follow the sequence in which you click the files, so if order matters, either rename them sequentially (photo1.jpg, photo2.jpg) or sort the folder by name first.
- 1Open File Explorer and go to the folder with your images.
- 2Hold Ctrl and click each image in the order you want them to appear in the PDF. You can also press Ctrl+A to select all at once.
- 3Right-click any of the selected images and choose Print. On Windows 11, you may need to click Show more options first to see it.
- 4In the Print Pictures dialog, open the Printer drop-down and select Microsoft Print to PDF.
- 5
- 6Click Print, and a "Save Print Output As" window will pop up. Pick a location, name your file, and hit Save.
That's all it takes to combine pictures into PDFs on Windows. The same steps work for screenshots too — just select your screenshot files instead and follow the process as usual.
How to combine images into one PDF on Mac
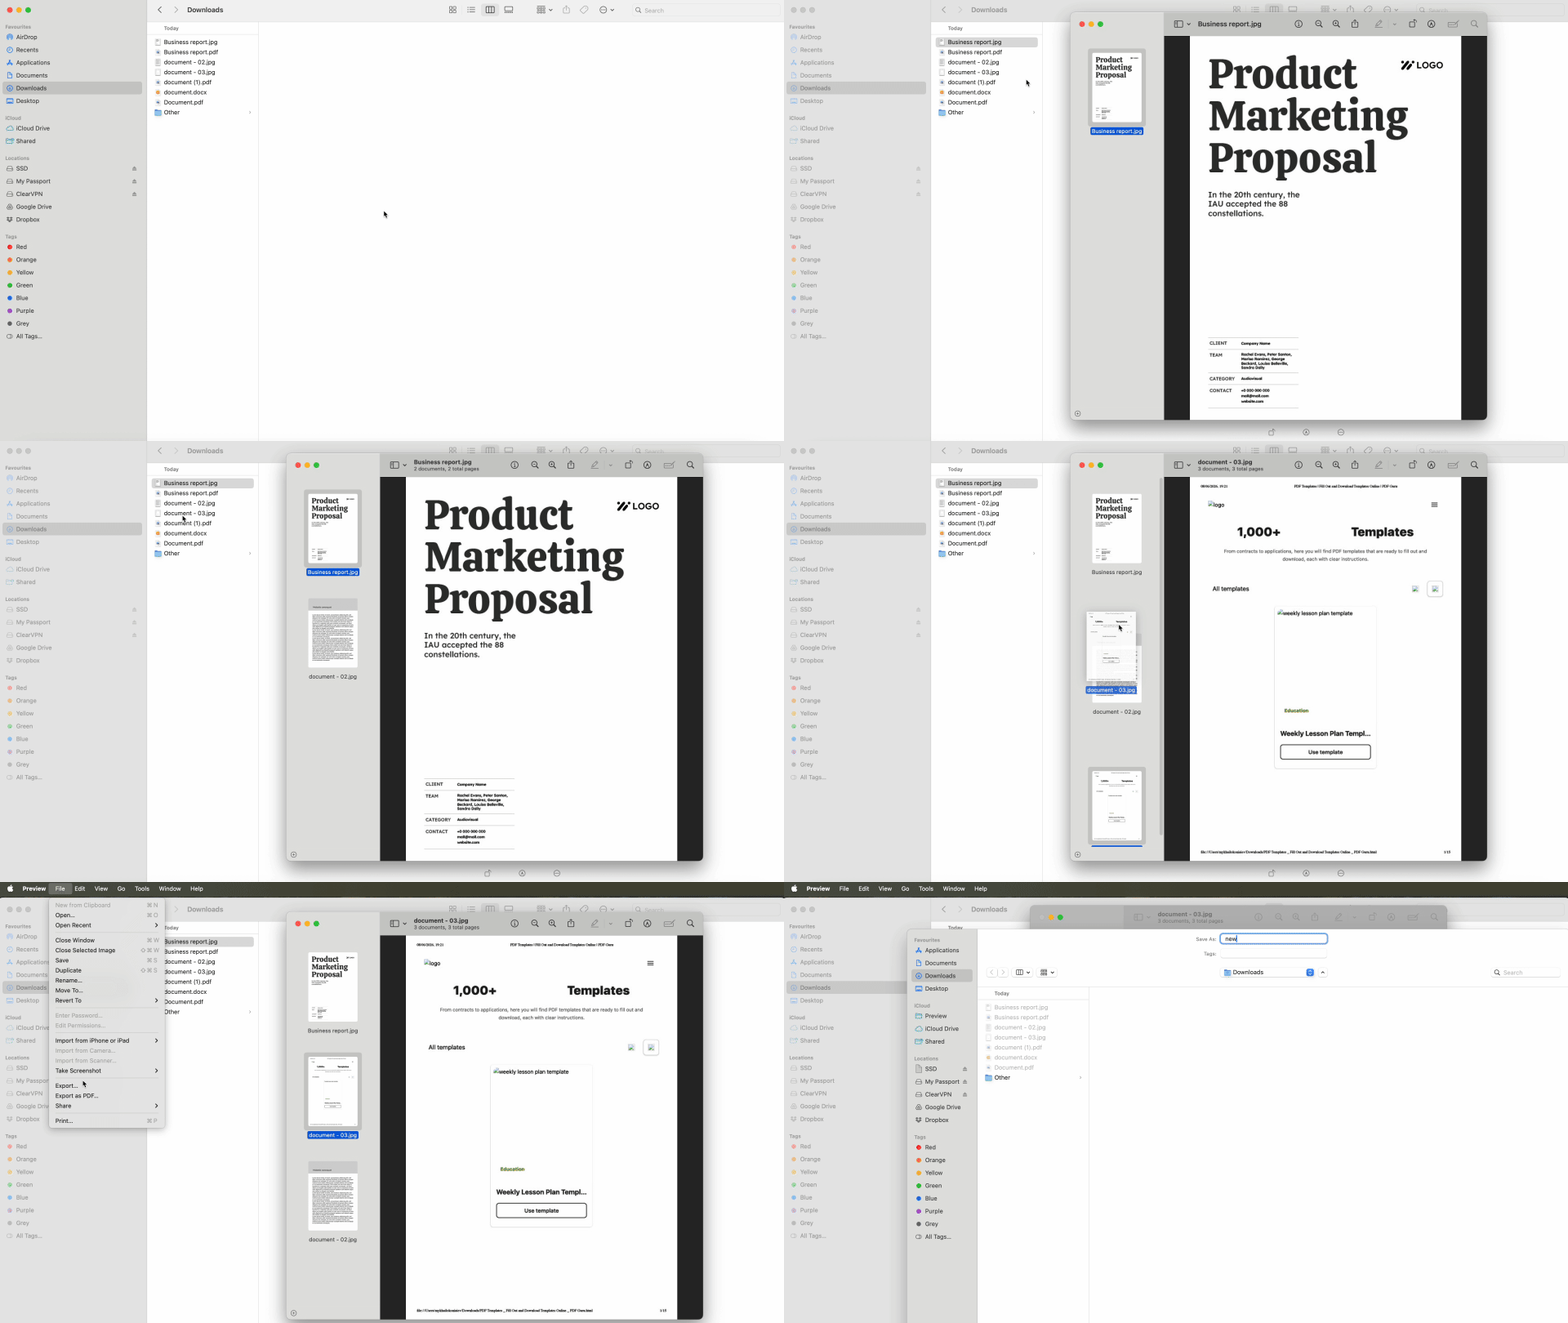
Mac users can rely on the Preview app, which comes pre-installed on macOS and offers more visual control when you want to combine images into one PDF than most built-in tools.
- 1Double-click the first JPG image to open it in Preview.
- 2Click View in the menu bar, then select Thumbnails to display the sidebar.
- 3Drag your remaining image files from Finder directly into the thumbnail sidebar (they'll appear as new pages).
- 4Arrange the thumbnails by dragging them up or down until they're in your preferred order.
- 5Click File, then choose Export as PDF.
- 6Select your save location and click Save.
This method gives you a clear visual preview of every page before you create the final document. You can see exactly which images appear where, making it easy to catch ordering mistakes before saving. The thumbnail sidebar also shows page orientation, so you can verify that all your images display correctly.
When you combine photos into one PDF using Preview, the app maintains original image quality by default, though you can adjust compression settings in the export dialog if file size becomes a concern.
How to combine screenshots into one PDF on mobile
Mobile devices offer built-in ways to merge images, though the methods differ between iOS and Android.
On iOS
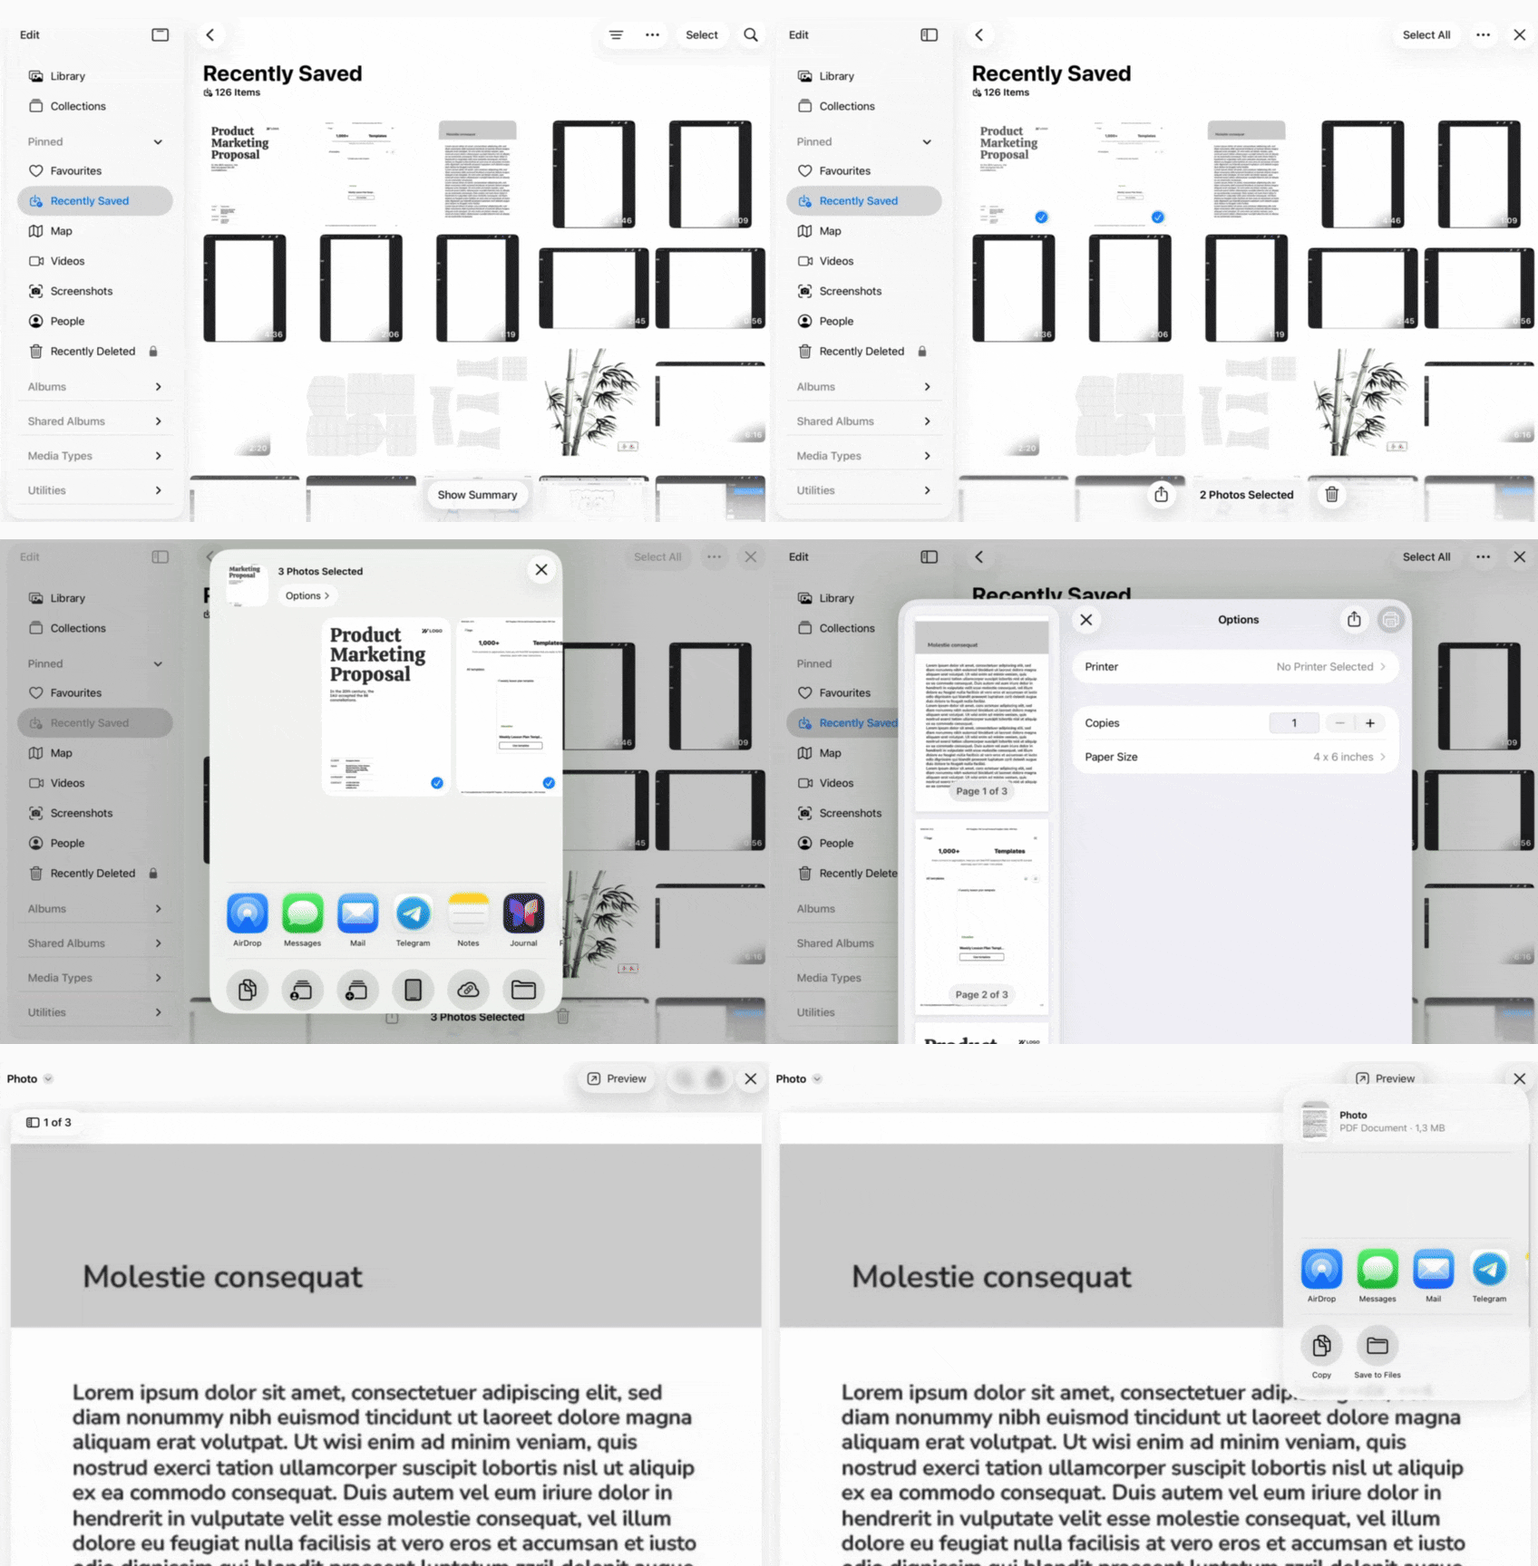
iPhone and iPad users have a hidden Print-to-PDF feature that works directly from the Photos app.
- 1Open the Photos app and select the images you want to combine (tap Select, then tap each photo).
- 2
- 3Scroll down and tap Print.
- 4Pinch outward (zoom gesture) on the preview thumbnail at the bottom of the screen.
- 5This creates a PDF preview — tap the Share icon again.
- 6Choose Save to Files and select your destination folder.
Each selected photo becomes a page in the order you originally selected them, so it helps to name your files with numbers if precise sequencing matters.
On Android
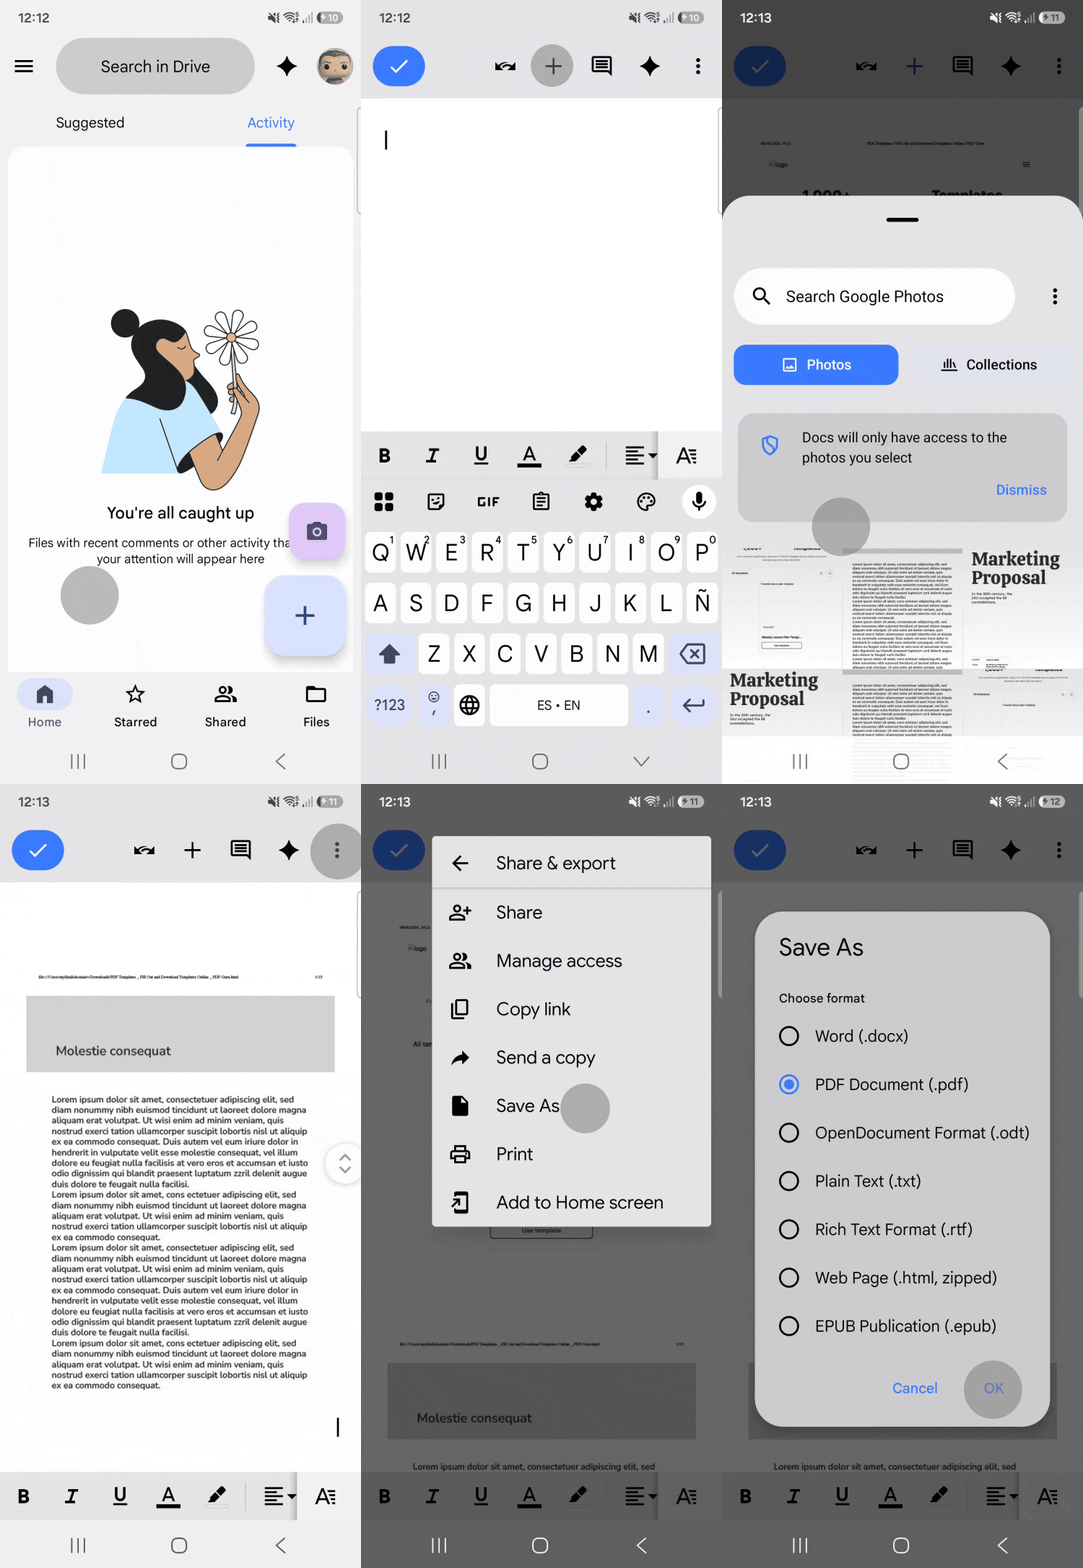
Unlike Windows or iOS, Android doesn't have a single built-in tool that works across all devices for combining images into a PDF. The easiest option is to use Google Drive, which comes pre-installed on most Android phones:
- 1Open the Google Drive app and tap the + icon to create a new document.
- 2Select Google Docs, then tap the image icon to insert your screenshots one by one.
- 3Once all images are added, tap the three-dot menu and select Share & export → Save as PDF.
Alternatively, you can open your mobile browser and visit PDF Guru to merge images online — it gives you more control over page order through drag-and-drop reordering. This browser method works identically on both iOS and Android, making it useful when you frequently combine photos into PDFs across different devices.
Why combine multiple images into one PDF?
Converting separate image files into a single PDF document solves several practical problems that anyone handling digital photos or screenshots encounters regularly.
Easier sharing and email management: Sending one PDF attachment instead of ten individual JPG files keeps your inbox organized and prevents recipients from downloading images one by one. Most email providers limit the number of attachments per message, so a single PDF sidesteps that restriction entirely.
Preserves page order and context: When you combine multiple images into one document, the page sequence stays locked. A client reviewing your project mockups sees screen 1, then screen 2, then screen 3 exactly as you intended, without needing to guess which file comes next based on confusing filenames.
Reduces total file size: A merged PDF often compresses more efficiently than the sum of individual image files. Five separate 2MB photos might combine into an 8MB PDF rather than a 10MB folder, especially if you're working with screenshots that contain large areas of solid color.
Universal compatibility: PDF files open on any device. Your colleague on Windows, your manager on Mac, and your client on an iPad all see identical formatting. You don't need to worry whether someone has the right image viewer installed or if their device supports WebP or HEIC formats.
Real-world scenarios where this matters include compiling receipts for expense reports, creating multi-page product catalogs, assembling before-and-after project documentation, or organizing family photos into a digital album that prints correctly. PDF Guru also has a full guide on how to add an image to a PDF if you need to go beyond merging.
Tips for merging JPG files into PDF
Here is how to combine JPEGs into one PDF while avoiding common frustrations.
Rename files with numerical prefixes before uploading: Instead of relying on timestamps or default camera names like IMG_4387.jpg, rename your files to 01_receipt.jpg, 02_receipt.jpg, 03_receipt.jpg. Most tools and operating systems sort alphabetically, so proper numbering ensures your pages appear in the correct order without manual reordering.
Compress large images beforehand if needed: If you're working with high-resolution photos from a DSLR camera, each image might be 5-10MB. Before merging, consider resizing images to web resolution (1920px width is usually plenty for on-screen viewing) to keep your final PDF from becoming too large to email or upload.
Preview page order before saving: Always check the thumbnail view or preview window before clicking the final save or download button. It takes two seconds to verify that page 5 didn't accidentally get placed before page 3, but fixing the mistake after the fact means starting the entire merge process over.
Use consistent orientation for professional results: Mixing portrait and landscape images in a single PDF isn't wrong, but it forces readers to rotate their device or tilt their head. If possible, crop or rotate images to match a single orientation before combining them, especially for formal documents like reports or presentations.
When you combine JPGs into one PDF with these habits in place, you'll spend less time troubleshooting and more time working with a clean, properly organized final document.